Epson LQ 670 Product Information Guide - Page 13
Facing the back of the printer, position the left sprocket unit
 |
View all Epson LQ 670 manuals
Add to My Manuals
Save this manual to your list of manuals |
Page 13 highlights
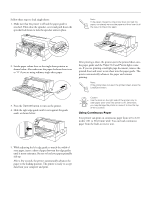
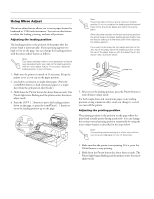
EPSON LQ-670 Positioning your continuous paper supply When you load continuous paper, make sure you align your paper supply with the tractor so the paper feeds smoothly into the printer, as shown below. 3. Release the sprocket lock levers by pushing them up. 4. Facing the back of the printer, position the left sprocket unit so that the sprocket pins are to the left of the "0" on the scale and the arrow mark on the printer. Then push down the lock lever to lock the sprocket in place. Loading continuous paper with the tractor 1. Make sure the printer is turned off. Set the paper release lever to the tractor position, as shown below. Also make sure the paper thickness lever is set to "0" if you are using ordinary continuous paper. Note: Printing starts at the arrow mark on the printer and the "0" mark on the scale. The unprintable area is to the left of the arrow mark and the "0". 5. Slide the right sprocket unit to roughly match the width of your paper, but do not lock it. 2. Slide the edge guides as far apart as they go. 3/97 EPSON LQ-0670 - 13
-
 1
1 -
2
-
3
-
4
-
5
-
6
-
7
-
 8
8 -
 9
9 -
 10
10 -
 11
11 -
 12
12 -
 13
13 -
 14
14 -
 15
15 -
 16
16 -
 17
17 -
 18
18 -
19
-
20
-
21
-
22
 |
 |
