Epson Stylus Photo RX600 User Manual - Page 81
The Epson Smart Panel window appears. Epson Scan automatically previews
 |
View all Epson Stylus Photo RX600 manuals
Add to My Manuals
Save this manual to your list of manuals |
Page 81 highlights
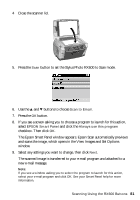
4 Close the scanner lid. 5. Press the Scan button to set the Stylus Photo RX600 to Scan mode. 6. Use the u and d buttons to choose Scan to Email. 7. Press the OK button. 8. If you see a screen asking you to choose a program to launch for this action, select EPSON Smart Panel and click the Always use this program checkbox. Then click OK. The Epson Smart Panel window appears. Epson Scan automatically previews and scans the image, which opens in the View Images and Set Options window. 9. Select any settings you want to change, then click Next. The scanned image is transferred to your e-mail program and attached to a new e-mail message. Note: If you see a window asking you to select the program to launch for this action, select your e-mail program and click OK. See your Smart Panel help for more information. Scanning Using the RX600 Buttons 81
-
 1
1 -
2
-
3
-
4
-
5
-
6
-
7
-
8
-
9
-
10
-
11
-
12
-
13
-
14
-
15
-
16
-
17
-
18
-
19
-
20
-
21
-
22
-
23
-
24
-
25
-
26
-
27
-
28
-
29
-
30
-
31
-
32
-
33
-
34
-
35
-
36
-
37
-
38
-
39
-
40
-
41
-
42
-
43
-
44
-
45
-
46
-
47
-
48
-
49
-
50
-
51
-
52
-
53
-
54
-
55
-
56
-
57
-
58
-
59
-
60
-
61
-
62
-
63
-
64
-
65
-
66
-
67
-
68
-
69
-
70
-
71
-
72
-
73
-
74
-
75
-
 76
76 -
 77
77 -
 78
78 -
 79
79 -
 80
80 -
 81
81 -
 82
82 -
 83
83 -
 84
84 -
 85
85 -
 86
86 -
87
-
88
-
89
-
90
-
91
-
92
-
93
-
94
-
95
-
96
-
97
-
98
-
99
-
100
-
101
-
102
-
103
-
104
-
105
-
106
-
107
-
108
-
109
-
110
-
111
-
112
-
113
-
114
-
115
-
116
-
117
-
118
-
119
-
120
-
121
-
122
-
123
-
124
-
125
-
126
-
127
-
128
-
129
-
130
-
131
-
132
-
133
-
134
-
135
-
136
-
137
-
138
-
139
-
140
-
141
-
142
-
143
-
144
-
145
-
146
-
147
-
148
-
149
-
150
-
151
-
152
-
153
-
154
-
155
-
156
-
157
-
158
-
159
-
160
-
161
-
162
-
163
-
164
-
165
-
166
-
167
-
168
-
169
-
170
-
171
-
172
-
173
-
174
 |
 |
