Epson Stylus Photo RX600 User Manual - Page 86
Viewing Photos from a Memory Card, Printing From a Memory Card
 |
View all Epson Stylus Photo RX600 manuals
Add to My Manuals
Save this manual to your list of manuals |
Page 86 highlights
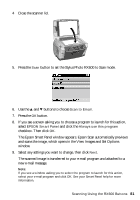
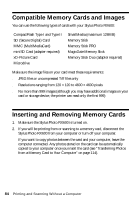
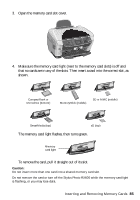
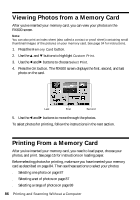
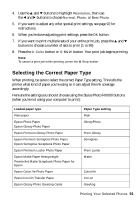
Viewing Photos from a Memory Card After you've inserted your memory card, you can view your photos on the RX600 screen. Note: You can also print an index sheet (also called a contact or proof sheet) containing small thumbnail images of the pictures on your memory card. See page 94 for instructions. 1. Press the Memory Card button. 2. Use the u and d buttons to highlight Custom Print. 3. Use the l and r buttons to choose Select Print. 4. Press the OK button. The RX600 screen displays the first, second, and last photo on the card. Last First Second 5. Use the l and r buttons to move through the photos. To select photos for printing, follow the instructions in the next section. Printing From a Memory Card After you've inserted your memory card, you need to load paper, choose your photos, and print. See page 15 for instructions on loading paper. Before selecting photos for printing, make sure you have inserted your memory card as described on page 84. Then see these sections to select your photos: ■ Selecting one photo on page 87 ■ Selecting a set of photos on page 87 ■ Selecting a range of photos on page 88 86 Printing and Scanning Without a Computer
-
 1
1 -
2
-
3
-
4
-
5
-
6
-
7
-
8
-
9
-
10
-
11
-
12
-
13
-
14
-
15
-
16
-
17
-
18
-
19
-
20
-
21
-
22
-
23
-
24
-
25
-
26
-
27
-
28
-
29
-
30
-
31
-
32
-
33
-
34
-
35
-
36
-
37
-
38
-
39
-
40
-
41
-
42
-
43
-
44
-
45
-
46
-
47
-
48
-
49
-
50
-
51
-
52
-
53
-
54
-
55
-
56
-
57
-
58
-
59
-
60
-
61
-
62
-
63
-
64
-
65
-
66
-
67
-
68
-
69
-
70
-
71
-
72
-
73
-
74
-
75
-
76
-
77
-
78
-
79
-
80
-
 81
81 -
 82
82 -
 83
83 -
 84
84 -
 85
85 -
 86
86 -
 87
87 -
 88
88 -
 89
89 -
 90
90 -
 91
91 -
92
-
93
-
94
-
95
-
96
-
97
-
98
-
99
-
100
-
101
-
102
-
103
-
104
-
105
-
106
-
107
-
108
-
109
-
110
-
111
-
112
-
113
-
114
-
115
-
116
-
117
-
118
-
119
-
120
-
121
-
122
-
123
-
124
-
125
-
126
-
127
-
128
-
129
-
130
-
131
-
132
-
133
-
134
-
135
-
136
-
137
-
138
-
139
-
140
-
141
-
142
-
143
-
144
-
145
-
146
-
147
-
148
-
149
-
150
-
151
-
152
-
153
-
154
-
155
-
156
-
157
-
158
-
159
-
160
-
161
-
162
-
163
-
164
-
165
-
166
-
167
-
168
-
169
-
170
-
171
-
172
-
173
-
174
 |
 |
