Epson Stylus Pro User Manual
Epson Stylus Pro - Stylus Color Pro Ink Jet Printer Manual
 |
View all Epson Stylus Pro manuals
Add to My Manuals
Save this manual to your list of manuals |
Epson Stylus Pro manual content summary:
- Epson Stylus Pro | User Manual - Page 1
instructions. Seiko Epson Corporation shall not be liable against any damages or problems arising from the use of any options or any consumable products other than those designated as Original EPSON Products or EPSON Approved Products by Seiko Epson Corporation. EPSON, EPSON Stylus, and EPSON - Epson Stylus Pro | User Manual - Page 2
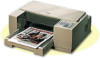
Printer Parts output tray interface card cover printer cover paper tray knob control panel serial interface parallel interface ink cartridge clamps Control Panel Operate button paper thickness lever - Epson Stylus Pro | User Manual - Page 3
pursuant to Part 15 of the FCC Rules. These limits are designed to provide reasonable protection against harmful interference in a residential installation. and, if not installed and used in accordance with the instructions, may cause harmful interference to radio or television reception. However - Epson Stylus Pro | User Manual - Page 4
Tips 2 How to Use This Manual 2 Where to Get Help 3 Electronic Support Services 4 Important Safety Instructions 6 Chapter 1 Paper Handling and Heavy Paper 1-11 Chapter 2 Controlling the Printer Using the Printer's Control Panel 2-2 Lights 2-3 Buttons 2-4 Using the Default Setting Mode - Epson Stylus Pro | User Manual - Page 5
Cleaning the Print Heads 3-2 Replacing an Ink Cartridge 3-3 Cleaning the Printer 3-8 Transporting the Printer 3-9 Troubleshooting 3-10 Error Lights 3-11 Print Quality Problems 3-12 Problems with Printing 3-16 Paper Handling Problems 3-20 Appendix A Using Optional Interfaces AppleTalk - Epson Stylus Pro | User Manual - Page 6
Appendix C Commands and Character Tables Command List Character Tables International Character Sets Characters Available with ESC (^ Command C-2 C-3 C-10 C-11 Glossary Index v - Epson Stylus Pro | User Manual - Page 7
This manual contains general operating and maintenance instructions for your EPSON® Stylus® Pro or Pro XL printer, as well as troubleshooting guidelines and technical specifications. For instructions on setting up your printer and using the Microsoft® Windows® or Apple® Macintosh® printer driver - Epson Stylus Pro | User Manual - Page 8
Software Guide, refer to this manual for the following information: Chapter 1, "Paper Handling," explains how to select the right paper for your print job and load paper and other media in your printer. Chapter 2, "Controlling the Printer," provides instructions for managing the printer's operation - Epson Stylus Pro | User Manual - Page 9
your printer in the United States or Canada and you need technical assistance, you can call an EPSON Color Specialist at one of the following numbers: u For the EPSON Stylus Pro: (800) 788-0343 u For the EPSON Stylus Pro XL: (800) 667-0664. EPSON also provides customer support and service through - Epson Stylus Pro | User Manual - Page 10
u Customer relations. You can purchase ink cartridges, paper, parts, printed manuals, and accessories for EPSON products from EPSON Accessories at (800) 873-7766 (U.S. sales only). In Canada, call (800) BUY-EPSON for sales locations. If you purchased your printer outside the United States or Canada - Epson Stylus Pro | User Manual - Page 11
's World Wide Web site at http://www.epson.com. EPSON's home page links users to What's New, EPSON Products, EPSON Connection,SM Corporate Info and EPSON Contacts. Link to the EPSON Connection for the latest drivers and FAQs (Frequently Asked Questions) and the EPSON Chat area. To get in touch with - Epson Stylus Pro | User Manual - Page 12
wall outlet does not exceed 15 amperes. u Except as specifically explained in this Reference Guide, do not attempt to service the printer yourself. u Unplug the printer and refer servicing to qualified service personnel under the following conditions: If the power cord or plug is damaged; if liquid - Epson Stylus Pro | User Manual - Page 13
Chapter 1 Paper Handling 1 Choosing Paper and Other Media 1-2 Loading Plain Paper 1-4 Loading Oversized Paper 1-6 Using Special Papers and Other Media 1-7 Loading Special Papers and Transparencies 1-8 Loading Envelopes and Heavy Paper 1-11 Paper Handling 1-1 - Epson Stylus Pro | User Manual - Page 14
, if the coated paper does not absorb enough ink, the ink can smear. To ensure the best results, EPSON provides special papers and transparencies that are formulated for the inks used in EPSON ink jet printers. These papers include the following: u EPSON Special coated paper for 360 dpi. Use this - Epson Stylus Pro | User Manual - Page 15
(800) 873-7766 (U.S. only). In Canada, call (800) BUY-EPSON for sales locations. Use the following part numbers when ordering: Paper Special transparency film or high-quality glossy paper, use only EPSON transparencies or glossy paper. Any other brands are not supported. Paper Handling 1-3 - Epson Stylus Pro | User Manual - Page 16
printable surface is marked with an arrow on most plain paper packaging. 1. Remove the output tray from the top of the paper tray. rear edge guide left edge guide 2. Slide the left edge guide inside the paper tray to the left as far as it will go. 3. Flip up the rear edge - Epson Stylus Pro | User Manual - Page 17
rests against the right side of the paper tray. Slide the stack into the tray until you feel some resistance. Then slide the left edge guide against the left edge of the paper as shown below. You can load up to 100 sheets of plain bond paper, but do not load - Epson Stylus Pro | User Manual - Page 18
8. Change the Media Type and other printer driver settings so they are appropriate for the paper you loaded. (See your Setup and Software Guide for instructions.) Loading Oversized Paper If you are loading paper that is larger than the paper tray, you need to pull out the paper tray extension. - Epson Stylus Pro | User Manual - Page 19
. Using Special Papers and Other Media This section explains how to use and load special coated paper, glossy paper, transparencies, and envelopes in your printer. When using these special types of media, keep the following in mind: u Use special coated paper and glossy papers within one year of - Epson Stylus Pro | User Manual - Page 20
damage the media. u Remember to select the appropriate setting in the driver software before you print. See your Setup and Software Guide for instructions. u You can print on sheets of labels in your printer; just follow the instructions for loading plain paper on page 1-4. Make sure the sheets are - Epson Stylus Pro | User Manual - Page 21
the paper tray to the left as far as it will go and slide the rear edge guide toward the front of the printer as far as it will go. 3. Fan a stack of paper; then tap it on a flat surface to even the edges. 4. Before you load paper, make - Epson Stylus Pro | User Manual - Page 22
tray until you feel some resistance. Then slide the left edge guide against the left edge of the paper stack. 5. Slide the rear edge guide against the rear edge of the paper. 6. Change the Media Type and other printer driver settings to match the paper or transparencies you loaded as described in - Epson Stylus Pro | User Manual - Page 23
Once your driver settings DOS application, you may be able to select 720 dpi if your DOS program supports 720 dpi printing. You can select from Bi-D, Uni-D, or Auto print directions using the Data light flashes. Paper loaded in the printer is ejected when you adjust this lever. Paper Handling 1-11 - Epson Stylus Pro | User Manual - Page 24
far as it will go. 4. Press the Alt button. Then press Pause. 5. Close the printer cover. Loading the paper tray After adjusting the paper thickness lever, follow these steps to load paper tray extension. Then remove the rear edge guide, turn it around, and reinstall it as shown. 1-12 Paper Handling - Epson Stylus Pro | User Manual - Page 25
them as shown. You can load up to 10 envelopes. 4. Adjust the rear and left edge guides as shown above so the media feeds straight into the paper path. 5. Change the Media Type and other printer driver settings so they are appropriate for the media you loaded, as described in your Setup and - Epson Stylus Pro | User Manual - Page 26
Chapter 2 Controlling the Printer Using the Printer's Control Panel 2-2 Lights 2-3 Buttons 2-4 Using the Default Setting Mode 2-6 2 Controlling the Printer 2-1 - Epson Stylus Pro | User Manual - Page 27
you can perform using the Default setting mode. Using the Printer's Control Panel The printer's front control panel contains lights for displaying the printer status and buttons for controlling certain settings. Operate button Since most printer settings can be controlled from your software, you do - Epson Stylus Pro | User Manual - Page 28
paper jam. No Ink Cartridge On when one or both ink cartridges are not installed. The printer will not work unless both cartridges are installed. Font Indicates the font selected through the control panel. Because you normally choose fonts from your software, ignore this light. Economy On when - Epson Stylus Pro | User Manual - Page 29
troubleshooting. Buttons Operate Turns the printer on and off. c Caution: Always turn off the printer by pressing the Operate button. Then wait until the Operate light stops flashing before unplugging the printer. Never turn off the printer while the Pause light the printer uses less ink to - Epson Stylus Pro | User Manual - Page 30
" in Chapter 1 of the Setup and Software Guide. To stop the self test, press Pause and then turn off the printer. Hex dump (Operate + Font + Load/Eject) On a PC, prints data in hexadecimal code for troubleshooting analysis. See the Troubleshooting section in Chapter 3. Default setting mode (Operate - Epson Stylus Pro | User Manual - Page 31
for the color print head. See "Cleaning the Print Heads" in Chapter 3. Using the Default Setting Mode Additional printer functions are available through the Default setting mode. Because the printer's factory defaults are designed to meet the needs of almost all users, you rarely need to change the - Epson Stylus Pro | User Manual - Page 32
switches automatically between Uni-D and Bi-D as necessary when it receives data. Network interface mode. If you're having trouble printing when the printer is connected to multiple computers, turn on network interface mode. By default, network interface mode is off. Auto line feed. Specifies - Epson Stylus Pro | User Manual - Page 33
the character tables, see Appendix C. To turn on Default setting mode and print instructions, turn off the printer. Then hold down the Economy/Condensed button while you turn the printer back on. Follow the instructions that describe how to change the default settings by pressing the buttons on the - Epson Stylus Pro | User Manual - Page 34
3 Maintenance and Troubleshooting Cleaning the Print Heads 3-2 Replacing an Ink Cartridge 3-3 Cleaning the Printer 3-8 Transporting the Printer 3-9 Troubleshooting 3-10 Error Lights 3-11 Print Quality Problems 3-12 Problems with Printing 3-16 Paper Handling Problems 3-20 3 Maintenance - Epson Stylus Pro | User Manual - Page 35
Instructions in this chapter tell you how to do the following to maintain and care for your printer: u Clean the print heads u Replace the ink cartridges u Clean the printer u Transport the printer. The Troubleshooting section, which begins on page 3-10, gives you solutions to possible problems you - Epson Stylus Pro | User Manual - Page 36
quality by doing a printer self test, as described in your Setup and Software Guide. Use only these EPSON ink cartridges in your Stylus Pro or Pro XL: Black ink cartridge Color ink cartridge S020034 S020036 When you need new ink cartridges, contact your dealer or call EPSON Accessories at (800 - Epson Stylus Pro | User Manual - Page 37
on. 3. Hold down the Alt button for about five seconds until the print head moves slightly left, to the ink cartridge install position. The Pause light begins flashing. The carriage returns to the home position after 60 seconds if no ink cartridge is removed. 3-4 Maintenance and Troubleshooting - Epson Stylus Pro | User Manual - Page 38
clamp to open it. The cartridge rises partially out of the printer. 5. Lift the cartridge out of the printer and dispose of it carefully so any excess ink does not spill. Do not take the used cartridge apart or try to refill it. w Warning: If ink gets on your hands, wash them thoroughly with - Epson Stylus Pro | User Manual - Page 39
from the cartridge. Leaving the tape on will permanently damage it. 7. Lower the ink cartridge into its holder with the label facing up and the arrow on the top of the cartridge pointing to the back of the printer. The larger (color) cartridge goes on the left. 3-6 Maintenance and Troubleshooting - Epson Stylus Pro | User Manual - Page 40
to charge the printer's ink delivery system. The Pause light flashes during the process. 11. Close the printer cover. When the charging cycle finishes, the Pause light stops flashing and stays on. Press the Pause button to turn off the light and resume printing. Maintenance and Troubleshooting 3-7 - Epson Stylus Pro | User Manual - Page 41
tray is dirty, clean it with a soft, clean cloth dampened with mild detergent. Keep the printer cover closed to prevent water from getting inside. 5. If the inside of the printer accidentally gets soiled with ink, wipe it off with a damp cloth. w Warning: Be careful not to touch the gears inside - Epson Stylus Pro | User Manual - Page 42
locked in the far right position. If it isn't, turn on the printer, wait about 10 seconds, and turn it off. c Caution: Do not remove the ink cartridges when transporting the printer. Transporting the printer without the cartridges installed can damage it. 3. Use a strong adhesive tape to secure the - Epson Stylus Pro | User Manual - Page 43
Setup and Software Guide. Troubleshooting This section describes what you can do if you are having problems printing. It is divided into the following sections: u Error lights. See this section to identify a problem indicated by the control panel lights. u Print quality problems. See this section - Epson Stylus Pro | User Manual - Page 44
you should do to correct the problem. Light(s) Paper Out is on Problem Printer is out of paper Paper Out is flashing No Ink Cartridge is on Data and Pause are flashing Paper jam Ink cartridge is not installed correctly Carriage error All lights except Operate are flashing Fatal error Solution - Epson Stylus Pro | User Manual - Page 45
: u Make sure you selected Color or Monochrome correctly in the printer driver. u Check whether the ink cartridges are empty. Print a self test as described in the Setup and Software Guide. After the first page prints, the printer prints an entire page of text lines in various colors, including - Epson Stylus Pro | User Manual - Page 46
Media Type setting in the driver is set for the type of paper loaded. Check whether economy printing mode is on. To turn off this mode, press the Economy/Condensed button until the Economy light goes off. Check whether your paper is moist or damp. Ink jet printers are sensitive to moisture absorbed - Epson Stylus Pro | User Manual - Page 47
Guide. You see white banding in your printout. Turn on MicroWeave in the printer driver. Clean one or both print heads. The printout contains incorrect or garbled characters. Make sure EPSON Stylus Pro or Pro XL is selected as the default Windows printer driver (PC driver) or is the last printer - Epson Stylus Pro | User Manual - Page 48
Make sure EPSON Stylus Pro or Pro XL is selected as the default Windows printer driver (PC driver) or is the last printer selected in the Chooser (Macintosh driver). Check that the printer driver's Brightness and Contrast settings (PC driver) or Light/Dark setting (Macintosh driver) are appropriate - Epson Stylus Pro | User Manual - Page 49
all this, see the following specific problems. Printing has stopped and the Pause light is on. Printing is temporarily suspended. Press the Pause button to continue. Printing has stopped but the Pause light is off. One or both ink cartridges may be empty or too old. A cartridge is too old if it has - Epson Stylus Pro | User Manual - Page 50
, contact your dealer or an authorized service provider. The printer sounds like it is printing, but nothing prints. The print heads may need cleaning. See "Cleaning the Print Heads" on page 3-2 for instructions. One or both ink cartridges are empty or too old. A cartridge is too old if it has been - Epson Stylus Pro | User Manual - Page 51
to Windows 95, the printer driver does not work correctly. You need to reinstall the EPSON Stylus Pro or Pro XL printer driver using Windows 95. See your Setup and Software Guide for Windows. You see created in step 1. Then select OK. 8. Close the Spool Manager. 3-18 Maintenance and Troubleshooting - Epson Stylus Pro | User Manual - Page 52
. Make sure EPSON Stylus Pro or Pro XL is selected as the default Windows printer driver (PC driver) or is the last printer selected in the Chooser (Macintosh driver). Make sure you selected the correct Paper Size option in the printer driver; see your Setup and Software Guide for instructions. Also - Epson Stylus Pro | User Manual - Page 53
menu. Click any print job shown under Waiting and click Cancel Printing. Make sure EPSON Stylus Pro or Pro XL is selected as the default Windows printer driver (PC driver) or is the last printer selected in the Chooser (Macintosh driver). If you're an experienced user, you can use the hex dump mode - Epson Stylus Pro | User Manual - Page 54
to turn the knob in the direction shown; otherwise ink from the printed sheet can come off onto the printer and smear other sheets. 4. Pull the paper out printer. 6. Close the printer cover. 7. Turn on the printer to move the print heads to the correct positions. Maintenance and Troubleshooting 3-21 - Epson Stylus Pro | User Manual - Page 55
it is suitable for ink jet printers. For best quality, use EPSON special coated and guides are too tight or too loose. Adjust the rear and left edge guides for the size of the paper. If you still have paper feeding problems, see the following suggestions. 3-22 Maintenance and Troubleshooting - Epson Stylus Pro | User Manual - Page 56
set correctly for your media type; see Chapter 1 for instructions. Make sure the printer driver's Copies setting and the copies setting in your application software selected the correct paper size in the driver software. See your Setup and Software Guide for instructions. The paper is too long. Use - Epson Stylus Pro | User Manual - Page 57
Paper is feeding crooked. The paper is old or creased. Use only new, smooth sheets of paper. Too much paper is loaded in the paper tray. Remove a few sheets. The paper is not the proper size and quality; see Appendix B for exact specifications. 3-24 Maintenance and Troubleshooting - Epson Stylus Pro | User Manual - Page 58
Appendix A Using Optional Interfaces AppleTalk and EtherTalk Networks for Macintosh A-2 Connecting the Printer to the Network A-3 Turning On the Printer's Network Interface Mode . . . . . A-4 Interface Boards for the PC A-5 Using the C823051 or C823061 Serial Interface Board . . . A-5 Installing - Epson Stylus Pro | User Manual - Page 59
.) If you install the EtherTalk board connected to a thin coaxial (10BASE2) cable and the printer is the last device on the network, you need to obtain a 50-ohm terminator. The Ethernet transceiver is included on the EPSON Ethernet board, so you do not need to obtain an Ethernet adapter box for the - Epson Stylus Pro | User Manual - Page 60
LocalTalk locking connector box to the LocalTalk connector on the back of the printer. Attach one end of a LocalTalk cable to this connector box. Attach the For more information about creating an AppleTalk network, see the owner's guide that comes with the LocalTalk Locking Connector Kit. u If you - Epson Stylus Pro | User Manual - Page 61
the Font button to change the control panel language.) The printer prints two instruction sheets that describe how to change default printer settings. 4. Press the Font button until the Courier and Sans Serif H lights are on and the Roman T light is off. 5. Press the Alt button until the Operate - Epson Stylus Pro | User Manual - Page 62
for the PC The following EPSON interface boards are compatible with your printer: Interface board Serial Interface board protocol, see your interface board manual. Selecting the baud rate You can select from the following baud rates: 300, 600, 1200, 2400, 4800, 9600, and 19200 bps (bits per - Epson Stylus Pro | User Manual - Page 63
DTR flag to 1 (MARK) to indicate that it cannot receive data. When the vacant area for data in the buffer increases to 512 bytes, the printer outputs an X-ON code or sets the DTR flag to 0 (SPACE) to indicate that it is ready to receive data. Error handling When the - Epson Stylus Pro | User Manual - Page 64
any switches and jumpers on the interface board. See the board's manual for details. If your interface board has a jumper labelled JG, fully insert the connector at the rear of the interface board into the printer's internal socket. 6. Secure the interface board in the slot with the two screws - Epson Stylus Pro | User Manual - Page 65
are using more than one computer. 8. Reconnect any interface cables you disconnected in step 2. 9. Make sure the printer is off. Then plug in the power cord. 10. If you are connecting your printer to an AppleTalk or EtherTalk network, follow the guidelines on page A- 3. You may need to change the - Epson Stylus Pro | User Manual - Page 66
Appendix B Technical Specifications Printing B-2 Paper B-3 Ink Cartridges B-6 Mechanical B-7 Electrical B-7 Environmental B-8 B Safety Approvals B-8 Fonts B-8 Interface Specifications B-9 Parallel Interface B-9 Serial Interface B-12 Optional Interfaces B-12 Initialization B-12 - Epson Stylus Pro | User Manual - Page 67
On-demand ink jet Nozzle configuration: 64 monochrome (black) nozzles (16 × 4 staggered) 48 color nozzles (16 × 3, cyan, magenta, yellow) Printable columns and printing speed*: Character pitch (characters per inch) 10 12 15 17 (10 condensed) 20 (12 condensed) Printable columns Pro Pro XL 80 - Epson Stylus Pro | User Manual - Page 68
(11 × 17 inches)* Super A3/B (13 × 9 inches)* A3 (297 × 420 mm)* Statement (8.5 × 5.5 inches) Executive (7.5 × 10 inches) * Stylus Pro XL only Plain paper and special papers distributed by EPSON (special coated paper, highquality glossy paper, and transparencies) 0.003 to 0.004 inch (0.08 to 0.11 mm - Epson Stylus Pro | User Manual - Page 69
quality paper may reduce print quality and cause paper jams and other problems. If you encounter problems, switch to a higher grade of paper. u Print on RH u Use envelopes that do not curl. u The following EPSON genuine papers are available: S041062 Special coated paper for 720 dpi printing - Epson Stylus Pro | User Manual - Page 70
BR C A The minimum top margin is 0.12 inch (3 mm). BL The minimum left margin is 0.12 inch (3 mm). BR The minimum right margin is: For Stylus Pro: 3.8 mm (0.15 inch) for A4 size paper 3 mm (0.12 inch) for Statement and Executive size paper 9.7 mm (0.38 inch) for Letter and Legal size paper - Epson Stylus Pro | User Manual - Page 71
hours at 140° F (60° C) Freezing:** 24.8° F (-4° C) Dimensions 1.1 inches (W) × 2.7 inches (D) × 1.7 inches (H) (26.9 mm × 67.4 mm × 41.8 mm) Color ink cartridge (S020036): Colors Cyan, magenta, and yellow Print capacity* In each color, approximately 1.2 million characters (670 sheets/color - Epson Stylus Pro | User Manual - Page 72
not covered by EPSON's warranty. Do not use an ink cartridge after the expiration date on the package. Mechanical Paper feed method: Print head life: Total print volume: Dimensions and weight: Friction with auto sheet feeder 1 billion dots per nozzle 75,000 pages Stylus Pro Width 19.0 inches - Epson Stylus Pro | User Manual - Page 73
* 5 to 85% RH (without condensation) * Stored in shipping container UL 1950 with D3, CSA 22.2 950 with D3 FCC part 15 subpart B class B Fonts The printer comes with an installed set of fonts, shown below, which are selectable with the Font button on the control panel. However, the - Epson Stylus Pro | User Manual - Page 74
Interface Specifications Your printer is equipped with an 8-bit parallel interface and a serial interface. Parallel Interface Data format: it is logical 0. About a 5-µs pulse. LOW indicates data has been received and the printer is ready to accept more data. Technical Specifications B-9 - Epson Stylus Pro | User Manual - Page 75
the paper is automatically fed one line after printing Not used Logic ground level Printer's chassis ground, which is connected to the logic ground Not used Twisted-pair LOW when the printer: 1) Is out of paper 2) Is in an error state 3) Has no ink cartridges installed B-10 Technical Specifications - Epson Stylus Pro | User Manual - Page 76
heading "Direction" refers to the direction of signal flow as viewed from the printer. u "Return pin" denotes the twisted-pair return pin to be connected at out by observing the ACKNLG or BUSY signal. Data transfer to this printer can be carried out only after receipt of the ACKNLG signal or when - Epson Stylus Pro | User Manual - Page 77
Interfaces The available interfaces are listed in Appendix A. Please refer to the specifications in the user's guide packed with the optional interface card. Initialization The printer can be initialized (returned to a fixed set of conditions) in these ways: Hardware initialization Software - Epson Stylus Pro | User Manual - Page 78
mechanism or clear the user-defined character set. Default Settings The table below shows the default settings that take effect when the printer is initialized. Item Top-of-form position Page length Left and right margins Line spacing Character pitch Vertical tab position Horizontal tab positions - Epson Stylus Pro | User Manual - Page 79
Appendix C Commands and Character Tables Command List C-2 Character Tables C-3 International Character Sets C-10 Characters Available with ESC (^ Command C-11 C Commands and Character Tables C-1 - Epson Stylus Pro | User Manual - Page 80
Command List This printer supports the following ESC/P 2 commands in your DOS software programs. If you need more information about using printer commands, you can purchase the ESC/P 2 Reference Manual (ESCP2REF) from EPSON Accessories by calling (800) 873-7766 (in the U.S. only). In Canada, call ( - Epson Stylus Pro | User Manual - Page 81
DOS program, and cannot print the character you need, you should never have to change the character table. These character tables are selected using the printer's Default setting mode or by using software commands. All tables except the italic are the same as the PC437 table for hex codes 00 through - Epson Stylus Pro | User Manual - Page 82
PC850 (Multilingual) PC860 (Portuguese) PC861 (Icelandic) PC863 (Canadian-French) C-4 Commands and Character Tables - Epson Stylus Pro | User Manual - Page 83
PC865 (Nordic) PC437 (Greek) PC853 (Turkish) PC855 (Cyrilic) Commands and Character Tables C-5 - Epson Stylus Pro | User Manual - Page 84
PC852 (East Europe) PC857 (Turkish) PC866 (Russian) PC869 (Greek) C-6 Commands and Character Tables - Epson Stylus Pro | User Manual - Page 85
BRASCII Abicomp MAZOWIA Code MJK Commands and Character Tables C-7 - Epson Stylus Pro | User Manual - Page 86
ISO 8859-7 ISO Latin 1T Bulgaria C-8 Commands and Character Tables - Epson Stylus Pro | User Manual - Page 87
Italic No characters are available for hex code 15 in the italic character table. Commands and Character Tables C-9 - Epson Stylus Pro | User Manual - Page 88
International Character Sets You can select one of the following international character sets using the printer's Default setting mode or the ESC R command. For example, when you select "Italic France," the characters in the "France" row on the table below are - Epson Stylus Pro | User Manual - Page 89
Characters Available with ESC (^ Command To print the characters in the table below, use the ESC ( ^ command. Commands and Character Tables C-11 - Epson Stylus Pro | User Manual - Page 90
in which the width of each character is approximately 60% of the width of standard characters. control code A special code used to control a printer function such as performing a carriage return or line feed. cpi Characters per inch. Determines the size and number of text characters that will fit - Epson Stylus Pro | User Manual - Page 91
. The system of commands sent by the computer to control the printer. It is standard for all EPSON printers and supported by most application software for personal computers. font A style of type designated by a family name, such as Courier or Helvetica™. grayscale An image consisting of multiple - Epson Stylus Pro | User Manual - Page 92
can print. It is smaller than the physical size of the page due to margins. printer driver A software program that sends commands for using the features of a particular printer. reset To return the printer to its default settings. resolution A measure of the amount of detail that can be represented - Epson Stylus Pro | User Manual - Page 93
printer, 3-8 Clearing paper jams, see Jammed paper Coated papers loading, 1-7-11 selecting, 1-2-3 specifications, B-3-5 Coaxial cable, A-2-3 Color button, 2-4 Color images, 3-12, 3-15 Color ink cartridge, see Ink cartridges Color Specialist, Intro-3 CompuServe, Intro-5 Condensed button, 2-4-6 light - Epson Stylus Pro | User Manual - Page 94
light, 2-3, 3-13 mode, 2-3-4, 3-13, 3-15 Edge guides, 1-4, 1-6, 1-10, 1-13 Ejecting paper, 2-4, 3-23 Electrical specifications, B-7 Electronic support services 1-8, 3-13, 3-23, B-4 for printer, B-8 I Initialization, B-12-13, Ink cartridges clamps, 3-5 conserving ink, 2-4, 3-19 empty, 3-12 life - Epson Stylus Pro | User Manual - Page 95
, 3-14, 3-20 Moving the printer, see Transporting the printer N Network interface mode, 2-6-7, A-4 Networks, A-2-4 No Ink Cartridge light, 2-3, 3-11, 3-17 Notice sheet, 3-9 Nozzles, print head, 3-7, B-2 O Online support, Intro-5 Operate button, 2-2, 2-4-5 light, 2-3 Ordering paper, 1-3 Output tray - Epson Stylus Pro | User Manual - Page 96
problems, 3-22-24 glossy, see Glossy paper handling, 1-2-11, 3-20-24 jams, 3-21-22 ordering EPSON, 1-6 Parallel interface, 2-7, B-9-11 Pause button, 2-4-6 light, 2-3, 3-11, 3-17 Pin assignments, B-9-11 Pitch driver, Intro-1, 1-10-11 hex dump mode, 2-5, 3-20 initializing, B-12-13 pausing, 2-4 problems - Epson Stylus Pro | User Manual - Page 97
ink cartridges, B-6 for paper, 1-8, B-4 for printer, B-8 Testing the printer, 2-5, 3-12 Timeout period, 2-7 Timing chart, B-11 Top margin, 2-7, 3-15, B-5 Transparencies loading, 1-7-11 selecting, 1-2-3 specifications, B-3-4 Transporting the printer, 3-9-10 Troubleshooting, 3-10-24 Turning printer - Epson Stylus Pro | User Manual - Page 98
W Wait mode, auto interface, 2-6-7 Web site, Intro-5 Weight paper, B-3-4 printer, B-7 White banding, 3-14 Windows, Intro-1, 3-10 Windows 95, reinstalling driver, 3-18 World Wide Web, Intro-5 Wrinkled paper, 3-23 X X-OFF code, A-6 X-ON code, A-6 6 Index
-
 1
1 -
 2
2 -
 3
3 -
 4
4 -
 5
5 -
 6
6 -
 7
7 -
8
-
9
-
10
-
11
-
12
-
13
-
14
-
15
-
16
-
17
-
18
-
19
-
20
-
21
-
22
-
23
-
24
-
25
-
26
-
27
-
28
-
29
-
30
-
31
-
32
-
33
-
34
-
35
-
36
-
37
-
38
-
39
-
40
-
41
-
42
-
43
-
44
-
45
-
46
-
47
-
48
-
49
-
50
-
51
-
52
-
53
-
54
-
55
-
56
-
57
-
58
-
59
-
60
-
61
-
62
-
63
-
64
-
65
-
66
-
67
-
68
-
69
-
70
-
71
-
72
-
73
-
74
-
75
-
76
-
77
-
78
-
79
-
80
-
81
-
82
-
83
-
84
-
85
-
86
-
87
-
88
-
89
-
90
-
91
-
92
-
93
-
94
-
95
-
96
-
97
-
98
 |
 |

COLOR INK JET PRINTER
Reference Guide
All rights reserved. No part of this publication may be reproduced, stored in a retrieval
system, or transmitted in any form or by any means, electronic, mechanical, photocopying,
recording, or otherwise, without the prior written permission of Seiko Epson Corporation.
No patent liability is assumed with respect to the use of the information contained herein.
Neither is any liability assumed for damages resulting from the use of the information
contained herein.
Neither Seiko Epson Corporation nor its affiliates shall be liable to the purchaser of this
product or third parties for damages, losses, costs, or expenses incurred by purchaser or
third parties as a result of: accident, misuse, or abuse of this product or unauthorized
modifications, repairs, or alterations to this product, or (excluding the U.S.) failure to
strictly comply with Seiko Epson Corporation’s operating and maintenance instructions.
Seiko Epson Corporation shall not be liable against any damages or problems arising from
the use of any options or any consumable products other than those designated as
Original EPSON Products or EPSON Approved Products by Seiko Epson Corporation.
EPSON, EPSON Stylus, and EPSON ESC/P are registered trademarks and EPSON
ESC/P 2 is a trademark of Seiko Epson Corporation.
EPSON Connection is a service mark of Epson America, Inc.
General Notice: Other product names used herein are for identification purposes only and
may be trademarks of their respective owners. EPSON disclaims any and all rights in
those marks.
The Energy Star emblem does not represent EPA endorsement of any product or service.
Copyright © 1995 by Epson America, Inc.
10/95
Printed on recycled paper with at least 10% post-consumer content