Epson Stylus Pro User Manual - Page 17
not load paper above the arrow mark on the left edge guide.
 |
View all Epson Stylus Pro manuals
Add to My Manuals
Save this manual to your list of manuals |
Page 17 highlights
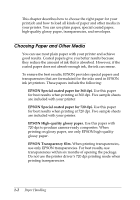
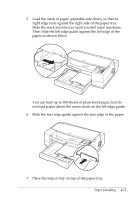
5. Load the stack of paper, printable side down, so that its right edge rests against the right side of the paper tray. Slide the stack into the tray until you feel some resistance. Then slide the left edge guide against the left edge of the paper as shown below. You can load up to 100 sheets of plain bond paper, but do not load paper above the arrow mark on the left edge guide. 6. Slide the rear edge guide against the rear edge of the paper. 7. Place the output tray on top of the paper tray. Paper Handling 1-5
-
 1
1 -
2
-
3
-
4
-
5
-
6
-
7
-
8
-
9
-
10
-
11
-
 12
12 -
 13
13 -
 14
14 -
 15
15 -
 16
16 -
 17
17 -
 18
18 -
 19
19 -
 20
20 -
 21
21 -
 22
22 -
23
-
24
-
25
-
26
-
27
-
28
-
29
-
30
-
31
-
32
-
33
-
34
-
35
-
36
-
37
-
38
-
39
-
40
-
41
-
42
-
43
-
44
-
45
-
46
-
47
-
48
-
49
-
50
-
51
-
52
-
53
-
54
-
55
-
56
-
57
-
58
-
59
-
60
-
61
-
62
-
63
-
64
-
65
-
66
-
67
-
68
-
69
-
70
-
71
-
72
-
73
-
74
-
75
-
76
-
77
-
78
-
79
-
80
-
81
-
82
-
83
-
84
-
85
-
86
-
87
-
88
-
89
-
90
-
91
-
92
-
93
-
94
-
95
-
96
-
97
-
98
 |
 |

5.
Load the stack of paper, printable side down, so that its
right edge rests against the right side of the paper tray.
Slide the stack into the tray until you feel some resistance.
Then slide the left edge guide against the left edge of the
paper as shown below.
You can load up to 100 sheets of plain bond paper, but do
not load paper above the arrow mark on the left edge guide.
6.
Slide the rear edge guide against the rear edge of the paper.
7.
Place the output tray on top of the paper tray.
Paper Handling
1-5