Epson Stylus Pro User Manual - Page 63
Installing an Optional Interface Board, Handshake timing, Error handling
 |
View all Epson Stylus Pro manuals
Add to My Manuals
Save this manual to your list of manuals |
Page 63 highlights
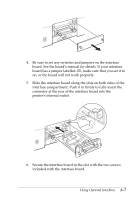
Handshake timing When the vacant area for data in the input buffer drops to 256 bytes, the printer outputs an X-OFF code or sets the DTR flag to 1 (MARK) to indicate that it cannot receive data. When the vacant area for data in the buffer increases to 512 bytes, the printer outputs an X-ON code or sets the DTR flag to 0 (SPACE) to indicate that it is ready to receive data. Error handling When the printer detects a parity error, it prints an asterisk (*). The printer ignores all other errors, including framing and overrun errors. Installing an Optional Interface Board 1. Turn off the printer. 2. Unplug the printer's power cord from the electrical outlet and disconnect any interface cables. c Caution: Do not install or remove an interface board when the printer is connected to the electrical outlet. If you do, you may damage your printer or computer. 3. Remove the two screws securing the shield plate to the optional interface slot; then lift off the plate as shown in the following illustration. Store the plate in case you later remove the interface board. A-6 Using Optional Interfaces
-
 1
1 -
2
-
3
-
4
-
5
-
6
-
7
-
8
-
9
-
10
-
11
-
12
-
13
-
14
-
15
-
16
-
17
-
18
-
19
-
20
-
21
-
22
-
23
-
24
-
25
-
26
-
27
-
28
-
29
-
30
-
31
-
32
-
33
-
34
-
35
-
36
-
37
-
38
-
39
-
40
-
41
-
42
-
43
-
44
-
45
-
46
-
47
-
48
-
49
-
50
-
51
-
52
-
53
-
54
-
55
-
56
-
57
-
 58
58 -
 59
59 -
 60
60 -
 61
61 -
 62
62 -
 63
63 -
 64
64 -
 65
65 -
 66
66 -
 67
67 -
 68
68 -
69
-
70
-
71
-
72
-
73
-
74
-
75
-
76
-
77
-
78
-
79
-
80
-
81
-
82
-
83
-
84
-
85
-
86
-
87
-
88
-
89
-
90
-
91
-
92
-
93
-
94
-
95
-
96
-
97
-
98
 |
 |
