Epson Stylus Pro User Manual - Page 30
Alt/Cleaning, Operate + Load/Eject, Load/Eject, Operate, Pause, Operate + Economy/Condensed
 |
View all Epson Stylus Pro manuals
Add to My Manuals
Save this manual to your list of manuals |
Page 30 highlights
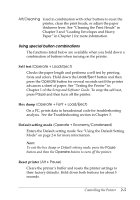
Alt/Cleaning Used in combination with other buttons to reset the printer, clean the print heads, or adjust the paper thickness lever. See "Cleaning the Print Heads" in Chapter 3 and "Loading Envelopes and Heavy Paper" in Chapter 1 for more information. Using special button combinations The functions listed below are available when you hold down a combination of buttons when turning on the printer. Self test (Operate + Load/Eject) Checks the paper length and performs a self test by printing fonts and colors. Hold down the Load/Eject button and then press the Operate button for several seconds until the printer advances a sheet of paper. See "Testing the Printer" in Chapter 1 of the Setup and Software Guide. To stop the self test, press Pause and then turn off the printer. Hex dump (Operate + Font + Load/Eject) On a PC, prints data in hexadecimal code for troubleshooting analysis. See the Troubleshooting section in Chapter 3. Default setting mode (Operate + Economy/Condensed) Enters the Default setting mode. See "Using the Default Setting Mode" on page 2-6 for more information. Note: To exit the hex dump or Default setting mode, press the Pause button and then the Operate button to turn off the printer. Reset printer (Alt + Pause) Clears the printer's buffer and resets the printer settings to their factory defaults. Hold down both buttons for about 5 seconds. Controlling the Printer 2-5
-
 1
1 -
2
-
3
-
4
-
5
-
6
-
7
-
8
-
9
-
10
-
11
-
12
-
13
-
14
-
15
-
16
-
17
-
18
-
19
-
20
-
21
-
22
-
23
-
24
-
 25
25 -
 26
26 -
 27
27 -
 28
28 -
 29
29 -
 30
30 -
 31
31 -
 32
32 -
 33
33 -
 34
34 -
 35
35 -
36
-
37
-
38
-
39
-
40
-
41
-
42
-
43
-
44
-
45
-
46
-
47
-
48
-
49
-
50
-
51
-
52
-
53
-
54
-
55
-
56
-
57
-
58
-
59
-
60
-
61
-
62
-
63
-
64
-
65
-
66
-
67
-
68
-
69
-
70
-
71
-
72
-
73
-
74
-
75
-
76
-
77
-
78
-
79
-
80
-
81
-
82
-
83
-
84
-
85
-
86
-
87
-
88
-
89
-
90
-
91
-
92
-
93
-
94
-
95
-
96
-
97
-
98
 |
 |
