Epson Stylus Scan 2000 Product Information Guide - Page 12
Scanning, Scanning a Photo, Scanning Text or Line Art - manual
 |
View all Epson Stylus Scan 2000 manuals
Add to My Manuals
Save this manual to your list of manuals |
Page 12 highlights
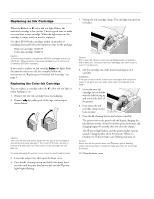
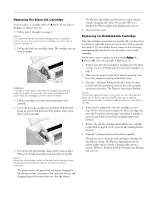
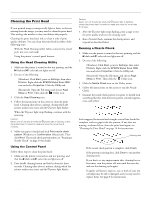
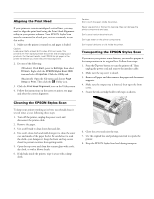
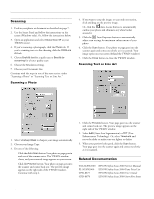
EPSON Stylus Scan 2000 Scanning 1. Feed in your photo or document as described on page 7. 2. Use the Smart Panel and follow the instructions on the screen (Windows only). Or, follow the instructions below. 3. Open an application and select Stylus Scan SF as your TWAIN source. 4. If you're scanning a photograph, click the Photo tab. If you're scanning text or a line drawing, click the OCR/Line Art tab. 5. Choose Draft & fast for a quick scan or Best & descreening for a better quality scan 6. Choose the Resolution setting. 7. Choose your Document Size. Continue with the steps in one of the next sectios: either "Scanning a Photo" or "Scanning Text or Line Art." Scanning a Photo 4. If you want to crop the image, or scan only one section, click and drag on the preview image. Or, click the Auto Locate button to automatically outline your photo and eliminate any white border around it. 5. Click the Auto Exposure button to automatically adjust scan settings for maximum enhancement of your photo. 6. Click the Scan button. Your photo or page goes into the scanner again and comes out slowly as it is scanned. Your image opens on your screen (behind the TWAIN window). 7. Click the Close button to close the TWAIN window. Scanning Text or Line Art 1. Select Unsharp Mask to sharpen your image automatically. 2. Choose your Image Type. 3. Do one of the following: t Click the Auto Scan button.Your photo or page goes in and out of the scanner twice. The TWAIN window closes, and your scanned image appears on your screen. t Click the Preview button. Your photo or page goes into the scanner and comes back out. The preview image appears on the right side of the TWAIN window. Continue with step 4. 1. Click the Preview button. Your page goes into the scanner and comes back out. The preview image appears on the right side of the TWAIN window. 2. Select AAS (Auto Area Segmentation) or TET (Text Enhancement Technology). Or, select Threshold and move the slider to make your text lighter or darker. 3. When your preview looks good, click the Scan button. Your page goes into the scanner again and comes out slowly as it is scanned. Related Documentation TM-SCAN2000 PL-SCAN2000 CPD-8877 CPD-8878 EPSON Stylus Scan 2000 Service Manual EPSON Stylus Scan 2000 Parts Price List EPSON Stylus Scan 2000 User's Guide EPSON Stylus Scan 2000 Start Here sheet 12 - EPSON Stylus Scan 2000 9/99
-
 1
1 -
2
-
3
-
4
-
5
-
6
-
 7
7 -
 8
8 -
 9
9 -
 10
10 -
 11
11 -
 12
12
 |
 |