Fisher and Paykel OR30SDG4X1 User Guide
Fisher and Paykel OR30SDG4X1 Manual
 |
View all Fisher and Paykel OR30SDG4X1 manuals
Add to My Manuals
Save this manual to your list of manuals |
Fisher and Paykel OR30SDG4X1 manual content summary:
- Fisher and Paykel OR30SDG4X1 | User Guide - Page 1
FREESTANDING RANGE OR30SCG & OR30SDG OR36SCG & OR36SDG models USER GUIDE US CA - Fisher and Paykel OR30SDG4X1 | User Guide - Page 2
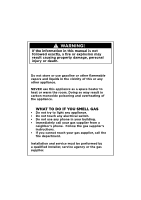
! WARNING! If the information in this manual is not followed exactly, a fire or explosion may Follow the gas supplier's instructions. ● If you cannot reach your gas supplier, call the fire department. Installation and service must be performed by a qualified installer, service agency or the gas - Fisher and Paykel OR30SDG4X1 | User Guide - Page 3
THESE INSTRUCTIONS The models shown in this user guide may not be available in all markets and are subject to change at any time. For current details about model and specification availability in your country, please visit our website listed on the back cover or contact your Fisher & Paykel dealer - Fisher and Paykel OR30SDG4X1 | User Guide - Page 4
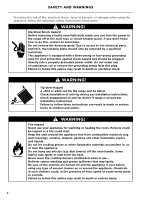
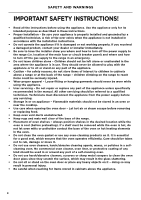
AND WARNINGS To reduce the risk of fire, electrical shock, injury to persons, or damage when using the appliance, follow the important safety instructions listed below: ! WARNING! Electrical Shock Hazard Before removing a faulty oven light bulb, make sure you turn the power to the range off at - Fisher and Paykel OR30SDG4X1 | User Guide - Page 5
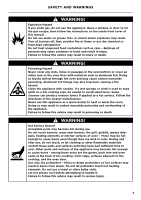
Hazard If you smell gas, do not use the appliance. Open a window or door to let the gas escape, then follow the instructions on the inside front cover of this manual. Do not use water on grease fires. A violent steam explosion may result. Turn all burners off, then smother fire or flame - Fisher and Paykel OR30SDG4X1 | User Guide - Page 6
over exists when the appliance is not installed in accordance with the installation instructions. ● Do not operate the appliance if it is damaged or not User servicing - Do not repair or replace any part of the appliance unless specifically recommended in the manual. All other servicing should be - Fisher and Paykel OR30SDG4X1 | User Guide - Page 7
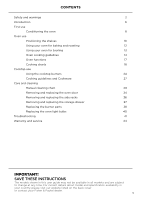
INSTRUCTIONS! ● Safe food handling: leave food in the oven for as short a time as possible before and after cooking. This is to avoid contamination by organisms which may cause food poisoning. Take particular care during warmer weather. ● Clean only the parts listed in this manual cooktop service - Fisher and Paykel OR30SDG4X1 | User Guide - Page 8
30" MODELS INTRODUCTION OR30SCG OR30SDG 36" MODELS OR36SCG OR36SDG Models may vary from shown 6 - Fisher and Paykel OR30SDG4X1 | User Guide - Page 9
rear of the range has been properly installed. 2 Make sure that the installer has completed the 'Final checklist' in the Installation instructions. 3 Read this guide, taking special note of the 'Safety and warnings' section. 4 Remove all accessories and packaging from the oven and cooktop. Recycle - Fisher and Paykel OR30SDG4X1 | User Guide - Page 10
Control panel layout FIRST USE Dials may vary Oven controls Cooktop burner controls Condition the oven It is important to condition your oven before using it for cooking and baking. Conditioning will burn off any manufacturing residues and ensure that you get the best results right from the - Fisher and Paykel OR30SDG4X1 | User Guide - Page 11
FIRST USE 3 When the burner is lit, close the door 4 After 30 minutes turn the LIGHT & FAN and adjust the temperature to 550F. dial counterclockwise to turn the oven fan on. IMPORTANT! If the flame extinguishes for any reason while the oven is on, the safety valve will automatically shut off - Fisher and Paykel OR30SDG4X1 | User Guide - Page 12
OVEN USE Positioning the shelves ● Shelf positions are numbered from the bottom. ● Position the shelves you will need before turning the oven on. ● For advice on which shelf position to use, see sections 'Oven functions', 'Oven cooking guidelines', and 'Cooking charts'. IMPORTANT! Always position - Fisher and Paykel OR30SDG4X1 | User Guide - Page 13
To insert the shelves Guard rail OVEN USE 1 Make sure the guard rail is at the back, facing up and the slides are not extended. 2 Hold the shelf firmly with both hands, making sure you grip the wire shelf too to stop it sliding forward. 3 4 3 Hook the rear tags over the wires of the desired - Fisher and Paykel OR30SDG4X1 | User Guide - Page 14
OVEN USE Using your oven for baking and roasting 1 In the O (OFF) position, push the BAKE & BROIL dial in as far it will go then turn clockwise to BAKE. ● Check the upper burner to see if it has lit. ● If the burner does not light turn the dial back to OFF and try again. 2 Close the door slowly, - Fisher and Paykel OR30SDG4X1 | User Guide - Page 15
Using your oven for broiling OVEN USE 1 In the O (OFF) position, push the BAKE & BROIL dial in as far it will go then turn counterclockwise to BROIL. ● Check the lower burner to see if it has lit. ● If the burner does not light turn the dial back to OFF and try again. 2 When you have finished - Fisher and Paykel OR30SDG4X1 | User Guide - Page 16
temperature. ● Avoid opening the oven door frequently during baking. Do not open the oven door until at least ¾ through the suggested baking time. Shelf Position Guide Place your baking on a shelf that will have the top of your pan near the center of the oven cavity. ● Arrange pans and food items - Fisher and Paykel OR30SDG4X1 | User Guide - Page 17
continue to cook for a few minutes after removing it from the oven. Shelf Position Guide Place the meat on a shelf so that is is in the center of the burning. ● Use the broil rack and pan for perfect results. Shelf Position Guide ● For thinner cuts of meat, toasting or browning foods, use a higher - Fisher and Paykel OR30SDG4X1 | User Guide - Page 18
COOKING GUIDE Oven cooking guidelines REHEATING ● Use BAKE or BAKE + FAN to reheat food. ● BAKE mode is particularly good for reheating pastry based items, as the base - Fisher and Paykel OR30SDG4X1 | User Guide - Page 19
OVEN FUNCTIONS IMPORTANT! ● Use all the functions with the oven door closed. BAKE ● This is the traditional cooking function. ● It is best to cook on only one shelf at a time in this function. Ideal for cakes, pies, desserts and bread, and slow cooked dishes like casseroles. BAKE + FAN ● The fan can - Fisher and Paykel OR30SDG4X1 | User Guide - Page 20
COOKING CHARTS ● Shelf positions are counted from the base up (1 is the lowest, 7 is the highest). Position shelves before you turn the oven on. ● For best results preheat the oven. ● Multi shelf cooking may need the shelves rotating midway through cooking. ● Oven accessories may temporarily deform - Fisher and Paykel OR30SDG4X1 | User Guide - Page 21
COOKING CHARTS The information in these charts are guidelines only. Refer to your recipe or the packaging and be prepared to adjust the cooking times and settings accordingly. RECOMMENDED MODE Bake with Fan Bake with Fan Bake with Fan Bake with Fan Bake with Fan Bake with Fan Bake Bake Bake Bake - Fisher and Paykel OR30SDG4X1 | User Guide - Page 22
COOKING CHARTS SAVOURY FOOD SHELVES Cornbread Vegetables Lasagne Casserole Pizza Quiche (blind bake, then add filling) Potatoes (whole, baked) Frittata (shallow) Oven Meals Single Single Single Single Single Single Single Single Single ROASTING FOOD SHELVES * RECOMMENDED MODE Beef ( - Fisher and Paykel OR30SDG4X1 | User Guide - Page 23
COOKING CHARTS RECOMMENDED MODE Bake with Fan Bake with Fan Bake with Fan Bake Bake with Fan Bake with Fan Bake Bake with Fan Bake with Fan SHELF POSITIONS 3 3 3 2 or 3 2 3 3 3 3 TEMP (°F) 400 - 425 350 - 375 350 - 375 250 - 350 425 350 TEMP (°C) 210 - 215 175 - 190 175 - 190 120 - 175 220 175 - Fisher and Paykel OR30SDG4X1 | User Guide - Page 24
BROILING FOOD Beef Lamb Chops Pork Chicken Sausages Fish Vegetables COOKING CHARTS Steak Rare Medium Hamburger (ground - patties) Meatballs (ground) Medium Well done Chops (well done) Ham steak Bacon Boneless pieces Bone In Pieces Sausages Fillets Whole Sliced SHELVES Single Single - Fisher and Paykel OR30SDG4X1 | User Guide - Page 25
COOKING CHARTS RECOMMENDED MODE Broil Broil Broil Broil Broil Broil Broil Broil Broil Bake with Fan Bake with Fan Broil Broil Bake with Fan Broil SHELF POSITIONS 6 or 7 6 or 7 6 or 7 6 or 7 6 or 7 6 or 7 6 or 7 6 or 7 6 or 7 4 or 5 4 or 5 6 or 7 5 or 6 5 or 6 5 or 6 TEMP (°F) TEMP (°C) TIME (MINS - Fisher and Paykel OR30SDG4X1 | User Guide - Page 26
COOKTOP USE 1 1 1 2 1 2 OR30 models - cooktop 2 3 1 Semi-rapid burner 2 Dual wok burner 3 Triple-ring wok burner Burner Controls The dials control the flow of gas through the valve. 3 OR36 models - cooktop Using the single burners 1 Identify the dial of the burner you want to use. 2 - Fisher and Paykel OR30SDG4X1 | User Guide - Page 27
COOKTOP USE 3 When the burner has lit, adjust the flame anywhere between HI and LO. ● Do not adjust the dial between HI and O (OFF). 3 When you have finished cooking, turn the dial clockwise back to O (OFF). ● If you are using LP gas, there may be a slight 'extinction pop' or flash at the flame - Fisher and Paykel OR30SDG4X1 | User Guide - Page 28
methylated spirits, as shown below. See 'Care and cleaning' for instructions on removing and replacing the burner parts. If the flame is irregular For further advice, see sections 'Care and cleaning' and 'Troubleshooting'. Burner cap Ignitor Flame spreader Burner parts 26 Correct assembly of - Fisher and Paykel OR30SDG4X1 | User Guide - Page 29
this can deflect heat onto your benchtop and damage its surface. ● Always make sure saucepans are stable. Using very heavy saucepans may bend the pan supports or deflect the flame. ● Make sure the size of the pan matches the size of the burner. A small pot on a large burner is not efficient - Fisher and Paykel OR30SDG4X1 | User Guide - Page 30
COOKING GUIDELINES AND COOKWARE Wok stand The wok stand fits over the triple-ring wok or dual burner trivet. IMPORTANT! ● Using a wok without the stand may cause the wok to tip or the wok or dual burner to operate incorrectly. ● Do not use the stand for ordinary, flat-bottomed saucepans. ● The wok - Fisher and Paykel OR30SDG4X1 | User Guide - Page 31
ensure it doesn't stain. ● See the pages following this chart for instructions on removing and replacing different parts of the range for cleaning or chart below. If in doubt, contact Customer Care. ● Only an authorized service technician can take apart the door. ● Do not attempt to take the - Fisher and Paykel OR30SDG4X1 | User Guide - Page 32
CARE AND CLEANING Manual cleaning chart WHAT? HOW OFTEN? HOW? RANGE EXTERIOR Door frame models: For extra shine, use a suitable stainless steel cleaner and polish, following manufacturer's instructions. Always rub the stainless steel in the direction of the polish lines. Dials Oven handles - Fisher and Paykel OR30SDG4X1 | User Guide - Page 33
. them in soapy water, 2 Apply a chrome cleaner with a or use oven cleaner damp sponge or cloth following on them. Doing so will manufacturer instructions. remove the lubricating 3 Wipe and dry. grease in the slides, stopping them from running smoothly. 1 Pre-soak any stubborn soiling in - Fisher and Paykel OR30SDG4X1 | User Guide - Page 34
CARE AND CLEANING Manual cleaning chart WHAT? HOW OFTEN? OVEN PARTS Oven door glass (interior) Oven door gasket Storage drawer (interior) HOW? ● Use a soft cloth and a mixture of warm - Fisher and Paykel OR30SDG4X1 | User Guide - Page 35
dry. ● The wok ring is also dishwashersafe. IMPORTANT! ● Keep the notches of the flame spreaders clear. Soiling may clog these and cause ignition problems. ● Before replacing the burner parts, check that they are dry. Wet burner parts may result in an irregular flame. ● Before lighting a burner you - Fisher and Paykel OR30SDG4X1 | User Guide - Page 36
CARE AND CLEANING Removing and replacing the oven door IMPORTANT! ● Do not lift the oven door by its handle. Doing so may damage the door. ● Make sure the oven and the door are cool before you begin to remove the door. ● Before removing the door, make sure there is a large enough clear, protected - Fisher and Paykel OR30SDG4X1 | User Guide - Page 37
CARE AND CLEANING To replace the oven door Notch 1 Hold the door firmly in an approximately halfway open position. 2 Insert the hinge tongues into the slots, making sure that the notches on both sides drop into place as shown. 3 Open the door fully. 4 Fully close the levers on the left and - Fisher and Paykel OR30SDG4X1 | User Guide - Page 38
CARE AND CLEANING Removing and replacing the side racks IMPORTANT! Always turn off the oven at the wall first. Ensure the oven has cooled down completely before starting. To remove side racks Remove all shelves 1 Slide out all shelves and remove. For easier access we recommend removing the oven - Fisher and Paykel OR30SDG4X1 | User Guide - Page 39
● On the right side push the lever up 3 Remove the drawer while holding the levers in position. To replace the storage drawer 1 Insert the drawer guides onto the sliding runners on either side of the range interior. ● Make sure they are correctly lined up on both sides of the drawer. 2 Gently - Fisher and Paykel OR30SDG4X1 | User Guide - Page 40
that the burner flame spreader and the cap have been correctly positioned. Failure to do so can cause serious problems. ● Check that the ignitor is always clean to ensure trouble free sparking. It must be cleaned very carefully using a toothbrush and methylated spirits. ● Note: to avoid damage to - Fisher and Paykel OR30SDG4X1 | User Guide - Page 41
CARE AND CLEANING Replacing the triple-ring wok and dual burners Ignitor Ignitor Correct positioning of flame spreader - triple-ring wok burner Correct positioning of flame spreader - dual burner ACap BRing Correct positioning of cap and ring - triple-ring wok and dual burner Incorrect and - Fisher and Paykel OR30SDG4X1 | User Guide - Page 42
CARE AND CLEANING Replacing the oven light bulbs IMPORTANT! Use a 25W, 120V 60HZ G9 halogen bulb for replacement. Do not use a standard light bulb in any oven, the heat will break it. 1 Allow the oven (including the lamp cover and the bulb) to cool completely. IMPORTANT! Turn the oven off at the - Fisher and Paykel OR30SDG4X1 | User Guide - Page 43
TROUBLESHOOTING If you can't find an answer to your problem in the chart below, or if the problem cannot be fixed, you will need technical help. Contact your Authorized Service Center or Customer Care. PROBLEM . Contact your local gas supplier. See instructions for 'Replacing the oven light bulb' - Fisher and Paykel OR30SDG4X1 | User Guide - Page 44
TROUBLESHOOTING PROBLEM OVEN Condensation around oven (e.g. on Oven not properly preheated. Unsuitable or incorrectly arranged bakeware. Contact your Authorized Service Center or Customer Care. Wait until the halo around the temperature dial the ignitor(s). See 'Care and cleaning' for instructions. - Fisher and Paykel OR30SDG4X1 | User Guide - Page 45
TROUBLESHOOTING PROBLEM COOKTOP BURNERS Some burners will are clean and dry. See 'Care and cleaning' for instructions. Clean the ignitor(s). See 'Care and cleaning' for instructions. The cooktop burners can still be used. To light burners. Contact your Authorized Service Center or Customer Care. 43 - Fisher and Paykel OR30SDG4X1 | User Guide - Page 46
Before you call for service or assistance ... Check the things you can do yourself. Refer to the installation instructions and your user guide and check that: 1 Your product is correctly installed. 2 You are familiar with its normal operation. If after checking these points you still need assistance - Fisher and Paykel OR30SDG4X1 | User Guide - Page 47
45 - Fisher and Paykel OR30SDG4X1 | User Guide - Page 48
F I S H E R PAY K E L . C O M © Fisher & Paykel Appliances 2017. All rights reserved. The product specifications in this booklet apply to the specific products and models described at the date of issue. Under
-
 1
1 -
 2
2 -
 3
3 -
 4
4 -
 5
5 -
 6
6 -
 7
7 -
8
-
9
-
10
-
11
-
12
-
13
-
14
-
15
-
16
-
17
-
18
-
19
-
20
-
21
-
22
-
23
-
24
-
25
-
26
-
27
-
28
-
29
-
30
-
31
-
32
-
33
-
34
-
35
-
36
-
37
-
38
-
39
-
40
-
41
-
42
-
43
-
44
-
45
-
46
-
47
-
48
 |
 |

USER GUIDE
US CA
FREESTANDING RANGE
OR30SCG & OR30SDG
OR36SCG & OR36SDG
models