Fluke TiR1 FE Ti10-25-Tir-1 Users Manual - Page 9
Unpacking the Imager, Charging the Battery, Turning the Imager On and Off, Features and Controls, Ti10 - charger
 |
View all Fluke TiR1 manuals
Add to My Manuals
Save this manual to your list of manuals |
Page 9 highlights
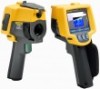
Thermal Imagers Unpacking the Imager Unpacking the Imager Carefully unpack the following items: • Ti10, Ti25, TiR or TiR1 Imager • AC Power Adapter/Charger • Rugged Carrying Case • SD Memory Card • SD Card Reader • Soft Transport Bag • User Manuals (in various languages) • SmartView™ Software • Warranty Registration Card Charging the Battery Before using the Imager for the first time, charge the battery for at least two hours. The Imager's battery condition is displayed in the upper-left corner of the display. When the last segment of the battery icon extinguishes, the Imager will shut down and will require recharging before operating again. To charge the Imager's battery: 1. Plug the ac input of the battery charger into an ac wall outlet. 2. Plug the battery charger's dc output into the Imagers ac adapter socket. The optional Car Charger can also be used to recharge the Imager's battery. While the battery is charging, the battery icon appears as A while the Imager is operating. With the Imager off, b appears in the display while connected to the battery charger. Turning the Imager On and Off To turn the Imager on or off, press the center softkey (a) for two seconds. Features and Controls Imager features and controls are shown and described in Table 2. 3
-
 1
1 -
2
-
3
-
 4
4 -
 5
5 -
 6
6 -
 7
7 -
 8
8 -
 9
9 -
 10
10 -
 11
11 -
 12
12 -
 13
13 -
 14
14 -
15
-
16
-
17
-
18
-
19
-
20
-
21
-
22
-
23
-
24
 |
 |
