Garmin Edge 130 Plus Owners Manual - Page 7
Acquiring Satellite Signals, Going for a Ride, Following a Saved Ride, Segments - bike computer
 |
View all Garmin Edge 130 Plus manuals
Add to My Manuals
Save this manual to your list of manuals |
Page 7 highlights
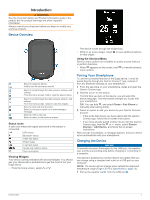
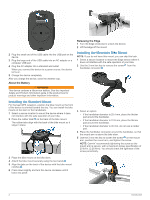
6 If necessary, use the 2 mm hex key to remove the two screws on the back side of the mount , remove and rotate the connector, and replace the screws to change the orientation of the mount. 7 Replace and tighten the screw on the handlebar connector. NOTE: Garmin recommends tightening the screw so the mount is secure, with a maximum torque specification of 7 lbf-in. (0.8 N-m). You should check the tightness of the screw periodically. 8 Align the tabs on the back of the Edge device with the bike mount notches . 9 Press down slightly and turn the Edge device clockwise until it locks into place. Acquiring Satellite Signals The device may need a clear view of the sky to acquire satellite signals. The time and date are set automatically based on the GPS position. TIP: For more information about GPS, go to www.garmin.com /aboutGPS. 1 Go outdoors to an open area. The front of the device should be oriented toward the sky. 2 Wait while the device locates satellites. It may take 30-60 seconds to locate satellite signals. Training Going for a Ride If your device was packaged with an ANT+® sensor, they are already paired and can be activated during initial setup. 1 Hold to turn on the device. 2 Go outside, and wait while the device locates satellites. appears solid when the device is ready. 3 From the home screen, select . 4 Select the ride type. TIP: Accurate ride type data is important for creating bike friendly courses on your Garmin Connect account. 5 Select to start the activity timer. NOTE: History is recorded only while the activity timer is running. 6 Select to stop the activity timer. 7 Select an option: • Select Resume to resume your ride. • Select Save Ride to stop your ride and save it. • Select Discard Ride to stop your ride and delete it from your device. • Select Back to Start to navigate back to your starting location. • Select Mark Location to mark your location and save it. • Select Main Menu to return to the main menu. Following a Saved Ride 1 Hold . 2 Select Navigation > Ride an Activity. 3 Select a ride. TIP: You can select to view more detailed information about your ride, such as a summary, map location, lap details, or to delete this ride. 4 Select Ride. 5 Select to start the activity timer. Segments Following a segment: You can send segments from your Garmin Connect account to your device. After a segment is saved to your device, you can follow the segment. NOTE: When you download a course from your Garmin Connect account, all segments in the course are downloaded automatically. Racing a segment: You can race a segment, trying to match or exceed your personal record or other cyclists who have ridden the segment. Strava™ Segments You can download Strava segments to your Edge 130 Plus device. Follow Strava segments to compare your performance with your past rides, friends, and pros who have ridden the same segment. To sign up for a Strava membership, go to the segments widget in your Garmin Connect account. For more information, go to www.strava.com. The information in this manual applies to both Garmin Connect segments and Strava segments. Following a Segment From Garmin Connect Before you can download and follow a segment from Garmin Connect, you must have a Garmin Connect account (Garmin Connect, page 10). NOTE: If you are using Strava segments, your favorite segments are transferred automatically to your device when it is connected to the Garmin Connect app or your computer. 1 Select an option: • Open the Garmin Connect app. • Go to connect.garmin.com. 2 Create a new segment, or select an existing segment. 3 Select or Send to Device. 4 Follow the on-screen instructions. 5 On the Edge device, select to start the activity timer, and go for a ride. When your path crosses an enabled segment, you can race the segment. Training 3
-
 1
1 -
 2
2 -
 3
3 -
 4
4 -
 5
5 -
 6
6 -
 7
7 -
 8
8 -
 9
9 -
 10
10 -
 11
11 -
 12
12 -
13
-
14
-
15
-
16
-
17
-
18
-
19
-
20
-
21
-
22
 |
 |
