Garmin GPS 48 Owner's Manual - Page 20
Battery Level, Backlighting &, Emergency Erase - lithium battery
 |
UPC - 753759007553
View all Garmin GPS 48 manuals
Add to My Manuals
Save this manual to your list of manuals |
Page 20 highlights
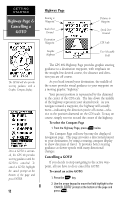
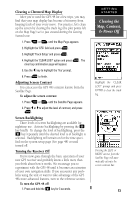
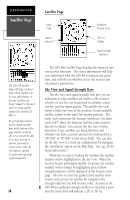
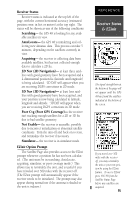
REFERENCE Battery Level, Backlighting & Emergency Erase When backlighting is on, a bulb icon will appear on the Satellite Page. Use the icon to determine if backlighting is turned on during daylight hours. Upon activating the Emergency Erase Function, you will be asked to confirm your decision. Battery Level Indicator The Satellite Page also features a battery level indica- tor, located to the left of the sky view, which displays the strength of the unit's batteries. The battery indicator will not appear if the receiver is using external power. The battery level indicator is calibrated for alkaline batteries. Voltage differences will display ! Ni-Cad and lithium batteries differently. No other receiver functions are affected. The GPS 48 features an internal lithium battery that will maintain the unit's memory when the receiver is not running off batteries or external power. Backlighting Bulb Icon The GPS 48 features full-screen backlighting with three selectable levels of brightness. To activate the backlight, press the B key briefly. To increase the brightness, repeatedly press the B key. The backlight will remain on until cycled off or the backlight timeout setting has been reached (see page 48). Note: A bulb icon will appear on the Satellite Page when backlighting is turned on. Emergency Erase Function You may erase the GPS 48's memory in four quick steps. This will cause all stored data to be deleted, including: routes, waypoints, and the track log. To erase all stored data: 1. Ensure that the GPS 48 is turned off. 2. While holding down the Mkey, hold down the B key to turn the unit on. A warning message will appear with "Yes?" highlighted, and ask you to confirm your selection. 3. If you do not wish to erase all stored data, select 'No?' by pressing Rand E to cancel the emergency erase. 4. If you do wish to complete the emergency erase, press E to confirm. 16
-
 1
1 -
2
-
3
-
4
-
5
-
6
-
7
-
8
-
9
-
10
-
11
-
12
-
13
-
14
-
 15
15 -
 16
16 -
 17
17 -
 18
18 -
 19
19 -
 20
20 -
 21
21 -
 22
22 -
 23
23 -
 24
24 -
 25
25 -
26
-
27
-
28
-
29
-
30
-
31
-
32
-
33
-
34
-
35
-
36
-
37
-
38
-
39
-
40
-
41
-
42
-
43
-
44
-
45
-
46
-
47
-
48
-
49
-
50
-
51
-
52
-
53
-
54
-
55
-
56
-
57
-
58
-
59
-
60
-
61
-
62
-
63
-
64
-
65
-
66
-
67
-
68
-
69
-
70
-
71
-
72
-
73
-
74
 |
 |
