Garmin GPSMAP 740/740s Owner's Manual
Garmin GPSMAP 740/740s Manual
 |
View all Garmin GPSMAP 740/740s manuals
Add to My Manuals
Save this manual to your list of manuals |
Garmin GPSMAP 740/740s manual content summary:
- Garmin GPSMAP 740/740s | Owner's Manual - Page 1
GPSMAP® 700 series owner's manual - Garmin GPSMAP 740/740s | Owner's Manual - Page 2
the express prior written consent of Garmin. Garmin hereby grants permission to download a single copy of this manual onto a hard drive or other electronic this and other Garmin products. Garmin®, the Garmin logo, GPSMAP®, BlueChart®, g2 Vision®, and MapSource® are trademarks of Garmin Ltd. or its - Garmin GPSMAP 740/740s | Owner's Manual - Page 3
guide in the product box for product warnings and other important information. This manual includes information for the following products: • GPSMAP® 720/720s • GPSMAP 740/740s • GPSMAP hold to turn the chartplotter on or off. Manual Conventions In this manual, when you are instructed to select an - Garmin GPSMAP 740/740s | Owner's Manual - Page 4
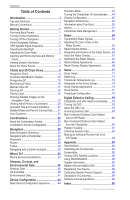
Screenshots 85 Viewing GPS Satellite Locations 85 Using WAAS/EGNOS 85 System Information 85 NMEA 0183 and NMEA 2000 86 Registering Your Device 89 Contacting Garmin Product Support 89 Declaration of Conformity 89 Software License Agreement 89 Index 90 ii GPSMAP 700 Series Owner's Manual - Garmin GPSMAP 740/740s | Owner's Manual - Page 5
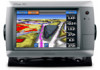
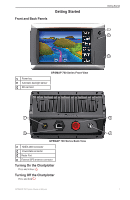
Automatic backlight sensor ➌ SD card slot ➊ ➌ GPSMAP 700 Series Back View ➊ NMEA 2000 connector ➋ Power/data connector ➌ Radar Port ➍ External GPS antenna connector Turning On the Chartplotter Press and release . Turning Off the Chartplotter Press and hold . GPSMAP 700 Series Owner's Manual ➋ ➍ 1 - Garmin GPSMAP 740/740s | Owner's Manual - Page 6
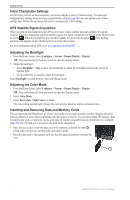
the top of the Home screen are green . When the chartplotter loses satellite signals, the green bars disappear and a flashing question mark appears on the vehicle (boat) icon on the chart screen. For more information about GPS, go to www.garmin.com/aboutGPS. Adjusting the Backlight 1. From the Home - Garmin GPSMAP 740/740s | Owner's Manual - Page 7
your built-in map supports Fishing charts. • Sonar-sets up and provides sonar information (only available with an "S" series unit, such as a GPSMAP 720s) (page 71 (page 33). • Radar-sets up and shows radar (only available if the chartplotter is connected to a Garmin marine radar) (page 54). • - Garmin GPSMAP 740/740s | Owner's Manual - Page 8
GPSMAP 700 series chartplotters have a basic imagery map. The charts and 3D chart views listed below are available on the chartplotter 19). • Radar Overlay-superimposes radar information on the with BlueChart g2 Vision Data ➊ Light ➋ Marina services ➌ Your boat ➍ Submerged wreck ➎ Buoy ➏ - Garmin GPSMAP 740/740s | Owner's Manual - Page 9
or Radar Overlay. 3. Touch and drag the Navigation screen to pan the map. When you pan past the edge of the map, the screen scrolls forward to provide continuous map coverage. 4. Select Stop Panning to stop panning and return the screen to your present location. GPSMAP 700 Series Owner's Manual 5 - Garmin GPSMAP 740/740s | Owner's Manual - Page 10
Select Review to view details of objects in the vicinity of the cursor. (Review does 38), chart notes, or local services information near the cursor. • Select supports Fishing charts. 1. From the Home screen, select Charts. 2. Select a chart or a 3D chart view. 6 GPSMAP 700 Series Owner's Manual - Garmin GPSMAP 740/740s | Owner's Manual - Page 11
Vision SD card or a BlueChart g2 SD card, or if your built-in map supports Fishing charts. 1. From the Home screen, select Charts. 2. Select Navigation Chart or : • Select the button with the station name ➌. • Select Review if more than one item is in the vicinity, and select the button with the - Garmin GPSMAP 740/740s | Owner's Manual - Page 12
g2 SD card, or if your built-in map supports Fishing charts. 1. From the Home screen, select Charts 4. Select the name of the navaid (or Review and then the name of the navaid) or to known as magnetic heading) or to use GPS heading data. The heading line appears GPSMAP 700 Series Owner's Manual - Garmin GPSMAP 740/740s | Owner's Manual - Page 13
a BlueChart g2 SD card, or if your built-in map supports Fishing charts. The basic world map is available on all GPSMAP 700 series chartplotters. 1. From the Home screen, select Charts. 2. Select Navigation you reach the end of the heading line, and select Done. GPSMAP 700 Series Owner's Manual 9 - Garmin GPSMAP 740/740s | Owner's Manual - Page 14
source for the display of the heading line on the chartplotter is determined by the heading line source setting (Auto or GPS Hdg) and whether heading information is available from a Chart Setup or Fishing Chart Setup. 5. Select Chart Appearance > Symbols. 10 GPSMAP 700 Series Owner's Manual - Garmin GPSMAP 740/740s | Owner's Manual - Page 15
sectors at all times, or select Auto to allow the chartplotter to automatically filter out light sectors depending on the zoom level Showing Marine Service Points Service points indicate locations where marine maintenance and repair services may be Wind). ➋ ➊ GPSMAP 700 Series Owner's Manual 11 - Garmin GPSMAP 740/740s | Owner's Manual - Page 16
area traffic. When connected to an external AIS device, the chartplotter can show some AIS information about other vessels that are within vessel includes the Maritime Mobile Service Identity (MMSI), the location, the GPS speed, the GPS heading, the time that 12 GPSMAP 700 Series Owner's Manual - Garmin GPSMAP 740/740s | Owner's Manual - Page 17
. A green X indicates that the AIS transmission from the vessel is lost, and the chartplotter displays a message banner asking whether the vessel should continue to be tracked. If you discontinue vessel targeting and tracking, and information about AIS vessels. GPSMAP 700 Series Owner's Manual 13 - Garmin GPSMAP 740/740s | Owner's Manual - Page 18
g2 SD card, or if your built-in map supports Fishing charts. 1. From the Home screen, select Charts the AIS signal status, MMSI, GPS speed, GPS heading, and other information that all 3D chart views, to all radar modes, and to the Radar Overlay. 1. From the Home screen, GPSMAP 700 Series Owner's Manual - Garmin GPSMAP 740/740s | Owner's Manual - Page 19
use a BlueChart g2 Vision SD card or a BlueChart g2 SD card, or if your built-in map supports Fishing charts. 1. From the Home screen, select Charts. 2. Select Navigation Chart, Fishing Chart, Perspective Vision data card. 1. From the Home screen, select Charts. GPSMAP 700 Series Owner's Manual 15 - Garmin GPSMAP 740/740s | Owner's Manual - Page 20
you are not using the card, keep it in the original packaging for safekeeping and store it away from exposure to sun and Garmin GPS units or Garmin HomePort™. You can insert or remove a BlueChart g2 Vision data card (page 2) while your chartplotter is on or off. 16 GPSMAP 700 Series Owner's Manual - Garmin GPSMAP 740/740s | Owner's Manual - Page 21
shallow water. • Select Off to view the land as seen from the water. Mariner's Eye 3D, Hazard Colors Off Mariner's Eye 3D, Hazard Colors On GPSMAP 700 Series Owner's Manual 17 - Garmin GPSMAP 740/740s | Owner's Manual - Page 22
Fish Eye 3D provides an underwater view of the sea floor or lake bottom. When a sonar transducer is connected, suspended targets (such as fish) are indicated by red, green, and yellow spheres. > Fish Eye 3D > Menu > View. 2. Select Fore, Aft, Port, or Starboard. 18 GPSMAP 700 Series Owner's Manual - Garmin GPSMAP 740/740s | Owner's Manual - Page 23
Showing a Sonar Cone on the Chart You can show a cone that indicates the area covered by your transducer. From the Home screen, select Charts > Fish Eye 3D > Menu > Sonar Cone > On. select Charts > Navigation Chart > Menu > Navigation Chart Setup > Photos. GPSMAP 700 Series Owner's Manual 19 - Garmin GPSMAP 740/740s | Owner's Manual - Page 24
. • A camera icon with a cone ( ) indicates a perspective photo. The photo was taken from the location of the camera, pointed in the direction of the cone. 3. Select Review > Aerial Photo. Note: Select and to zoom out and zoom in while viewing the aerial photo on the full screen. 20 - Garmin GPSMAP 740/740s | Owner's Manual - Page 25
best path to a destination, based on available BlueChart g2 Vision chart information. Auto Guidance is available when you navigate to a destination using Guide To (page 26). Configuring Auto Guidance Settings See "Auto Guidance Line Configurations" (page 45). GPSMAP 700 Series Owner's Manual 21 - Garmin GPSMAP 740/740s | Owner's Manual - Page 26
depends on the optional devices you have connected to your chartplotter, and whether you are using an optional BlueChart g2 settings as described in "Charts and 3D Chart Views" (page 4), "Radar" (page 54), or "Sonar" (page 71). Combination Screen Overlay Numbers 22 GPSMAP 700 Series Owner's Manual - Garmin GPSMAP 740/740s | Owner's Manual - Page 27
to show next-turn data based on time. • Select Destination, and select Distance, Time to Destination, or Arrival to indicate how the destination data appears. GPSMAP 700 Series Owner's Manual 23 - Garmin GPSMAP 740/740s | Owner's Manual - Page 28
Tape. Using Full-screen View You can view the content of any combination screen on the full chartplotter screen. 1. From the Home screen, select Combinations. 2. Select a combination. 3. Touch the screen Select Stop Panning to return to the Combination screen. 24 GPSMAP 700 Series Owner's Manual - Garmin GPSMAP 740/740s | Owner's Manual - Page 29
How do I make the chartplotter guide me along a straight line do I make the chartplotter guide me to a Chartplotter To navigate using a GPSMAP 700 series chartplotter, if your built-in map supports Fishing charts. Destinations You (page 30). • Select Offshore Services to view a list of marinas - Garmin GPSMAP 740/740s | Owner's Manual - Page 30
Select a destination using a chart or Where To? (page 25). 2. Select Navigate To > Guide To. 3. Review the course indicated by the magenta Auto Guidance line. Note: A gray line within any part of , select Charts. 2. Select Navigation Chart or Fishing Chart. 26 GPSMAP 700 Series Owner's Manual - Garmin GPSMAP 740/740s | Owner's Manual - Page 31
Home screen, select Man Overboard. An international MOB symbol marks the active MOB point and the chartplotter sets a course back to the marked location using the Go To feature. Viewing a List of . • Select Enter Coordinates, move the waypoint, and select Done. GPSMAP 700 Series Owner's Manual 27 - Garmin GPSMAP 740/740s | Owner's Manual - Page 32
Clear User Data > Waypoints > All. Copying Waypoints See "Chartplotter Data Management" (page 52). Routes You can create and or a BlueChart g2 SD card, or if your built-in map supports Fishing charts. 1. From the Home screen, select Charts. 2. Select Turn. ➌ ➋ 28 GPSMAP 700 Series Owner's Manual - Garmin GPSMAP 740/740s | Owner's Manual - Page 33
your boat. 8. Select Done when the route is complete. 9. Review the course indicated by the magenta line. 10. Follow the you want to make the next turn. 5. Select Add Turn. The chartplotter marks the position of the turn with a waypoint. 6. If necessary, list. GPSMAP 700 Series Owner's Manual 29 - Garmin GPSMAP 740/740s | Owner's Manual - Page 34
Route To. 7. Review the course indicated by the magenta line. 8. Follow the magenta line, steering to avoid land, shallow water, and other obstacles. Copying Routes See "Chartplotter Data Management" ( > On. A trailing line ➊ on the chart indicates your track. ➊ 30 GPSMAP 700 Series Owner's Manual - Garmin GPSMAP 740/740s | Owner's Manual - Page 35
• Select the time the active track began or Midnight, if shown. • Select Entire Log. 3. Review the course indicated by the colored line. 4. Follow the colored line, steering to avoid land, shallow memory is cleared, and the active track continues to be recorded. GPSMAP 700 Series Owner's Manual 31 - Garmin GPSMAP 740/740s | Owner's Manual - Page 36
Done. Copying Tracks See "Chartplotter Data Management" (page Guide To), if you are connected through a National Marine Electronics Association (NMEA) 2000 network to a compatible Garmin autopilot (such as the GHP™ 10), you are prompted to engage the autopilot. 32 GPSMAP 700 Series Owner's Manual - Garmin GPSMAP 740/740s | Owner's Manual - Page 37
To? > Offshore Services. 2. Select the marine service category to which you want to navigate. The chartplotter shows a list Select Go To. • Select Route To. • Select Guide To to use Auto Guidance. 5. Review the course indicated by the magenta line. Note: When GPSMAP 700 Series Owner's Manual 33 - Garmin GPSMAP 740/740s | Owner's Manual - Page 38
for saved waypoints, saved routes, saved tracks, and marine services destinations by name. 1. From the Home screen, select Where Select Go To. • Select Route To. • Select Guide To to use Auto Guidance. 5. Review the course indicated by the magenta line. Note: When 34 GPSMAP 700 Series Owner's Manual - Garmin GPSMAP 740/740s | Owner's Manual - Page 39
with your boat when you are off course. 5. Review the course indicated by the magenta line. 6. Follow with your boat when you are off course. 8. Review the course indicated by the magenta line. 9. Follow used when the track was created. 5. Review the course indicated by the colored line. 6. - Garmin GPSMAP 740/740s | Owner's Manual - Page 40
when the next high and low tides will occur. By default, the chartplotter shows tide information for the most-recently viewed tide station and for the 2. Select a station. 3. Complete an action: • Select Change Date > Manual to view tide information for a different date, enter the date, and select - Garmin GPSMAP 740/740s | Owner's Manual - Page 41
a specific date and time, including the current speed and level ➋. By default, the chartplotter shows current information for the most-recently viewed current station and for the present date and time • Select or to change the time in 4- to 5-minute intervals. GPSMAP 700 Series Owner's Manual 37 - Garmin GPSMAP 740/740s | Owner's Manual - Page 42
sun ➊ and moon ➋. By default, the chartplotter shows celestial information for the present date and 2. Complete an action: • Select Change Date > Manual to view information for a different date. Enter a date engine gauges. See the GPSMAP 700 Series Installation Instructions for details. From the - Garmin GPSMAP 740/740s | Owner's Manual - Page 43
engines for which information appears in the gauges. Selecting the Engines Shown in Gauges You must manually select the number of engines shown in the engine gauges (page 39) before you can select second, third, and fourth engine bar, as needed. 5. Select Back. GPSMAP 700 Series Owner's Manual 39 - Garmin GPSMAP 740/740s | Owner's Manual - Page 44
Environmental Data Viewing Fuel Gauges To view fuel information, your chartplotter must be connected to an external fuel sensor, such as the Garmin GFS™ 10. From the Home screen, select Information > the Home screen, select Information > Dashboard Gauges > Trip. 40 GPSMAP 700 Series Owner's Manual - Garmin GPSMAP 740/740s | Owner's Manual - Page 45
. Selecting True or Apparent Wind for the Wind Gauges The chartplotter must be connected to the peripheral devices listed below to capture sensor; or a air experienced while on a stationary boat. wind sensor and a GPS antenna. For the most-accurate data, the VMG Source setting should be set to Auto - Garmin GPSMAP 740/740s | Owner's Manual - Page 46
gauge. Magnetic heading is the heading data received from a heading sensor, and GPS heading is calculated by your chartplotter GPS (course over ground). 1. From the Home screen, select Information > Dashboard when the downwind close hauled wind gauge appears. 42 GPSMAP 700 Series Owner's Manual - Garmin GPSMAP 740/740s | Owner's Manual - Page 47
calculate the barometer trend. The trend is indicated in the barometer field. From the Home screen, select Information > Dashboard Gauges > Environment > Menu > Pressure Ref. Time. GPSMAP 700 Series Owner's Manual 43 - Garmin GPSMAP 740/740s | Owner's Manual - Page 48
not try to navigate using simulator mode because the GPS receiver is turned off. Any satellite signal strength chartplotter is turned off using , and power is removed and reapplied within less than two minutes, you may have to press to restart the chartplotter. 44 GPSMAP 700 Series Owner's Manual - Garmin GPSMAP 740/740s | Owner's Manual - Page 49
chartplotter beep only when alarms are triggered (default). • Select On (Touch and Alarms) to have the chartplotter the chartplotter. GPS speed is calculated from your GPS GPS Speed, or whether the chartplotter GPS Speed. Auto Guidance Line Configurations You can set the parameters the chartplotter - Garmin GPSMAP 740/740s | Owner's Manual - Page 50
influence how the chartplotter calculates an Auto depth (chart depth datum) the chartplotter uses when calculating an Auto Guidance line Navigate To > Guide To. 6. Review the placement of Near or Far in step 7, review the placement of the Auto As a result, the chartplotter may not reposition the - Garmin GPSMAP 740/740s | Owner's Manual - Page 51
10. If you selected Farthest or Nearest in step 9, review the placement of the Auto Guidance line. Determine whether the chartplotter to set the time zone automatically. • Select Time Zone > Custom Time Zone to set the time zone manually, enter the time zone hour adjustment, and select Done. GPSMAP - Garmin GPSMAP 740/740s | Owner's Manual - Page 52
receiving NMEA Sonar depth data or using an "S" series chartplotter (such as a GPSMAP 720s) with a built-in sounder to view depth and with data fields ➊ can appear on specific charts, 3D charts, radar views (page 66), and combination screens (page 22). The data GPSMAP 700 Series Owner's Manual - Garmin GPSMAP 740/740s | Owner's Manual - Page 53
that shows the bearing to the desired course appears while navigating. 1. From the Home screen, select Charts. 2. Select a chart or a 3D chart view. 3. Select Menu. GPSMAP 700 Series Owner's Manual 49 - Garmin GPSMAP 740/740s | Owner's Manual - Page 54
Configure > System > GPS. 2. Complete an , your chartplotter must be transducer, you can calibrate that speed-sensing device. 1. From the Home screen, select Configure > My Boat > Calibrate Water Speed. 2. Follow the on-screen instructions Garmin Product Support. 50 GPSMAP 700 Series Owner's Manual - Garmin GPSMAP 740/740s | Owner's Manual - Page 55
weather alarms. The chartplotter must be on for the alarms to work. NOTE: See the GPSMAP 700 Series XM Alarms Setting the Clock Alarm You can set an alarm using the system (GPS) clock. 1. From the Home screen, select Configure > Alarms > System . 3. Select Done. GPSMAP 700 Series Owner's Manual 51 - Garmin GPSMAP 740/740s | Owner's Manual - Page 56
the user-defined value. 1. From the Home screen, select Configure > Alarms > System > GPS Accuracy > On. 2. Enter the GPS location accuracy that triggers the alarm. 3. Select Done. Setting the Total Fuel Onboard Alarm The chartplotter must be connected to an external fuel sensor to capture fuel data - Garmin GPSMAP 740/740s | Owner's Manual - Page 57
Copy a backup file from the computer to the memory card, into a folder named Garmin\UserData. 3. Insert the memory card into the SD card slot on the chartplotter. 4. From the Home screen, select Information > User Data > Data Transfer > Card > Replace From Card. GPSMAP 700 Series Owner's Manual 53 - Garmin GPSMAP 740/740s | Owner's Manual - Page 58
reflected back to the radar. Transmitting Radar Signals 1. With the chartplotter off, connect your radar as described in the radar installation instructions. 2. Turn on the chartplotter. The radar warms up and a countdown out. Touch and to zoom out and zoom in. 54 GPSMAP 700 Series Owner's Manual - Garmin GPSMAP 740/740s | Owner's Manual - Page 59
image of the gathered radar information appears. Your position is in the center of the screen, and the range rings ➊ provide distance measurements. The distance between rings ➋ and the radar range ➌ are shown on the bottom of the screen. ➊ ➋ ➌ Cruising Mode GPSMAP 700 Series Owner's Manual 55 - Garmin GPSMAP 740/740s | Owner's Manual - Page 60
604 xHD, 606 xHD, 1204 xHD, or 1206 xHD radar. Note: If you switch from Sentry mode to Offshore mode, the radar switches to full-time transmission and disables all guard zones. Showing Offshore Mode From the Home screen, select Radar > Offshore. Offshore Mode 56 GPSMAP 700 Series Owner's Manual - Garmin GPSMAP 740/740s | Owner's Manual - Page 61
radar object enters this zone. Sentry mode works with all Garmin GMR model radars. Showing Sentry Mode From the Home screen, select Radar > Sentry. Enabling Timed Transmit From the Home screen, select Radar your boat. 1. From the Home screen, select Radar > Sentry > Menu > Sentry Setup > Adjust - Garmin GPSMAP 740/740s | Owner's Manual - Page 62
select Radar > radar view or the Radar Overlay, you can view and customize the appearance of a list of AIS threats. 1. From the Home screen, select Radar. 2. Select Cruising, Harbor, Offshore, Sentry, or Radar Overlay. 3. Select Menu > Other Vessels > AIS List. 58 GPSMAP 700 Series Owner's Manual - Garmin GPSMAP 740/740s | Owner's Manual - Page 63
the Home screen, select Radar. 2. Select Cruising, Harbor, or Offshore. 3. Select Menu > Adjust VRM/EBL > Move VRM/EBL. 4. Touch the target location. The range and the bearing to the target location appear in the upper-left corner of the screen. 5. Select Done. GPSMAP 700 Series Owner's Manual 59 - Garmin GPSMAP 740/740s | Owner's Manual - Page 64
save at least one route (page 28). Navigation lines must be showing in order to view a route on the Radar screen (page 68). 1. From the Home screen, select Where To? > Routes. 2. Select a route. 3. route was created. 5. From the Home screen, select Radar. 60 GPSMAP 700 Series Owner's Manual - Garmin GPSMAP 740/740s | Owner's Manual - Page 65
indicated. 9. Review the course Radar Overlay, the Radar Overlay would show Harbor mode radar data. If you changed the gain setting using the Radar Overlay menu, the gain setting for Harbor mode would change automatically. Radar Overlay on the Navigation Chart GPSMAP 700 Series Owner's Manual - Garmin GPSMAP 740/740s | Owner's Manual - Page 66
, the chartplotter aligns radar data with chart data based on the boat heading, which is based by default on data from a magnetic heading sensor connected using a NMEA 0183 or NMEA 2000 network. If a heading sensor is not available, the boat heading is based on GPS tracking data. GPS tracking data - Garmin GPSMAP 740/740s | Owner's Manual - Page 67
3. Select Menu > Gain > Auto. The chartplotter sets the gain automatically once based on average conditions, the range of the radar signal, and the selected radar mode. The chartplotter does not readjust the gain automatically in response to changing conditions. GPSMAP 700 Series Owner's Manual 63 - Garmin GPSMAP 740/740s | Owner's Manual - Page 68
the Radar Overlay (page 63). 1. From the Home screen, select Radar. 2. Select Cruising, Harbor, Offshore, or Sentry mode. 3. Select Menu > Noise Rejection > Sea Clutter > Presets. 4. Select a setting that reflects present sea conditions: Rough, Medium, or Calm. 64 GPSMAP 700 Series Owner's Manual - Garmin GPSMAP 740/740s | Owner's Manual - Page 69
settings configured for use in one radar mode may or may not be applied to other radar modes or to the Radar Overlay (page 63). 1. From the Home screen, select Radar. 2. Select Cruising, Harbor, Offshore, or Sentry mode. 3. Select Menu > Noise Rejection > FTC. GPSMAP 700 Series Owner's Manual 65 - Garmin GPSMAP 740/740s | Owner's Manual - Page 70
in each overlay. ➌ ➋ ➊ Radar with Data Overlay Selecting a Data Overlay 1. From the Home screen, select Radar. 2. Select Cruising, Harbor, Offshore, or Sentry mode. 3. Select Menu > Radar Setup > Overlay Numbers. 4. Select or to select a data overlay. 66 GPSMAP 700 Series Owner's Manual - Garmin GPSMAP 740/740s | Owner's Manual - Page 71
Up to set the top of the radar according to the heading data received from a heading sensor, also known as the magnetic heading. The heading line appears vertically on the screen. • Select Course Up to set the radar so the direction of navigation is always up. GPSMAP 700 Series Owner's Manual 67 - Garmin GPSMAP 740/740s | Owner's Manual - Page 72
Guide To, or Go To. This setting does not apply to the Radar Overlay. From the Home screen, select Radar > Radar Setup > Appearance > Nav Lines > Show. Radar xHD, 606 xHD, 1204 xHD, or 1206 xHD radars only. 1. From the Home screen, select Radar > Radar Setup > Rotation Spd. 2. Complete an action: • - Garmin GPSMAP 740/740s | Owner's Manual - Page 73
an optical bearing of a stationary target located within viewable range. 2. Measure the target bearing on the radar. 3. If the bearing deviation is more than +/- 1°, set the front-of-boat offset. Setting the the length of the track that appears using a trail. GPSMAP 700 Series Owner's Manual 69 - Garmin GPSMAP 740/740s | Owner's Manual - Page 74
the amount of detail shown on the map, at different zoom levels, for the Radar Overlay. 1. From the Home screen, select Charts > Radar Overlay > Menu > Setup > Chart Setup > Detail. 2. Select a level of until you reach the end of the heading line. 3. Select Done. 70 GPSMAP 700 Series Owner's Manual - Garmin GPSMAP 740/740s | Owner's Manual - Page 75
transducer, the following 700 series models can be used as fishfinders: • GPSMAP 720s • GPSMAP 740s • GPSMAP 750s Sonar Views The chartplotter Bottom ➎ Range ➏ GPS speed and GPS heading ➐ Transducer frequency Setting the Zoom Manual Zoom to set the depth range of the magnified area manually. - Garmin GPSMAP 740/740s | Owner's Manual - Page 76
zoom Sonar View ➊ Depth, water speed, and unit voltage ➋ ➌ GPS speed and GPS heading ➍ ➎ Range ➏ ➐ Transducer frequency Zoomed depth scale Zoom window Zoom window Split-frequency Sonar View 3. Select Menu > Change Sonar. 4. Select a different sonar view. 72 GPSMAP 700 Series Owner's Manual - Garmin GPSMAP 740/740s | Owner's Manual - Page 77
Log. Setting the Temperature Log Range and Time Scales You can indicate the amount of time and the range of temperatures that appear in the transducer temperature log. 1. From the Home screen, select Sonar > Temp Log. 2. Select Menu. GPSMAP 700 Series Owner's Manual 73 - Garmin GPSMAP 740/740s | Owner's Manual - Page 78
appears only when the scale setting is set to Auto. ➋ ➊ Transducer Temperature Log Waypoints on the Sonar Screen Pausing the Sonar Display 1. • Select Ultrascroll™, Fast, Medium, or Slow to set the scroll speed manually. • Select Auto to have the scroll speed automatically adjust to the water - Garmin GPSMAP 740/740s | Owner's Manual - Page 79
(if your transducer is capable), and navigation information to appear automatically on the Sonar screens. The navigation information always includes GPS speed and GPS heading, and includes to show suspended targets as symbols with target depth information. GPSMAP 700 Series Owner's Manual 75 - Garmin GPSMAP 740/740s | Owner's Manual - Page 80
to allow the chartplotter to adjust the gain automatically. • Select Up or Down to increase or decrease the gain manually. 5. Select Done frequencies appear on the sonar screen when using a dual frequency transducer. You can show data from a 200 kHz sonar signal, data GPSMAP 700 Series Owner's Manual - Garmin GPSMAP 740/740s | Owner's Manual - Page 81
the chartplotter to adjust the depth scale automatically. • Select Up or Down to increase or decrease the range of the depth scale manually. 5. Alarm You can set an alarm to sound when the transducer reports a temperature that is 2°F (1.1°C) above or below the GPSMAP 700 Series Owner's Manual 77 - Garmin GPSMAP 740/740s | Owner's Manual - Page 82
the transducer transducer: • If the transducer is installed at the water line ➊, measure the distance from the transducer transducer is installed at the bottom of the keel ➋, measure the distance from the transducer transducer transducer that is connected to the chartplotter chartplotter chartplotter - Garmin GPSMAP 740/740s | Owner's Manual - Page 83
details to your Garmin VHF radio (page 83). When you initiate a man-overboard distress call from your radio, the chartplotter shows the man call in the call list. Viewing the DSC List Your chartplotter must be connected to a VHF radio that supports DSC in order to view the DSC list. From the Home - Garmin GPSMAP 740/740s | Owner's Manual - Page 84
Maritime Mobile Service Identity (MMSI) of the vessel. 3. Select Done. 4. Enter the name of the vessel. 5. Select Done. Incoming Distress Calls If your Garmin chartplotter and VHF radio from your radio, see your Garmin VHF Radio Owner's Manual. You can mark an MOB and navigate to it (page 27). 80 - Garmin GPSMAP 740/740s | Owner's Manual - Page 85
Digital Selective Calling Position Tracking When you connect your Garmin chartplotter to a VHF radio using NMEA 0183, you can track vessels that send , select Information > Other Vessels > DSC List. 2. Select a position-report call. 3. Select Clear Report. GPSMAP 700 Series Owner's Manual 81 - Garmin GPSMAP 740/740s | Owner's Manual - Page 86
g2 SD card, or if your built-in map supports Fishing charts. ➋ ➊ ➌ Vessel Trail on the BlueChart g2 SD card, or if your built-in map supports Fishing charts. 1. From the Home screen, select Charts g2 SD card, or if your built-in map supports Fishing charts. 1. From the Home screen, select Charts - Garmin GPSMAP 740/740s | Owner's Manual - Page 87
map supports Fishing Review > Edit > Trail Line. 6. Select a color for the trail line. Individual Routine Calls When you connect your Garmin chartplotter to a Garmin chartplotter sends information about the call to the radio. 5. On your Garmin VHF radio, select Call. GPSMAP 700 Series Owner's Manual - Garmin GPSMAP 740/740s | Owner's Manual - Page 88
the chartplotter is turned off, press . The Warning screen appears. 2. Touch anywhere on the black portion of the screen for approximately 15 seconds until the calibration screen appears. 3. Follow the instructions on the screen until "Calibration is complete" appears. 4. Touch OK. 84 GPSMAP 700 - Garmin GPSMAP 740/740s | Owner's Manual - Page 89
system information to a memory card as a troubleshooting tool. A Garmin Product Support representative may ask you to use this information to retrieve data about the network. 1. Insert a memory card into the SD card slot on the chartplotter. 2. Select Configure > System > System Information > Save - Garmin GPSMAP 740/740s | Owner's Manual - Page 90
GPSMAP 700 Series Installation Instructions. Approved NMEA 0183 Sentences GPAPB, GPBOD, GPBWC, GPGGA, GPGLL, GPGSA, GPGSV, GPRMB, GPRMC, GPRTE, GPVTG, GPWPL, GPXTE, and Garmin proprietary sentencesPGRME, PGRMM, and PGRMZ. This chartplotter also includes support 86 GPSMAP 700 Series Owner's Manual - Garmin GPSMAP 740/740s | Owner's Manual - Page 91
you can better identify their location on the boat. To connect a GPSMAP 700 series chartplotter to an existing NMEA 2000 network and to see a list of supported NMEA 2000 PGN numbers, see the GPSMAP 700 Series Installation Instructions. Viewing a List of NMEA 2000 Network Devices You can view the - Garmin GPSMAP 740/740s | Owner's Manual - Page 92
network to negotiate with each other to determine which chartplotter will perform this function. Only one chartplotter on the NMEA 2000 network can bridge NMEA 0183 data over the NMEA 2000 bus at a time. • • All GPSMAP 700 series units are NMEA 2000 certified. 88 GPSMAP 700 Series Owner's Manual - Garmin GPSMAP 740/740s | Owner's Manual - Page 93
garmin.com. • Keep the original sales receipt, or a photocopy, in a safe place. Contacting Garmin Product Support Contact Garmin Product Support if you have any questions about this product: • In the USA, go to www.garmin.com/support, or contact Garmin country. GPSMAP 700 Series Owner's Manual 89 - Garmin GPSMAP 740/740s | Owner's Manual - Page 94
of tracks 6, 31 color scheme radar 67 sonar 76 combinations customizing 22 selecting 22 compass 41 compass roses 11 compass tape data bar 24, 49, 67 configuration, chartplotter 44 configure, button 3 contact information 6 sonar cone 19 suspended targets 19 tracks 19 GPSMAP 700 Series Owner's Manual - Garmin GPSMAP 740/740s | Owner's Manual - Page 95
radar type 63 side lobes 64 sonar 76 Garmin Product Support 89 gauges analog 39 digital 39 engine 38 limits 39 maximums 39 status alarms 39 trip 40 type 39 Go To 26, 33 GPS accuracy alarm 52 performance 84 signals 2 GPS performance 84 grid north 47 guard zone 57 Guide To 26, 33 H harbor mode - Garmin GPSMAP 740/740s | Owner's Manual - Page 96
89 product support 89 projected course 13 projected heading 14 R radar AIS 59 minimum 38 rear panel 1 registration 89 reset 86 Review 6 roses 11 rotating, 3D view 15 routes bypassing 69 fuel capacity 51 gain 63, 76 GPS 85 GPS accuracy 52 hazard colors 17 heading 47 GPSMAP 700 Series Owner's Manual - Garmin GPSMAP 740/740s | Owner's Manual - Page 97
sea clutter 64 service points 11 targets 75 views 71 whiteline 76 specifications 84 GPSMAP 700 Series Owner's Manual speed data 45 speed filter 50 speed sensor overboard 27 moving 27 navigating to 34 present location 26 radar 60 radar overlay, labeling 69 showing 60 sonar 74 tracked vessel 81 - Garmin GPSMAP 740/740s | Owner's Manual - Page 98
- Garmin GPSMAP 740/740s | Owner's Manual - Page 99
- Garmin GPSMAP 740/740s | Owner's Manual - Page 100
map data) throughout the life of your Garmin products, visit the Garmin Web site at www.garmin.com. November 2010 © 2010 Garmin Ltd. or its subsidiaries Garmin International, Inc. 1200 East 151st Street, Olathe, Kansas 66062, USA Garmin (Europe) Ltd. Liberty House, Hounsdown Business Park
-
 1
1 -
 2
2 -
 3
3 -
 4
4 -
 5
5 -
 6
6 -
 7
7 -
8
-
9
-
10
-
11
-
12
-
13
-
14
-
15
-
16
-
17
-
18
-
19
-
20
-
21
-
22
-
23
-
24
-
25
-
26
-
27
-
28
-
29
-
30
-
31
-
32
-
33
-
34
-
35
-
36
-
37
-
38
-
39
-
40
-
41
-
42
-
43
-
44
-
45
-
46
-
47
-
48
-
49
-
50
-
51
-
52
-
53
-
54
-
55
-
56
-
57
-
58
-
59
-
60
-
61
-
62
-
63
-
64
-
65
-
66
-
67
-
68
-
69
-
70
-
71
-
72
-
73
-
74
-
75
-
76
-
77
-
78
-
79
-
80
-
81
-
82
-
83
-
84
-
85
-
86
-
87
-
88
-
89
-
90
-
91
-
92
-
93
-
94
-
95
-
96
-
97
-
98
-
99
-
100
 |
 |

GPSMAP
®
700 series
owner’s manual