Garmin GPSMAP 740/740s Owner's Manual - Page 64
Waypoints and Routes on the Radar Screen, Drop VRM/EBL
 |
View all Garmin GPSMAP 740/740s manuals
Add to My Manuals
Save this manual to your list of manuals |
Page 64 highlights
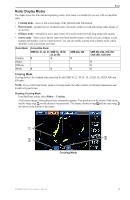
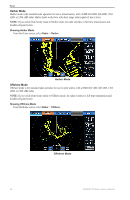
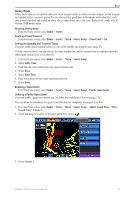
Radar Hiding the VRM and the EBL 1. From the Home screen, select Radar. 2. Select Cruising, Harbor, or Offshore. 3. Select Menu > Adjust VRM/EBL > Hide VRM/EBL. Measuring the Range and Bearing to a Target Object while VRM and EBL are Hidden If you have hidden VRM and EBL (page 60), you can quickly display the range and bearing to a location by touching the screen. 1. From the Home screen, select Radar. 2. Select Cruising, Harbor, or Offshore. 3. Touch a location. 4. Select Drop VRM/EBL. Measuring the Distance to a Point on the Radar Screen You can touch a point on the radar screen to display the distance and bearing of that location from your present location in the upper-left corner of the screen. 1. From the Home screen, select Radar. 2. Select Cruising, Harbor, or Offshore. 3. Touch a location on the screen. 4. Select Measure Distance. 5. If necessary, select Set Reference to measure from the selected location rather than your present location. Waypoints and Routes on the Radar Screen Marking a Waypoint on the Radar Screen 1. From the Home screen, select Radar. 2. Select a radar mode. 3. Touch a location. 4. Select Create Waypoint. Showing Waypoints on the Radar Screen You can show waypoints that are within the range shown on the Radar screen. This setting does not apply to the Radar Overlay. 1. From the Home screen, select Radar > Radar Setup > Appearance > Waypoints. 2. Complete an action: • Select Show to show all waypoints. • Select Navigation Only to show only waypoints associated with the currently active route. Hiding Waypoints on the Radar Screen You can hide waypoints that are within the range shown on the Radar screen. From the Home screen, select Radar > Radar Setup > Appearance > Waypoints > Select Hide. Navigating a Saved Route on the Radar Screen Before you can browse a list of routes and navigate to one of them, you must record and save at least one route (page 28). Navigation lines must be showing in order to view a route on the Radar screen (page 68). 1. From the Home screen, select Where To? > Routes. 2. Select a route. 3. Select Navigate To. 4. Complete an action: • Select Forward to navigate the route from the starting point used when the route was created. • Select Backward to navigate the route from the destination point used when the route was created. 5. From the Home screen, select Radar. 60 GPSMAP 700 Series Owner's Manual
-
 1
1 -
2
-
3
-
4
-
5
-
6
-
7
-
8
-
9
-
10
-
11
-
12
-
13
-
14
-
15
-
16
-
17
-
18
-
19
-
20
-
21
-
22
-
23
-
24
-
25
-
26
-
27
-
28
-
29
-
30
-
31
-
32
-
33
-
34
-
35
-
36
-
37
-
38
-
39
-
40
-
41
-
42
-
43
-
44
-
45
-
46
-
47
-
48
-
49
-
50
-
51
-
52
-
53
-
54
-
55
-
56
-
57
-
58
-
 59
59 -
 60
60 -
 61
61 -
 62
62 -
 63
63 -
 64
64 -
 65
65 -
 66
66 -
 67
67 -
 68
68 -
 69
69 -
70
-
71
-
72
-
73
-
74
-
75
-
76
-
77
-
78
-
79
-
80
-
81
-
82
-
83
-
84
-
85
-
86
-
87
-
88
-
89
-
90
-
91
-
92
-
93
-
94
-
95
-
96
-
97
-
98
-
99
-
100
 |
 |