Garmin GPSMAP 740/740s Owner's Manual - Page 71
Route Leg Details, Time to Destination
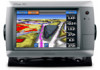 |
View all Garmin GPSMAP 740/740s manuals
Add to My Manuals
Save this manual to your list of manuals |
Page 71 highlights
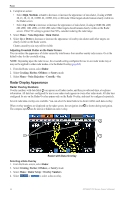
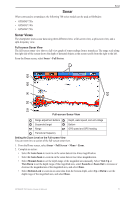
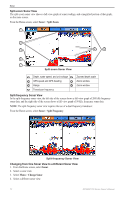
Radar Configuring Data Fields on a Radar You can select the type of data shown within a data field. 1. From the Home screen, select Radar. 2. Select Cruising, Harbor, Offshore, or Sentry mode. 3. Select Menu > Radar Setup > Overlay Numbers. 4. Select or to select a data overlay. 5. Touch a data field. 6. Select a category of data. 7. Select the data to be displayed. Configuring the Navigation Inset on the Radar Screen The navigation inset is shown only when the boat is navigating to a destination. 1. From the Home screen, select Radar. 2. Select Cruising, Harbor, Offshore, or Sentry mode. 3. Select Menu > Radar Setup > Overlay Numbers. 4. Select or to select a data overlay. 5. Select Navigation Inset. 6. Select Nav. Inset Config. 7. Complete an action: • Select Route Leg Details > On to show waypoint velocity made good (VMG) when navigating a route with more than one leg. • Select Next Turn > Distance to show next-turn data based on distance. • Select Next Turn > Time to show next-turn data based on time. • Select Destination, and select Distance, Time to Destination, or Arrival to indicate how the destination data appears. Showing the Compass Tape on the Radar Screen The compass tape appears in a row across the top of the radar screen. It shows the present heading, and an indicator that shows the bearing to the desired course appears while navigating. 1. From the Home screen, select Radar. 2. Select Cruising, Harbor, Offshore, or Sentry mode. 3. Select Menu > Radar Setup > Overlay Numbers. 4. Select Show Compass Tape. Radar Display Settings Setting the Radar Color Scheme You can set the color scheme used for all Radar screens. This setting does not apply to the Radar Overlay. 1. From the Home screen, select Radar > Radar Setup > Appearance > Color Scheme. 2. Select White, Black, or Blue. Setting the Radar Display Orientation You can set the perspective of the radar display. The orientation setting applies to every radar mode. This setting does not apply to the Radar Overlay. 1. From the Home screen, select Radar > Radar Setup > Orientation. 2. Complete an action: • Select North Up to set the top of the radar to a north heading. • Select Head Up to set the top of the radar according to the heading data received from a heading sensor, also known as the magnetic heading. The heading line appears vertically on the screen. • Select Course Up to set the radar so the direction of navigation is always up. GPSMAP 700 Series Owner's Manual 67
-
 1
1 -
2
-
3
-
4
-
5
-
6
-
7
-
8
-
9
-
10
-
11
-
12
-
13
-
14
-
15
-
16
-
17
-
18
-
19
-
20
-
21
-
22
-
23
-
24
-
25
-
26
-
27
-
28
-
29
-
30
-
31
-
32
-
33
-
34
-
35
-
36
-
37
-
38
-
39
-
40
-
41
-
42
-
43
-
44
-
45
-
46
-
47
-
48
-
49
-
50
-
51
-
52
-
53
-
54
-
55
-
56
-
57
-
58
-
59
-
60
-
61
-
62
-
63
-
64
-
65
-
 66
66 -
 67
67 -
 68
68 -
 69
69 -
 70
70 -
 71
71 -
 72
72 -
 73
73 -
 74
74 -
 75
75 -
 76
76 -
77
-
78
-
79
-
80
-
81
-
82
-
83
-
84
-
85
-
86
-
87
-
88
-
89
-
90
-
91
-
92
-
93
-
94
-
95
-
96
-
97
-
98
-
99
-
100
 |
 |