Gateway 510 Gateway 510-Series Computer User's Guide - Page 214
the system board documentation for further instructions.
 |
View all Gateway 510 manuals
Add to My Manuals
Save this manual to your list of manuals |
Page 214 highlights
Chapter 13: Upgrading Your Computer 6 Use a Phillips screwdriver to remove the eight motherboard screws. Screw Screw Screw Screw Screw Screw Screw Screw 7 Lift the system board up and out of the case. 8 Align the new system board on the standoffs and secure into the computer case with the screws. 9 Reconnect the power and data cables using your notes from Step 5. See the system board documentation for further instructions. 10 Reinstall the memory by following the instructions in "Installing memory" on page 207. 206 www.gateway.com
-
 1
1 -
2
-
3
-
4
-
5
-
6
-
7
-
8
-
9
-
10
-
11
-
12
-
13
-
14
-
15
-
16
-
17
-
18
-
19
-
20
-
21
-
22
-
23
-
24
-
25
-
26
-
27
-
28
-
29
-
30
-
31
-
32
-
33
-
34
-
35
-
36
-
37
-
38
-
39
-
40
-
41
-
42
-
43
-
44
-
45
-
46
-
47
-
48
-
49
-
50
-
51
-
52
-
53
-
54
-
55
-
56
-
57
-
58
-
59
-
60
-
61
-
62
-
63
-
64
-
65
-
66
-
67
-
68
-
69
-
70
-
71
-
72
-
73
-
74
-
75
-
76
-
77
-
78
-
79
-
80
-
81
-
82
-
83
-
84
-
85
-
86
-
87
-
88
-
89
-
90
-
91
-
92
-
93
-
94
-
95
-
96
-
97
-
98
-
99
-
100
-
101
-
102
-
103
-
104
-
105
-
106
-
107
-
108
-
109
-
110
-
111
-
112
-
113
-
114
-
115
-
116
-
117
-
118
-
119
-
120
-
121
-
122
-
123
-
124
-
125
-
126
-
127
-
128
-
129
-
130
-
131
-
132
-
133
-
134
-
135
-
136
-
137
-
138
-
139
-
140
-
141
-
142
-
143
-
144
-
145
-
146
-
147
-
148
-
149
-
150
-
151
-
152
-
153
-
154
-
155
-
156
-
157
-
158
-
159
-
160
-
161
-
162
-
163
-
164
-
165
-
166
-
167
-
168
-
169
-
170
-
171
-
172
-
173
-
174
-
175
-
176
-
177
-
178
-
179
-
180
-
181
-
182
-
183
-
184
-
185
-
186
-
187
-
188
-
189
-
190
-
191
-
192
-
193
-
194
-
195
-
196
-
197
-
198
-
199
-
200
-
201
-
202
-
203
-
204
-
205
-
206
-
207
-
208
-
 209
209 -
 210
210 -
 211
211 -
 212
212 -
 213
213 -
 214
214 -
 215
215 -
 216
216 -
 217
217 -
 218
218 -
 219
219 -
220
-
221
-
222
-
223
-
224
-
225
-
226
-
227
-
228
-
229
-
230
-
231
-
232
-
233
-
234
-
235
-
236
-
237
-
238
-
239
-
240
-
241
-
242
-
243
-
244
-
245
-
246
-
247
-
248
-
249
-
250
-
251
-
252
-
253
-
254
-
255
-
256
-
257
-
258
-
259
-
260
-
261
-
262
-
263
-
264
-
265
-
266
-
267
-
268
-
269
-
270
-
271
-
272
 |
 |

206
Chapter 13: Upgrading Your Computer
www.gateway.com
6
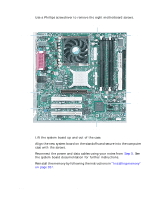
Use a Phillips screwdriver to remove the eight motherboard screws.
7
Lift the system board up and out of the case.
8
Align the new system board on the standoffs and secure into the computer
case with the screws.
9
Reconnect the power and data cables using your notes from
Step 5
. See
the system board documentation for further instructions.
10
Reinstall the memory by following the instructions in
“Installing memory”
on page 207
.
Screw
Screw
Screw
Screw
Screw
Screw
Screw
Screw