GE C1433 User Manual (c1433-usermanual-eng) - Page 65
Connecting to a PC
 |
UPC - 846951000191
View all GE C1433 manuals
Add to My Manuals
Save this manual to your list of manuals |
Page 65 highlights
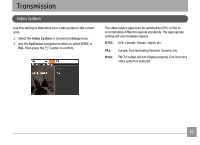
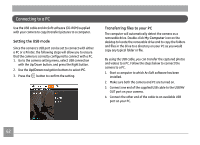
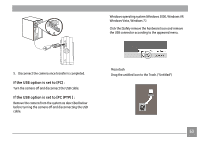
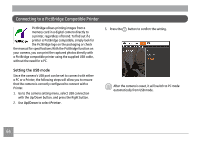
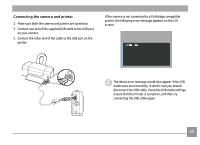
Connecting to a PC Use the USB cable and ArcSoft software (CD-ROM) supplied with your camera to copy (transfer) pictures to a computer. Setting the USB mode Since the camera's USB port can be set to connect with either a PC or a Printer, the following steps will allow you to ensure that the camera is correctly configured to connect with a PC. 1. Go to the camera setting menu, select USB connection with the Up/Down button, and press the Right button. 2. Use the Up/Down navigation buttons to select PC. 3. Press the button to confirm the setting. Transferring files to your PC The computer will automatically detect the camera as a removable drive. Double-click My Computer icon on the desktop to locate the removable drive and to copy the folders and files in the drive to a directory on your PC as you would copy any typical folder or file. By using the USB cable, you can transfer the captured photos and videos to a PC. Follow the steps below to connect the camera to a PC. 1. Start a computer to which ArcSoft software has been installed. 2. Make sure both the camera and PC are turned on. 3. Connect one end of the supplied USB cable to the USB/AV OUT port on your camera. 4. Connect the other end of the cable to an available USB port on your PC. 62
-
 1
1 -
2
-
3
-
4
-
5
-
6
-
7
-
8
-
9
-
10
-
11
-
12
-
13
-
14
-
15
-
16
-
17
-
18
-
19
-
20
-
21
-
22
-
23
-
24
-
25
-
26
-
27
-
28
-
29
-
30
-
31
-
32
-
33
-
34
-
35
-
36
-
37
-
38
-
39
-
40
-
41
-
42
-
43
-
44
-
45
-
46
-
47
-
48
-
49
-
50
-
51
-
52
-
53
-
54
-
55
-
56
-
57
-
58
-
59
-
 60
60 -
 61
61 -
 62
62 -
 63
63 -
 64
64 -
 65
65 -
 66
66 -
 67
67 -
 68
68 -
 69
69 -
 70
70 -
71
-
72
-
73
-
74
-
75
-
76
-
77
-
78
-
79
-
80
-
81
 |
 |
