GE GFDS140GDWW Owners Manual - Page 21
Installing The Stack Bracket Kit
 |
View all GE GFDS140GDWW manuals
Add to My Manuals
Save this manual to your list of manuals |
Page 21 highlights
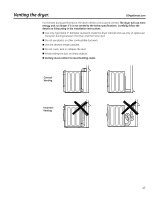
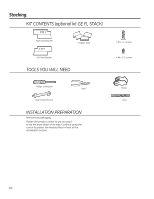
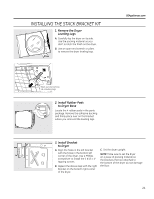
INSTALLING THE STACK BRACKET KIT 1. Remove the Dryer Leveling Legs A. Carefully lay the dryer on its side. Use the packing material so you don't scratch the finish on the dryer. B. Use an open-end wrench or pliers to remove the dryer leveling legs. GEAppliances.com Back out and remove all 4 leveling legs 2. Install Rubber Pads to Dryer Base Locate the 4 rubber pads in the parts package. Remove the adhesive backing and firmly place over on the bracket where you removed the leveling legs. 3. Install Bracket to Dryer A. Align the holes in the left bracket with the holes in the bottom left corner of the dryer. Use a Phillips screwdriver to install the 2 #12 x 1s tapping screws. B. Repeat the above step with the right bracket on the bottom right corner of the dryer. C. Set the dryer upright. NOTE: Make sure to set the dryer on a piece of packing material so the brackets that are attached to the bottom of the dryer do not damage the floor. 21
-
 1
1 -
2
-
3
-
4
-
5
-
6
-
7
-
8
-
9
-
10
-
11
-
12
-
13
-
14
-
15
-
 16
16 -
 17
17 -
 18
18 -
 19
19 -
 20
20 -
 21
21 -
 22
22 -
 23
23 -
 24
24 -
 25
25 -
 26
26 -
27
-
28
-
29
-
30
-
31
-
32
-
33
-
34
-
35
-
36
-
37
-
38
-
39
-
40
-
41
-
42
-
43
-
44
-
45
-
46
-
47
-
48
-
49
-
50
-
51
-
52
-
53
-
54
-
55
-
56
-
57
-
58
-
59
-
60
 |
 |
