GE JS900 Installation Instructions - Page 12
Installing The Range
 |
View all GE JS900 manuals
Add to My Manuals
Save this manual to your list of manuals |
Page 12 highlights
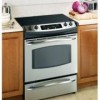
Installation Instructions Installing The Range cont. 11 SLIDE RANGE INTO OPENING A Position the range in front of the cabinet opening. B Make sure that the glass which overhangs the countertop clears the countertop. If necessary, raise the unit by lowering the leveling legs. C Push while lifting the range into the opening, until the range is within 2" of engaging the anti-tip bracket. D Remove the protective trim from the side of glass (if provided). E Using the adjustable pliers or wrench, carefully screw in the back leveling leg until the glass overhang comes to rest on the countertop. 11 SLIDE RANGE INTO OPENING (cont.) H Plug the range cord into the receptacle. Locate the cord in the back of the range in a manner that it will not touch or be moved by the drawer. Position range cord so that there is no interference with storage drawer STORAGE DRAWER Adjustable wrench or pliers F Then carefully screw in the front two leveling legs (similar to E) until the glass overhang touches the countertop. G Carefully push the range into the opening until the countertop fully engages the control panel. The back glass overhang should cover the cutout opening. 12 FINAL CHECK OF THE ANTI-TIP BRACKET When installation is complete and the range is in place, check to be sure that the rear leveling leg is fully inserted into the slot of the Anti-Tip Bracket. Countertop Make sure the edge of the countertop fits flush against the end of the Front Control Panel 12
-
 1
1 -
2
-
3
-
4
-
5
-
6
-
 7
7 -
 8
8 -
 9
9 -
 10
10 -
 11
11 -
 12
12 -
 13
13 -
 14
14 -
 15
15 -
 16
16 -
 17
17 -
18
-
19
-
20
 |
 |
