GE JS900 Installation Instructions - Page 6
Standard Installation
 |
View all GE JS900 manuals
Add to My Manuals
Save this manual to your list of manuals |
Page 6 highlights
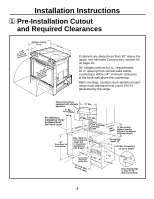
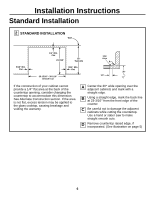
Installation Instructions Standard Installation 2 STANDARD INSTALLATION Wall 9/16" Min. Flat 1/4" Min. Flat 23-3/16" 25" Typically 9/16" Min. Flat 29-15/16"- 30-1/16" Smooth Cut Flat Area R 36" 1/4" If the construction of your cabinet cannot provide a 1/4" flat area at the back of the countertop opening, consider changing the countertop to accommodate this dimension. See Alternate Construction section. If the area is not flat, excess tension may be applied to the glass cooktop, causing breakage and voiding the warranty. A Center the 30" wide opening over the adjacent cabinets and mark with a straight edge. B Using a straight edge, mark the back line at 23-3/16" from the front edge of the counter. C Be careful not to damage the adjacent cabinets while cutting the countertop. Use a hand or saber saw to make straight smooth cuts. D Remove countertop raised edge, if incorporated. (See illustration on page 5) 6
-
 1
1 -
 2
2 -
 3
3 -
 4
4 -
 5
5 -
 6
6 -
 7
7 -
 8
8 -
 9
9 -
 10
10 -
 11
11 -
 12
12 -
13
-
14
-
15
-
16
-
17
-
18
-
19
-
20
 |
 |
