GE PS968SPSS Use and Care Manual - Page 27
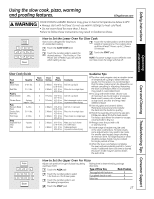
Using the slow cook, pizza, warming, and proofing features., How to Set the Lower Oven For Slow Cook
 |
UPC - 084691197546
View all GE PS968SPSS manuals
Add to My Manuals
Save this manual to your list of manuals |
Page 27 highlights
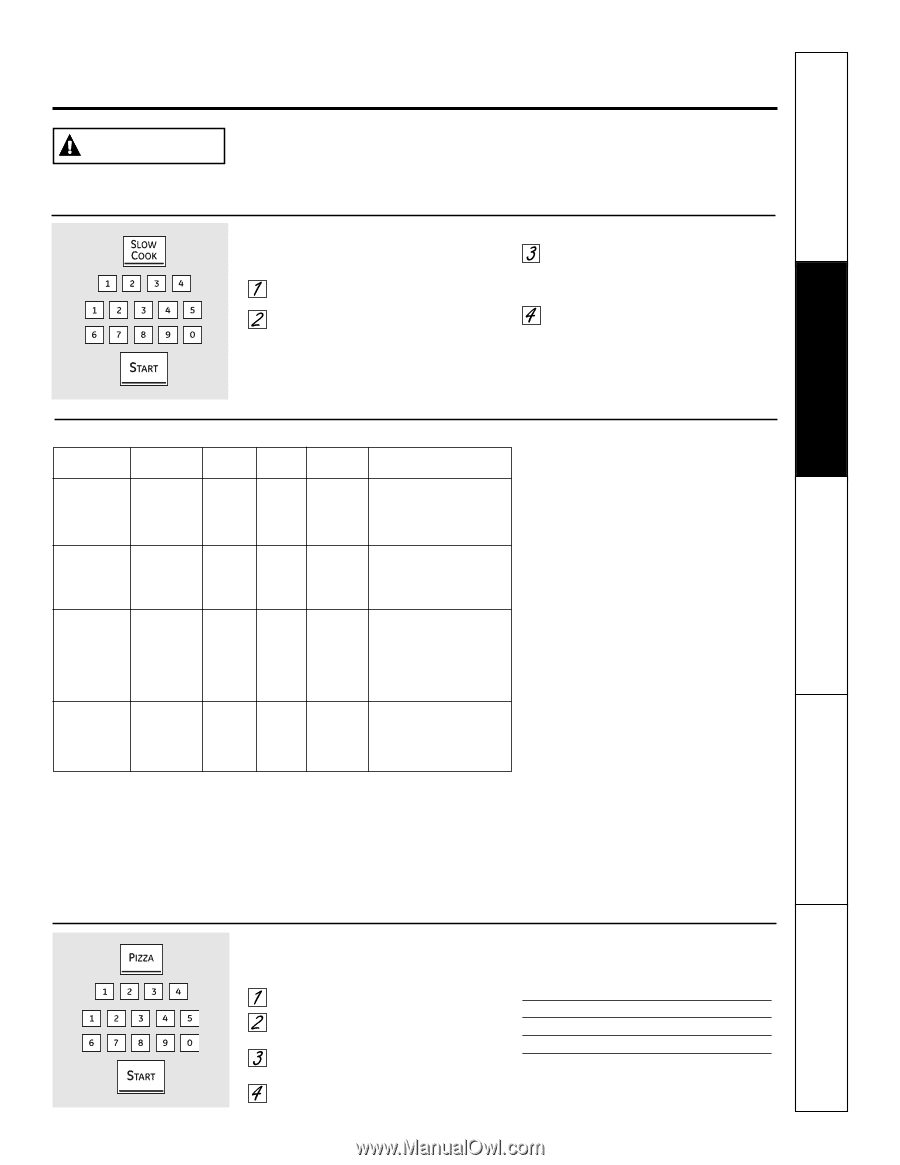
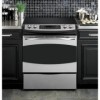
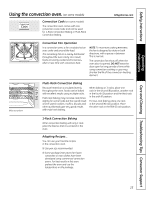
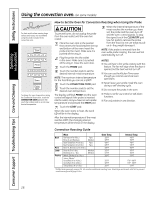
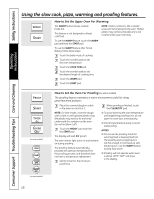
Safety Instructions Using the slow cook, pizza, warming and proofing features. GEAppliances.com WARNING FOOD POISON HAZARD: Bacteria may grow in food at temperatures below 140°F. • Always start with hot food. Do not use warm settings to heat cold food. • Do not warm food for more than 2 hours. Failure to follow these instructions may result in foodborne illness. How to Set the Lower Oven For Slow Cook Slow Cook is designed for long hours of unattended cooking. Touch the SLOW COOK pad. Touch the number pads to set the desired length of cooking time. The cooking time must be at least 3 hours, up to 11 hours 59 minutes. Touch the number pads to select the desired setting - 1 for Poultry or 2 for Meats. Use 2-Meats if you are unsure which setting to use. Touch the START pad. NOTE: If a power outage occurs while the oven is in Slow Cook, the range will shut off. Operating Instructions Care and Cleaning Troubleshooting Tips Consumer Support Slow Cook Guide Food Beef Chuck Roast Quantity 3-31⁄2 lbs. Beef Ribs 31⁄2-4 lbs. Poultry Whole Chicken 4 lbs. Chicken Pieces Pork Boneless Blade Roast Country Style Pork Ribs Pork Chops 8 pieces (approx. 3 lbs.) 3-4 lbs. 31⁄2-4 lbs. 4-8 lbs. Soup Vegetable Beef Soup Chili 4 quarts 4 quarts Rack Position C C C C C C C C C Food Time Setting (Hours) Comments 2-Meats HI 5-6 hrs. Add 1/2 cup liquid. LO 8-10 hrs. 2-Meats HI 3-4 hrs. Place ribs in a single layer. LO 6-8 hrs. 1-Poultry 1-Poultry HI 4-5 hrs. LO 7-9 hrs. HI 3-4 hrs. LO 5-6 hrs. Add 1/2 cup liquid. Best submerged under a sauce to prevent surface drying. 2-Meats 2-Meats 2-Meats HI 5-6 hrs. LO 8-10 hrs. HI 3-4 hrs. LO 6-8 hrs. HI 3-4 hrs. LO 6-8 hrs. Add 1/2-1 cup liquid. Place ribs in a single layer. Place chops in a single layer. 2-Meats HI 4-5 hrs. Make sure beef chunks LO 8-10 hrs. are submerged. 2-Meats HI 3-4 hrs. Submerge beans LO 6-8 hrs. to prevent surface drying. Guideline Tips s The slow cook program uses a complex series of temperature cycling to obtain the best results. For this reason, it is recommended that the slow cook program be allowed to run without cancelling or restarting. Restarting the slow cook feature while it is in progress may result in overcooked meat. s For juicy and tender meat, choose cuts of meat such as chuck roast or a boneless blade roast. Leaner cuts of meat, such as top round, are drier and may need additional liquid. s Use only glass and ceramic dishes. Metal pots and pans tend to transfer the heat into the foods too quickly. s Match the quantity of food to the size pan. Fill the pan about 3/4 full for best results. Too large a pot allows the steam to escape, causing foods to dry out. s Always cover the pot with a lid or aluminum foil. s A wide range of recipes may be used in the slow cook feature. For best results some adjustments may need to be made. For smaller sized recipes, begin checking at minimum time. For large recipes or when doubling recipes, foods may be cooked for longer periods of time. s When the slow cook feature completes, the oven will automatically switch to "warm" mode. If additional slow cook time is desired, this warm mode may be used to obtain the extra time. How to Set the Upper Oven For Pizza Adjust rack position for type of pizza tray being Baking time is determined by package used (see chart). directions. Touch the PIZZA pad. Type of Pizza Tray Rack Position Touch the number pads to select 1 for fresh or 2 for frozen pizza. Touch the number pads to set the baking temperature. Tray supplied with fresh pizza B Pizza placed directly on rack B Metal tray A Touch the START pad. 27
-
 1
1 -
2
-
3
-
4
-
5
-
6
-
7
-
8
-
9
-
10
-
11
-
12
-
13
-
14
-
15
-
16
-
17
-
18
-
19
-
20
-
21
-
 22
22 -
 23
23 -
 24
24 -
 25
25 -
 26
26 -
 27
27 -
 28
28 -
 29
29 -
 30
30 -
 31
31 -
 32
32 -
33
-
34
-
35
-
36
-
37
-
38
-
39
-
40
-
41
-
42
-
43
-
44
-
45
-
46
-
47
-
48
-
49
-
50
-
51
-
52
-
53
-
54
-
55
-
56
-
57
-
58
-
59
-
60
-
61
-
62
-
63
-
64
-
65
-
66
-
67
-
68
-
69
-
70
-
71
-
72
-
73
-
74
-
75
-
76
-
77
-
78
-
79
-
80
-
81
-
82
-
83
-
84
-
85
-
86
-
87
-
88
-
89
-
90
-
91
-
92
-
93
-
94
-
95
-
96
-
97
-
98
-
99
-
100
-
101
-
102
-
103
-
104
 |
 |