GE PS968SPSS Use and Care Manual - Page 34
WARNING, CAUTION, Using the warming drawer.
 |
UPC - 084691197546
View all GE PS968SPSS manuals
Add to My Manuals
Save this manual to your list of manuals |
Page 34 highlights
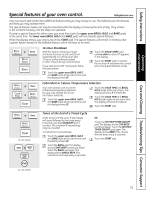
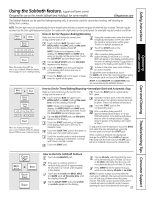
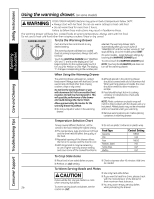
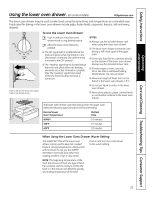
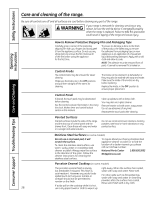
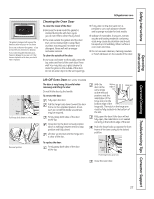
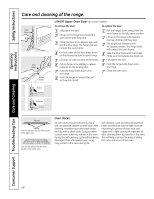
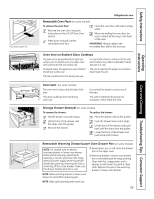
Safety Instructions Using the warming drawer. (on some models) Operating Instructions Consumer Support Troubleshooting Tips Care and Cleaning WARNING FOOD POISON HAZARD: Bacteria may grow in food at temperatures below 140°F. • Always start with hot food. Do not use warm settings to heat cold food. • Do not warm food for more than 2 hours. Failure to follow these instructions may result in foodborne illness. The warming drawer will keep hot, cooked foods at serving temperature. Always start with hot food. Do not use to heat cold food other than crisping crackers, chips or dry cereal. WARMING DRAWER To Use the Warming Drawer Push and turn the control knob to any desired setting. The warming drawer will keep hot, cooked foods at serving temperature. Always start with hot food. Touch the WARMING DRAWER pad. "WARMER ON" and "1" are lit on the display and "Set" begins to blink. On the number pads, touch 1 for Low, 2 for Medium or 3 for High. The display "1" changes corresponding to the number pad selected. The warming drawer starts automatically after you touch 1, 2 or 3. "WARMER ON" and the number remain lit. "Set" stops blinking. On some models press START. On some models - toggle between settings by touching the WARMING DRAWER pad. To cancel, touch the WARMING DRAWER pad. NOTE: Touching the CLEAR/OFF pad does not turn off the warming drawer. When Using the Warming Drawer The warming drawer will keep hot, cooked foods warm. Always start with hot food. Do not use to heat cold food other than crisping crackers, chips or dry cereal. Do not line the warming drawer or pan with aluminum foil. Foil is an excellent heat insulator and will trap heat beneath it. This will upset the performance of the drawer and could damage the interior finish. Allow approximately 25 minutes for the warming drawer to preheat. s Do not put liquid or water in the warming drawer. s All foods placed in the warming drawer should be covered with a lid or aluminum foil. When warming pastries or breads, the cover should be vented to allow moisture to escape. s Food should be kept hot in its cooking container or transferred to a heat-safe serving dish. NOTE: Plastic containers or plastic wrap will melt if in direct contact with the drawer, pan or a hot utensil. Melted plastic may not be removable and is not covered under your warranty. s Remove serving spoons, etc., before placing containers in warming drawer. Temperature Selection Chart To keep several different foods hot, set the control to the food needing the highest setting. s The temperature, type and amount of food, and the time held will affect the quality of the food. s Repeated opening of the drawer allows the hot air to escape and the food to cool. s With large loads it may be necessary to use a higher warming drawer setting and cover some of the cooked food items. s Do not use plastic containers or plastic wrap. Food Type Casserole Chili Pizza Potatoes, baked Tortilla Chips Waffles Control Setting MED/2 HI/3 MED/2 HI/3 LO/1 LO/1 To Crisp Stale Items s Place food in low-sided dishes or pans. s Preheat on LO/1 setting. s Check crispness after 45 minutes. Add time as needed. To Warm Serving Bowls and Plates CAUTION s Use only heat-safe dishes. s If you want to heat fine china, please check Dishes will be hot. Use pot holders or mitts when removing hot dishes. with the manufacturer of the dishes for their maximum heat tolerance. s You may warm empty serving dishes 34 To warm serving bowls and plates, set the control on LO/1. while preheating the drawer.
-
 1
1 -
2
-
3
-
4
-
5
-
6
-
7
-
8
-
9
-
10
-
11
-
12
-
13
-
14
-
15
-
16
-
17
-
18
-
19
-
20
-
21
-
22
-
23
-
24
-
25
-
26
-
27
-
28
-
 29
29 -
 30
30 -
 31
31 -
 32
32 -
 33
33 -
 34
34 -
 35
35 -
 36
36 -
 37
37 -
 38
38 -
 39
39 -
40
-
41
-
42
-
43
-
44
-
45
-
46
-
47
-
48
-
49
-
50
-
51
-
52
-
53
-
54
-
55
-
56
-
57
-
58
-
59
-
60
-
61
-
62
-
63
-
64
-
65
-
66
-
67
-
68
-
69
-
70
-
71
-
72
-
73
-
74
-
75
-
76
-
77
-
78
-
79
-
80
-
81
-
82
-
83
-
84
-
85
-
86
-
87
-
88
-
89
-
90
-
91
-
92
-
93
-
94
-
95
-
96
-
97
-
98
-
99
-
100
-
101
-
102
-
103
-
104
 |
 |