GE PS968SPSS Use and Care Manual - Page 38
Consumer Support, Troubleshooting Tips, Operating, Instructions, Safety Instructions
 |
UPC - 084691197546
View all GE PS968SPSS manuals
Add to My Manuals
Save this manual to your list of manuals |
Page 38 highlights
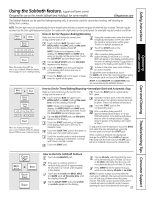
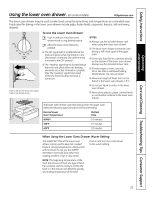
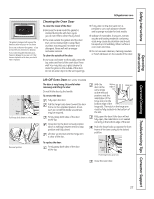
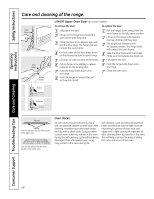
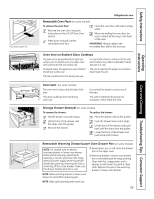
Safety Instructions Operating Instructions Care and cleaning of the range. Oven frame Door frame Release buttons Lift-Off Upper Oven Door (on some models) To remove the door: To replace the door: Fully open the door. Lift up on the hinge lock toward the oven frame until they stop. Close the door to 45 degrees (you will feel the door stop). The hinge lock will contact the oven frame. On both sides of the door, press down on the release buttons on each hinge. Lift door up until it is clear of the hinge. Pull the hinges down away from the oven frame to the fully open position. Lift up on the hinge locks toward the oven frame until they stop. The hinges will release to the 45-degree position. The hinge locks will contact the oven frame. Slide the door back onto the hinges. Make sure the buttons pop back out. Fully open the door. Pull on hinge arms slightly to relieve pressure on the locking tabs. Push the hinge locks down onto the hinge. Push the hinges in toward the unit so they are closed. Push the hinge locks down onto the hinge. Close the oven door. Push in Pull down Flat rack Handles Use the rack with the two front handles in the upper oven. Use the rack without the two front handles in the lower oven. Oven Racks All oven racks may be cleaned by hand with an abrasive cleaner or steel wool. After cleaning, rinse the racks with clean water and dry with a clean cloth. Gray porcelaincoated oven racks may remain in the oven during the self-cleaning cycle without being damaged. The nickel-plated oven racks may remain in the oven during the self-cleaning cycle, but they will lose their luster and become hard to slide. It will be necessary to grease all oven rack side edges with a light coating of vegetable oil after cleaning them by hand or in the oven. This will help maintain the ease of sliding the racks in and out of the oven. Consumer Support Troubleshooting Tips Care and Cleaning 38
-
 1
1 -
2
-
3
-
4
-
5
-
6
-
7
-
8
-
9
-
10
-
11
-
12
-
13
-
14
-
15
-
16
-
17
-
18
-
19
-
20
-
21
-
22
-
23
-
24
-
25
-
26
-
27
-
28
-
29
-
30
-
31
-
32
-
 33
33 -
 34
34 -
 35
35 -
 36
36 -
 37
37 -
 38
38 -
 39
39 -
 40
40 -
 41
41 -
 42
42 -
 43
43 -
44
-
45
-
46
-
47
-
48
-
49
-
50
-
51
-
52
-
53
-
54
-
55
-
56
-
57
-
58
-
59
-
60
-
61
-
62
-
63
-
64
-
65
-
66
-
67
-
68
-
69
-
70
-
71
-
72
-
73
-
74
-
75
-
76
-
77
-
78
-
79
-
80
-
81
-
82
-
83
-
84
-
85
-
86
-
87
-
88
-
89
-
90
-
91
-
92
-
93
-
94
-
95
-
96
-
97
-
98
-
99
-
100
-
101
-
102
-
103
-
104
 |
 |