GE PFSS6PKXSS Use and Care Manual - Page 28
Caution, Remove The Refrigerator Doors, Cont. - water inside
 |
UPC - 084691172420
View all GE PFSS6PKXSS manuals
Add to My Manuals
Save this manual to your list of manuals |
Page 28 highlights
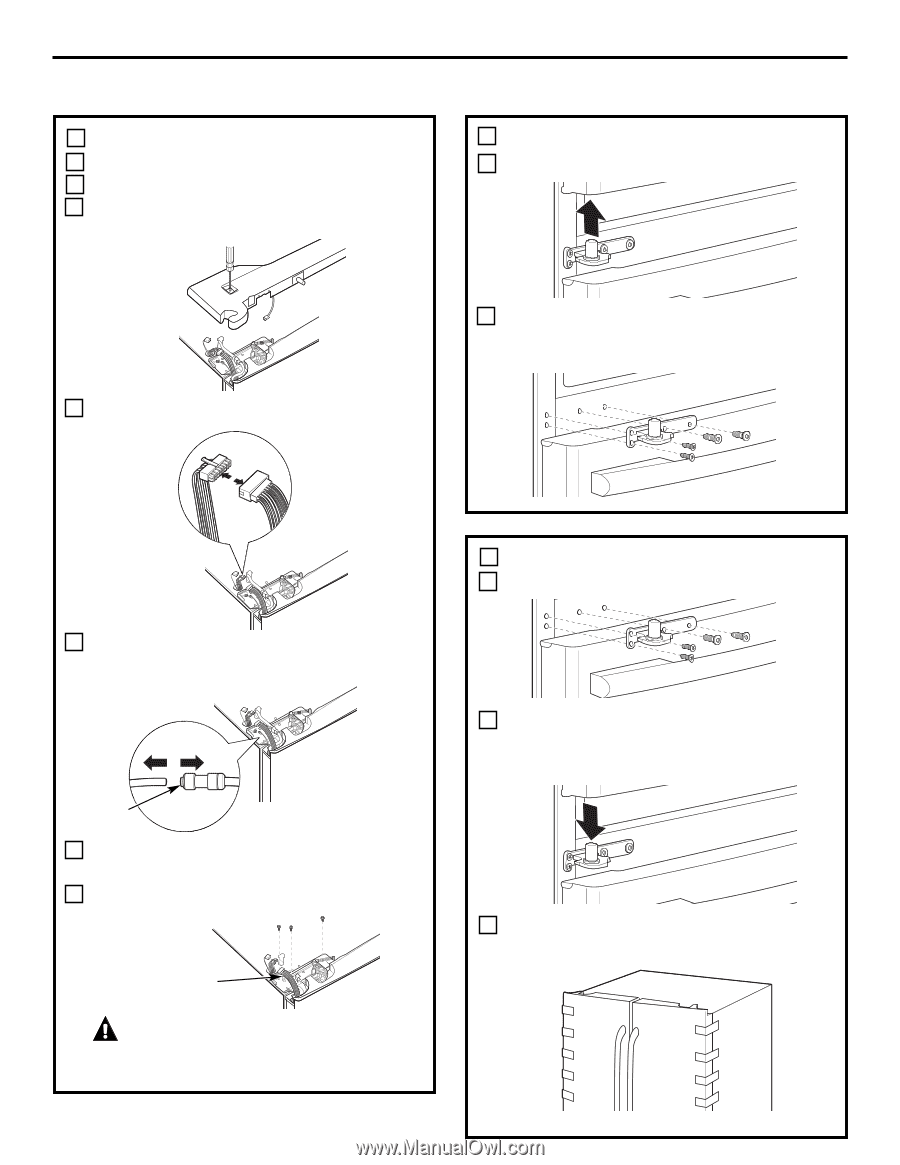
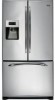
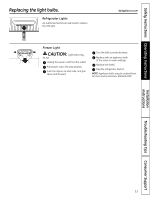
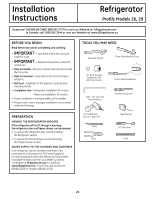
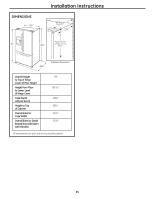
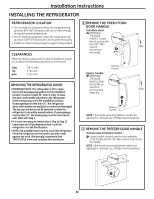
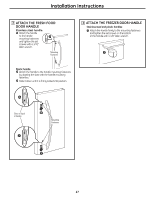
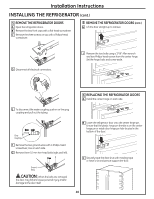
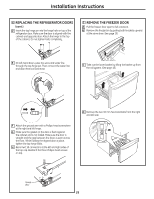
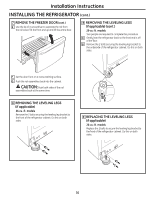
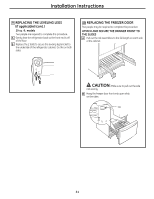
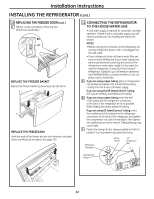
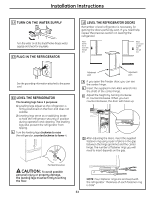
Installation Instructions INSTALLING THE REFRIGERATOR (cont.) 5 REMOVE THE REFRIGERATOR DOORS A Open the refrigerator doors. B Remove the two front caps with a flat-head screwdriver. C Remove the three screws on top with a Phillips-head screwdriver. 5 REMOVE THE REFRIGERATOR DOORS (cont.) H Lift the door straight up to remove. D Disconnect all electrical connectors. I Remove the two bolts using a 3/16″ Allen wrench and two Phillips-head screws from the center hinge. Set the hinge, bolts and screw aside. 6 REPLACING THE REFRIGERATOR DOORS A Install the center hinge on each side. E To disconnect the water coupling, push in on the gray coupling and pull out the tubing. Gray Coupling F Remove the two ground wires with a Phillips-head screwdriver, one on each side. G Remove three 10 mm hex-head bolts (right and left). Ground Wire CAUTION: When the bolts are removed, the door may fall and cause personal injury and/or damage to the door itself. B Lower the refrigerator door onto the center hinge pin. Ensure that the plastic hinge pin thimble is on the center hinge pin or inside door hinge pin hole located in the bottom of the door. C Securely tape the door shut with masking tape or have a second person support the door. 28
-
 1
1 -
2
-
3
-
4
-
5
-
6
-
7
-
8
-
9
-
10
-
11
-
12
-
13
-
14
-
15
-
16
-
17
-
18
-
19
-
20
-
21
-
22
-
 23
23 -
 24
24 -
 25
25 -
 26
26 -
 27
27 -
 28
28 -
 29
29 -
 30
30 -
 31
31 -
 32
32 -
 33
33 -
34
-
35
-
36
-
37
-
38
-
39
-
40
-
41
-
42
-
43
-
44
-
45
-
46
-
47
-
48
-
49
-
50
-
51
-
52
-
53
-
54
-
55
-
56
-
57
-
58
-
59
-
60
-
61
-
62
-
63
-
64
-
65
-
66
-
67
-
68
-
69
-
70
-
71
-
72
-
73
-
74
-
75
-
76
-
77
-
78
-
79
-
80
-
81
-
82
-
83
-
84
-
85
-
86
-
87
-
88
-
89
-
90
-
91
-
92
-
93
-
94
-
95
-
96
-
97
-
98
-
99
-
100
-
101
-
102
-
103
-
104
-
105
-
106
-
107
-
108
-
109
-
110
-
111
-
112
-
113
-
114
-
115
-
116
-
117
-
118
-
119
-
120
-
121
-
122
-
123
-
124
-
125
-
126
-
127
-
128
-
129
-
130
-
131
-
132
-
133
-
134
-
135
-
136
-
137
-
138
-
139
-
140
 |
 |