GE PFSS6PKXSS Use and Care Manual - Page 32
Connecting The Refrigerator, To The House Water Line, Replacing The Freezer Door, Cont. - filter
 |
UPC - 084691172420
View all GE PFSS6PKXSS manuals
Add to My Manuals
Save this manual to your list of manuals |
Page 32 highlights
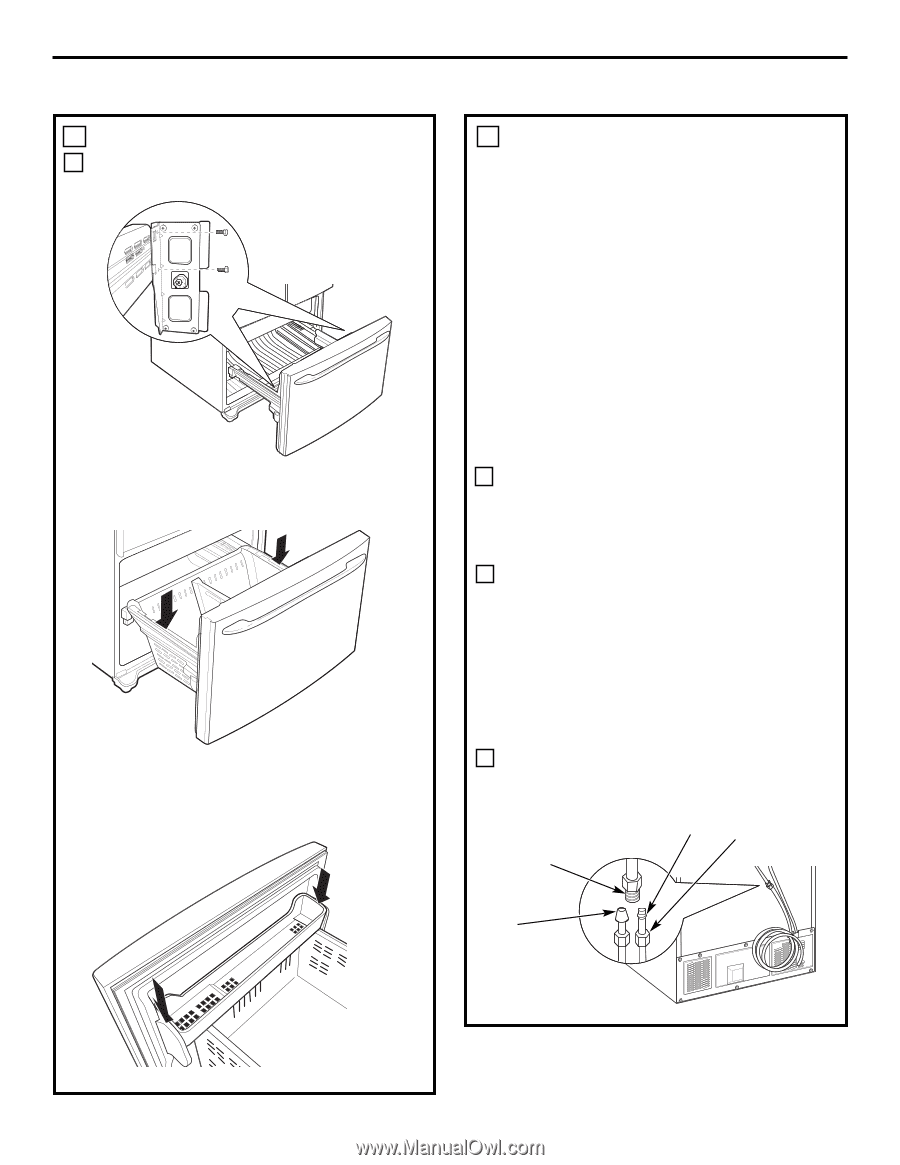
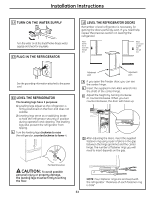
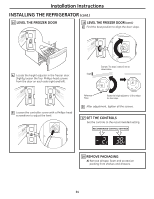
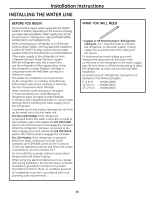
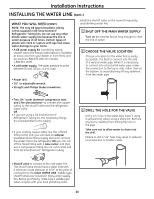
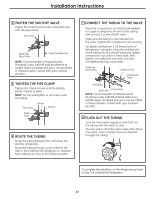
Installation Instructions INSTALLING THE REFRIGERATOR (cont.) 10 REPLACING THE FREEZER DOOR (cont.) C Tighten screws completely. (There are four 10 mm hex-head bolts.) REPLACE THE FREEZER BASKET Replace the freezer basket by lowering it into the frame. REPLACE THE FREEZER BIN Hook the ends of the freezer bin into both brackets, and push down until they lock into place. (See page 19.) 11 CONNECTING THE REFRIGERATOR TO THE HOUSE WATER LINE A cold water supply is required for automatic icemaker operation. If there is not a cold water supply, you will need to provide one. See Installing the Water Line section. NOTES: • Before making the connection to the refrigerator, be sure the refrigerator power cord is not plugged into the wall outlet. • If your refrigerator does not have a water filter, we recommend installing one if your water supply has sand or particles that could clog the screen of the refrigerator's water valve. Install it in the water line near the refrigerator. If using GE SmartConnect™ Refrigerator Tubing Kit, you will need an additional tube (WX08X10002) to connect the filter. Do not cut plastic tube to install filter. A If you are using copper tubing, place a compression nut and ferrule (sleeve) onto the end of the tubing coming from the house cold water supply. If you are using the GE SmartConnect™ tubing, the nuts are already assembled to the tubing. B If you are using copper tubing, insert the end of the tubing into the refrigerator connection, at the back of the refrigerator, as far as possible. While holding the tubing, tighten the fitting. If you are using GE SmartConnect™ tubing, insert the molded end of the tubing into the refrigerator connection, at the back of the refrigerator, and tighten the compression nut until it is hand tight. Then tighten one additional turn with a wrench. Overtightening may cause leaks. C Fasten the tubing into the clamp provided to hold it in position. You may need to pry open the clamp. Refrigerator Connection Ferrule (sleeve) 1/4″ Compression Nut SmartConnect™ Tubing 32
-
 1
1 -
2
-
3
-
4
-
5
-
6
-
7
-
8
-
9
-
10
-
11
-
12
-
13
-
14
-
15
-
16
-
17
-
18
-
19
-
20
-
21
-
22
-
23
-
24
-
25
-
26
-
 27
27 -
 28
28 -
 29
29 -
 30
30 -
 31
31 -
 32
32 -
 33
33 -
 34
34 -
 35
35 -
 36
36 -
 37
37 -
38
-
39
-
40
-
41
-
42
-
43
-
44
-
45
-
46
-
47
-
48
-
49
-
50
-
51
-
52
-
53
-
54
-
55
-
56
-
57
-
58
-
59
-
60
-
61
-
62
-
63
-
64
-
65
-
66
-
67
-
68
-
69
-
70
-
71
-
72
-
73
-
74
-
75
-
76
-
77
-
78
-
79
-
80
-
81
-
82
-
83
-
84
-
85
-
86
-
87
-
88
-
89
-
90
-
91
-
92
-
93
-
94
-
95
-
96
-
97
-
98
-
99
-
100
-
101
-
102
-
103
-
104
-
105
-
106
-
107
-
108
-
109
-
110
-
111
-
112
-
113
-
114
-
115
-
116
-
117
-
118
-
119
-
120
-
121
-
122
-
123
-
124
-
125
-
126
-
127
-
128
-
129
-
130
-
131
-
132
-
133
-
134
-
135
-
136
-
137
-
138
-
139
-
140
 |
 |