GE PFSS6PKXSS Use and Care Manual - Page 35
Installing the Water Line, BEFORE YOU BEGIN, WHAT YOU WILL NEED - codes
 |
UPC - 084691172420
View all GE PFSS6PKXSS manuals
Add to My Manuals
Save this manual to your list of manuals |
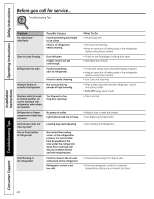
Page 35 highlights
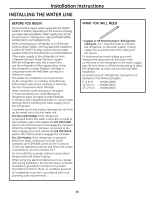
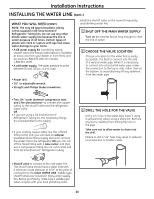
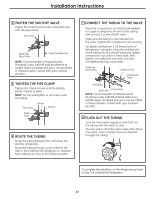
Installation Instructions INSTALLING THE WATER LINE BEFORE YOU BEGIN Recommended copper water supply kits are WX8X2, WX8X3 or WX8X4, depending on the amount of tubing you need. Approved plastic water supply lines are GE SmartConnect™ Refrigerator Tubing (WX08X10006, WX08X10015 and WX08X10025). When connecting your refrigerator to a GE Reverse Osmosis Water System, the only approved installation is with a GE RVKit. For other reverse osmosis water systems, follow the manufacturer's recommendations. If the water supply to the refrigerator is from a Reverse Osmosis Water Filtration System AND the refrigerator also has a water filter, use the refrigerator's filter bypass plug. Using the refrigerator's water filtration cartridge in conjunction with the MWF filter can result in hollow ice cubes. This water line installation is not warranted by the refrigerator or icemaker manufacturer. Follow these instructions carefully to minimize the risk of expensive water damage. Water hammer (water banging in the pipes) in house plumbing can cause damage to refrigerator parts and lead to water leakage or flooding. Call a qualified plumber to correct water hammer before installing the water supply line to the refrigerator. To prevent burns and product damage, do not hook up the water line to the hot water line. For Non-LCD Models: If the refrigerator is operated before the water connection is made to the icemaker, press and release the ICE OFF/LOCK pad on the control panel to disengage the icemaker. When the refrigerator has been connected to the water supply, press and release the ICE OFF/LOCK pad on the control panel to engage the icemaker. For LCD Models: If the refrigerator is operated before the water connection is made to the icemaker, see ICEMAKER under Screen Functions of the LCD Operations section and follow the screen commands to turn the icemaker OFF. Do not install the icemaker tubing in areas where temperatures fall below freezing. When using any electrical device (such as a power drill) during installation, be sure the device is double insulated or grounded in a manner to prevent the hazard of electric shock, or is battery powered. All installations must be in accordance with local plumbing code requirements. WHAT YOU WILL NEED • Copper or GE SmartConnect™ Refrigerator Tubing kit, 1/4″ outer diameter to connect the refrigerator to the water supply. If using copper, be sure both ends of the tubing are cut square. To determine how much tubing you need: measure the distance from the water valve on the back of the refrigerator to the water supply pipe. Be sure there is sufficient extra tubing to allow the refrigerator to move out from the wall after installation. GE SmartConnect™ Refrigerator Tubing Kits are available in the following lengths: 6′ (1.8 m) - WX08X10006 15′ (4.6 m) - WX08X10015 25′ (7.6 m) - WX08X10025 35
-
 1
1 -
2
-
3
-
4
-
5
-
6
-
7
-
8
-
9
-
10
-
11
-
12
-
13
-
14
-
15
-
16
-
17
-
18
-
19
-
20
-
21
-
22
-
23
-
24
-
25
-
26
-
27
-
28
-
29
-
 30
30 -
 31
31 -
 32
32 -
 33
33 -
 34
34 -
 35
35 -
 36
36 -
 37
37 -
 38
38 -
 39
39 -
 40
40 -
41
-
42
-
43
-
44
-
45
-
46
-
47
-
48
-
49
-
50
-
51
-
52
-
53
-
54
-
55
-
56
-
57
-
58
-
59
-
60
-
61
-
62
-
63
-
64
-
65
-
66
-
67
-
68
-
69
-
70
-
71
-
72
-
73
-
74
-
75
-
76
-
77
-
78
-
79
-
80
-
81
-
82
-
83
-
84
-
85
-
86
-
87
-
88
-
89
-
90
-
91
-
92
-
93
-
94
-
95
-
96
-
97
-
98
-
99
-
100
-
101
-
102
-
103
-
104
-
105
-
106
-
107
-
108
-
109
-
110
-
111
-
112
-
113
-
114
-
115
-
116
-
117
-
118
-
119
-
120
-
121
-
122
-
123
-
124
-
125
-
126
-
127
-
128
-
129
-
130
-
131
-
132
-
133
-
134
-
135
-
136
-
137
-
138
-
139
-
140
 |
 |