Gigabyte GA-K8N Pro Sil3512 SATARAID O.S. Installation Manual - Page 4
First Boot Device, Advanced BIOS Features, CDROM, Hard Disk Boot Priority
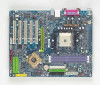 |
View all Gigabyte GA-K8N Pro manuals
Add to My Manuals
Save this manual to your list of manuals |
Page 4 highlights
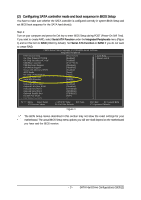
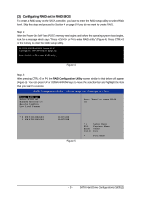
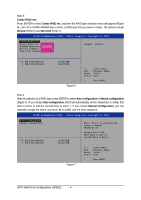
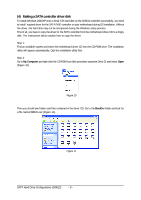
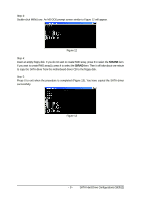
Ác Step 2: Select Hard Disk Boot Priority under the Advanced BIOS Features menu and then choose the model of the SATA hard drive onto which you want to install Microsoft Windows 2000/XP (Figure 2). CMOS Setup Utility-Copyright (C) 1984-2004 Award Software Hard Disk Boot Priority 1. SCSI-0 : 02:68-0 ST3120026AS 2. Bootable Add-in Cards Item Help Menu Level }} Use or to select a device, then press to move it up, or to move it down the list. Press to exit this menu. hi: Move PU/PD/+/-: Change Priority F10: Save ESC: Exit Figure 2 Step 3: Set First Boot Device under the Advanced BIOS Features menu to CDROM to boot from CD-ROM after system restarts (Figure 3). CMOS Setup Utility-Copyright (C) 1984-2004 Award Software Advanced BIOS Features } Hard Disk Boot Priority First Boot Device Second Boot Device Third Boot Device Boot Up Floopy Seek Password Check Flexible AGP 8X Init Display First [Press Enter] [CDROM] [Hard Disk] [CDROM] [Disabled] [Setup] [Auto] [AGP] Item Help Menu Level} higf: Move Enter: Select F5: Previous Values +/-/PU/PD: Value F10: Save F6: Fail-Safe Defaults Figure 3 ESC: Exit F1: General Help F7: Optimized Defaults Step 4: Save and exit BIOS Setup. SATA Hard Drive Configurations (Sil3512) - 4 -
-
 1
1 -
 2
2 -
 3
3 -
 4
4 -
 5
5 -
 6
6 -
 7
7 -
 8
8 -
 9
9 -
 10
10 -
11
-
12
 |
 |
