Gigabyte GA-K8N Pro Sil3512 SATARAID O.S. Installation Manual - Page 7
SATA Hard Drive Configurations Sil3512
 |
View all Gigabyte GA-K8N Pro manuals
Add to My Manuals
Save this manual to your list of manuals |
Page 7 highlights
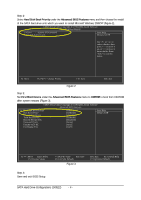
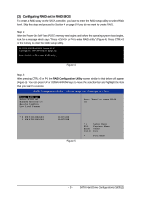
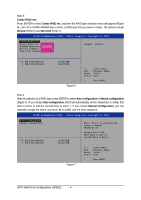
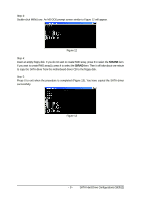
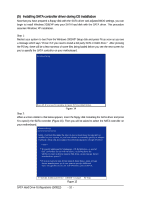
Step 5: After finishing all the settings of a RAID set and press ENTER, you should see a dialog box which says "Are You Sure?" Press Y to proceed with the RAID set creation and then configuration is completed. The lower-left screen lists the detailed RAID set information, such as: RAID type, chunk size, RAID volume name, and volume size (Figure 8). RAID Co nfigu ratio n Utility - Silicon Im age Inc. Copy right (C) 2003 Create RAID set Delete RAID set Rubuild Mirrored set Resolve Conflicts Low Level Format Striped = RAID 0 * 0 PM ST3120026AS 1 SM ST3120026AS * Set0 SiI Striped Set 0 ST3120026AS 1 ST3120026AS 114473MB 114473MB 228943MB Chunk size 16K Chunk size 16K Figure 8 hi ESC Enter Ctrl-E Select Menu Previous Menu Select Exit * First HDD If you want to remove one or more RAID sets, select Delete RAID set item (Figure 9) in main menu. Press ENTER and follow the on-screen instructions to delete the RAID set. RAID Co nfigu ratio n Utility - Silicon Im age Inc. Copy right (C) 2003 Create RAID set Delete RAID set Rubuild Mirrored set Resolve Conflicts Low Level Format Press "Enter" to delete a RAID set * 0 PM ST3120026AS 1 SM ST3120026AS * Set0 SiI Striped Set 0 ST3120026AS 1 ST3120026AS 114473MB 114473MB 228943MB Chunk size 16K Chunk size 16K Figure 9 hi ESC Enter Ctrl-E Select Menu Previous Menu Select Exit * First HDD While the configuration is completed, press CTRL+E to exit the RAID Configuration Utility. Then, you can proceed to the installation of the SATA driver and operating system. - 7 - SATA Hard Drive Configurations (Sil3512)
-
 1
1 -
 2
2 -
 3
3 -
 4
4 -
 5
5 -
 6
6 -
 7
7 -
 8
8 -
 9
9 -
 10
10 -
 11
11 -
 12
12
 |
 |
