Gigabyte GA-K8N Pro Sil3512 SATARAID O.S. Installation Manual - Page 5
Configuring RAID set in RAID BIOS
 |
View all Gigabyte GA-K8N Pro manuals
Add to My Manuals
Save this manual to your list of manuals |
Page 5 highlights
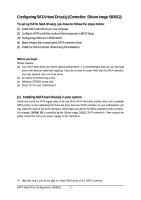
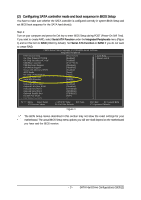
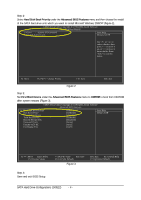
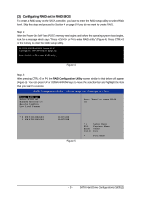
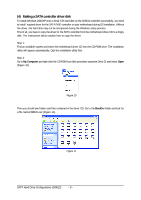
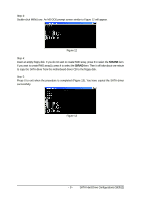
(3) Configuring RAID set in RAID BIOS To create a RAID array on the SATA controller, you have to enter the RAID setup utility to select RAID level. Skip this step and proceed to Section 4 on page 8 if you do not want to create RAID. Step 1: After the Power-On Self-Test (POST) memory test begins and before the operating system boot begins, look for a message which says "Press or F4 to enter RAID utility" (Figure 4). Press CTRL+S or the F4 key to enter the RAID setup utility. SiI 3512A SATARaid BIOS Version 4.3.47 Copyright (C) 1997-2004 Silicon Image, Inc. Press or F4 to enter RAID utility_ Figure 4 Step 2: After pressing CTRL+S or F4, the RAID Configuration Utility screen similar to that below will appear (Figure 5). You can press UP or DOWN ARROW keys to move the selection bar and highlight the item that you want to execute. RAID Co nfigu ratio n Utility - Silicon Im age Inc. Copy right (C) 2003 Create RAID set Delete RAID set Rubuild Mirrored set Resolve Conflicts Low Level Format Press "Enter" to create RAID set * 0 PM ST3120026AS 1 SM ST3120026AS 114473MB 114473MB Figure 5 hi ESC Enter Ctrl-E Select Menu Previous Menu Select Exit * First HDD - 5 - SATA Hard Drive Configurations (Sil3512)
-
 1
1 -
 2
2 -
 3
3 -
 4
4 -
 5
5 -
 6
6 -
 7
7 -
 8
8 -
 9
9 -
 10
10 -
 11
11 -
12
 |
 |
