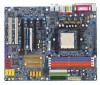
Gigabyte GA-K8N ULTRA-SLI User Manual - Page 20
Enabling SLI Mode - windows 7
 |
View all Gigabyte GA-K8N ULTRA-SLI manuals
Add to My Manuals
Save this manual to your list of manuals |
Page 20 highlights
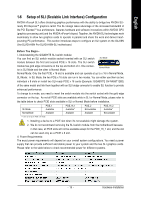
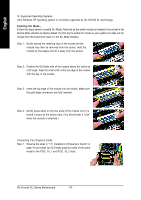
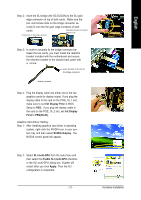
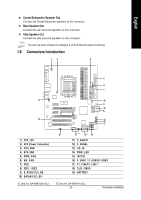
English III. Supported Operating Systems: Only Windows XP operating system is currrently supported by the NVIDIA SLI technology. Enabling SLI Mode-Follow the steps below to enable SLI Mode. Note that as the switch module is inserted in the socket in the Normal Mode direction by factory default, the first step to enable SLI mode on your system is to take out the module from the socket and insert it in the SLI Mode direction. Step 1: Gently spread the retaining clips of the socket and the module may then be removed from the socket. Hold the module by the edges and lift it away from the socket. Step 2: Position the SLI Mode side of the module above the socket at a 25o angle. Align the small notch at the top edge of the module with the key in the socket. Step 3: Insert the top edge of the module into the socket. Make sure the gold edge connectors are fully inserted. Step 4: Gently press down on the two ends of the module until it is locked in place by the socket clips. (You should hear a "click" when the module is attached.) Connecting Two Graphics Cards: Step 1: Observe the steps in "1-5 Installation of Expansion Cards" on page 16 and install two SLI-ready graphics cards of the same model to the PCIE_16_1 and PCIE_16_2 slots. K8 nForce4 SLI Series Motherboard - 20 -
-
 1
1 -
2
-
3
-
4
-
5
-
6
-
7
-
8
-
9
-
10
-
11
-
12
-
13
-
14
-
 15
15 -
 16
16 -
 17
17 -
 18
18 -
 19
19 -
 20
20 -
 21
21 -
 22
22 -
 23
23 -
 24
24 -
 25
25 -
26
-
27
-
28
-
29
-
30
-
31
-
32
-
33
-
34
-
35
-
36
-
37
-
38
-
39
-
40
-
41
-
42
-
43
-
44
-
45
-
46
-
47
-
48
-
49
-
50
-
51
-
52
-
53
-
54
-
55
-
56
-
57
-
58
-
59
-
60
-
61
-
62
-
63
-
64
-
65
-
66
-
67
-
68
-
69
-
70
-
71
-
72
-
73
-
74
-
75
-
76
-
77
-
78
-
79
-
80
-
81
-
82
-
83
-
84
-
85
-
86
-
87
-
88
 |
 |
