Gigabyte GA-K8N ULTRA-SLI User Manual - Page 21
NVIDIA Display, SLI multi-GPU, Enable SLI multi-GPU, Apply, Init Display First, Init Display, First - 9 drivers
 |
View all Gigabyte GA-K8N ULTRA-SLI manuals
Add to My Manuals
Save this manual to your list of manuals |
Page 21 highlights
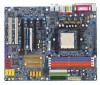
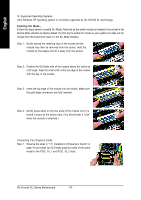
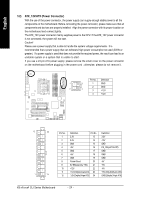
English Step 2: Insert the SLI bridge (the GC-SLICON) to the SLI gold edge connector on top of both cards. Make sure the two mini female slots on the bridge connector se- curely fit onto the SLI gold edge connetors of both cards. Female slots on the bridge connector Gold edge connector on the top of graphics card Step 3: In order to securely fix the bridge connector between the two cards, you must install the retention bracket included with the motherboard and secure the retention bracket to the chassis back panel with a screw. place this part on the top of the bridge connector. retention bracket Step 4: Plug the display cable into either one of the two graphics cards for display output. If you plug the display cable to the card on the PCIE_16_1 slot, make sure to set Init Display First in BIOS Setup to PEG; if you plug the display cable to the card on the PCIE_16_2 slot, set Init Display First to PEG(Slot2). Graphics Card Driver Setting: Step 1: After installing graphics card driver in operating system, right-click the NVIDIA icon in your system tray and then select NVIDIA Display. The NVIDIA control panel will appear. Step 2: Select SLI multi-GPU from the side menu and then select the Enable SLI multi-GPU checkbox in the SLI multi-GPU dialog box. System will restart after you click Apply. Then the SLI configuration is completed. - 21 - Hardware Installation
-
 1
1 -
2
-
3
-
4
-
5
-
6
-
7
-
8
-
9
-
10
-
11
-
12
-
13
-
14
-
15
-
 16
16 -
 17
17 -
 18
18 -
 19
19 -
 20
20 -
 21
21 -
 22
22 -
 23
23 -
 24
24 -
 25
25 -
 26
26 -
27
-
28
-
29
-
30
-
31
-
32
-
33
-
34
-
35
-
36
-
37
-
38
-
39
-
40
-
41
-
42
-
43
-
44
-
45
-
46
-
47
-
48
-
49
-
50
-
51
-
52
-
53
-
54
-
55
-
56
-
57
-
58
-
59
-
60
-
61
-
62
-
63
-
64
-
65
-
66
-
67
-
68
-
69
-
70
-
71
-
72
-
73
-
74
-
75
-
76
-
77
-
78
-
79
-
80
-
81
-
82
-
83
-
84
-
85
-
86
-
87
-
88
 |
 |
