Harman Kardon AVR 630 Owners Manual
Harman Kardon AVR 630 Manual
 |
View all Harman Kardon AVR 630 manuals
Add to My Manuals
Save this manual to your list of manuals |
Harman Kardon AVR 630 manual content summary:
- Harman Kardon AVR 630 | Owners Manual - Page 1
® Power for the Digital Revolution.® AVR 630 AUDIO/VIDEO RECEIVER OWNER'S MANUAL - Harman Kardon AVR 630 | Owners Manual - Page 2
Renaming 49 Resetting the Remote 50 Troubleshooting Guide 50 Processor Reset 51 Technical Specifications See trademark acknowledgements on page 51. Typographical Conventions In order to help you use this manual with the remote control, front-panel controls and rear-panel connections, certain - Harman Kardon AVR 630 | Owners Manual - Page 3
, including Dolby* Digital, Dolby Digital EX, Dolby Pro Logic* II, DTS,® DTS-ES® Discrete and Matrix, DTS Neo:6® and DTS 96/24 ■ Seven channels of high-current, ultrawide bandwidth amplification with the surround back channels assignable to either main room or remote room use ■ Harman Kardon - Harman Kardon AVR 630 | Owners Manual - Page 4
Voltage Before Use Your AVR 630 has been designed for use with 120-volt AC current. Connection to a line voltage other than that for which it is intended can create a safety and fire hazard and may damage the unit. If you have any questions about the voltage requirements for your specific model, or - Harman Kardon AVR 630 | Owners Manual - Page 5
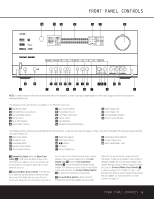
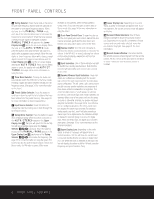
To make it easier to follow the instructions that refer to this illustration, a larger copy may be downloaded from the Product Support section for this product at www.harmankardon.com. The following controls and indicators are available on the AVR 630's front panel: 1 Standby/On Switch 2 Surround - Harman Kardon AVR 630 | Owners Manual - Page 6
, gently pull the door down and towards you using either upper corner of the door. ) Volume Control: Turn this knob clockwise to increase the volume, counterclockwise to decrease the volume. If the AVR 630 is muted, adjusting the volume control will automatically release the unit from the silenced - Harman Kardon AVR 630 | Owners Manual - Page 7
apply power to the AVR 630. When the switch is pressed in, the unit is placed in a Standby mode, as indicated by the amber illumination surrounding the Standby/On Switch 1. This button MUST be pressed in to operate the unit. To turn the unit off and prevent the use of the remote control, this switch - Harman Kardon AVR 630 | Owners Manual - Page 8
, output and speaker connections, all connection jacks and terminals are color-coded in conformance with the CEA standards as follows: Front Left: White Front Right: Red Center: Green Surround Left: Surround Right: Surround Back Left: Surround Back Right: Subwoofer: Digital Audio: Composite - Harman Kardon AVR 630 | Owners Manual - Page 9
Port: This jack may be used to control the AVR 630 over a bi-directional RS-232 serial control link to a compatible computer or programmable remote control system. Due to the complexity of programming RS-232 commands we strongly recommend that connections to this port for control purposes be made by - Harman Kardon AVR 630 | Owners Manual - Page 10
may be used. Connect the output of the sensor to this jack. h Remote IR Output: This connection permits the IR sensor in the receiver to serve other remote controlled devices. Connect this jack to the "IR IN" jack on Harman Kardon (or other compatible) equipment. i Coaxial Digital Audio Output - Harman Kardon AVR 630 | Owners Manual - Page 11
remote is reserved for future use. Do not remove the plug provided or connect any device to the jack. • To make it easier to follow the instructions that refer to this illustration, a larger copy may be downloaded from the Product Support section for this product at www.harmankardon.com. AVR 630 - Harman Kardon AVR 630 | Owners Manual - Page 12
factory to operate the AVR 630 and most Harman Kardon CD or DVD players and cassette decks. The remote is also capable of operating a wide variety of other products using the control codes that are part of the remote. Before using the remote with other products, follow the instructions on pages 40 - Harman Kardon AVR 630 | Owners Manual - Page 13
in specially encoded Dolby Digital sources, and it preserves dialogue (center channel) intelligibility at low volume levels. U OSD Button: Press this button to activate or turn off the On-Screen Display (OSD) system used to set up or adjust the AVR 630's parameters. V Tone Control Button: This - Harman Kardon AVR 630 | Owners Manual - Page 14
then follow the instructions as displayed in the LCD display. (For complete information, see page 26.) j EzSet Microphone Sensor: The microphone sensor that is used by the EzSet system is behind the three slots at the top of the remote control. When using EzSet to calibrate the AVR 630, be certain - Harman Kardon AVR 630 | Owners Manual - Page 15
these buttons to control compatible Harman Kardon CD, DVD or cassette players. ˚ Mute Button: When the Zone II remote is used in the room where the AVR 630 is located, press this button to temporarily silence the unit. When it is used in a remote room with a sensor that is connected to the Multiroom - Harman Kardon AVR 630 | Owners Manual - Page 16
to the Tape Outputs 35 on the AVR 630. 3. Connect the output of any digital sources such as such as a CD or DVD changer or player, advanced video game, a digital satellite receiver, HDTV tuner or digital cable set-top box or the output of a compatible computer sound card to the Optical and Coaxial - Harman Kardon AVR 630 | Owners Manual - Page 17
simply connect the keypad or module that is in the remote room to the AVR 630 using standard Category 5 wiring that is properly rated for the in-wall use specific to the installation. Terminate the wiring at the receiver end to a standard RJ-45 connector in compliance with the instructions furnished - Harman Kardon AVR 630 | Owners Manual - Page 18
computer. At the time that any upgrade is available, instructions for making the connection and installing the upgrade will be available through the Product Support area of the Harman Kardon Web site at harmankardon.com. The physical connection to the AVR 630's RS-232 port is a standard D-SUB - Harman Kardon AVR 630 | Owners Manual - Page 19
across the front of the room sound smooth, and that sounds from all speakers appear to arrive at the listening position at the same time (without delay from the center speaker compared to the left and right speakers). When the AVR 630 is used in 5.1-channel operation, the preferred location for - Harman Kardon AVR 630 | Owners Manual - Page 20
for some inputs so that they are properly configured to reflect the use of digital or analog inputs, the type of speakers installed and the surround mode specifics of your home theater system. Remember that since the AVR 630 memorizes the settings for each input individually, you will need to make - Harman Kardon AVR 630 | Owners Manual - Page 21
the new digital input assignment. An exclusive Harman Kardon feature is the ability to switch front-panel coaxial digital audio and analog audio/video jacks from their normal use as inputs to output connections so that portable recording devices may easily be connected. On the AVR 630, the Coaxial - Harman Kardon AVR 630 | Owners Manual - Page 22
appropriate to a five-speaker system will appear. When the SURR BACK line of the SPEAKER SETUP menu (Figure 6) is set to SMALL or LARGE, the AVR 630 will be configured for 6.1/7.1-channel operation, and additional modes such as Dolby Digital EX and DTS-ES will appear, as they are only available - Harman Kardon AVR 630 | Owners Manual - Page 23
the specifications in the speakers' owner's manual, or ask your dealer. This menu screen also allows you to enter the settings for the AVR 630's Quadruple Crossover feature which allows a different crossover point to be used for the front left/right, center, surround and surround back speakers - Harman Kardon AVR 630 | Owners Manual - Page 24
when the AVR 630 is being used with a digital source that contains a dedicated low-frequency effects, or LFE soundtrack. This allows you to use both your main and subwoofer speakers to take advantage of the special bass sounds created for some movies. Press ‹/› Navigation Button o on the remote so - Harman Kardon AVR 630 | Owners Manual - Page 25
it takes for sound to reach your ears from each channel is different. You may compensate for this difference through the use of the delay settings to adjust the timing for the speaker placement and acoustic conditions in your listening room or home theater. The AVR 630's advanced software enables - Harman Kardon AVR 630 | Owners Manual - Page 26
is first installed to establish the initial level settings. Using EzSet Harman Kardon's exclusive EzSet remote makes it possible to quickly and accurately set the AVR 630's output levels without the use of a sound-pressure meter, although manual adjustment is also available. However, for the easiest - Harman Kardon AVR 630 | Owners Manual - Page 27
speaker position shown in the Lower Display Line $. If the sound from a speaker location does NOT match the position indicated in the display, turn the AVR 630 off using the Main Power Switch A and check the speaker wiring or connections to external power amplifiers to make certain that each speaker - Harman Kardon AVR 630 | Owners Manual - Page 28
SYSTEM CONFIGURATION Continue to adjust the individual channels until the volume level sounds the same from each speaker. Adjustments should be made with the ‹/› Navigation Button o on the remote only, NOT the main volume controls. If you are using a sound-pressure level (SPL) meter for precise - Harman Kardon AVR 630 | Owners Manual - Page 29
you have completed the initial setup and configuration of the AVR 630, it is simple to operate and enjoy. The following instructions will help you maximize the enjoyment of your new receiver: Turning the AVR 630 On or Off • When using the AVR 630 for the first time, you must press the Main Power - Harman Kardon AVR 630 | Owners Manual - Page 30
specially encoded LD discs and satellite broadcasts and it is a part of the high-definition television (HDTV) system. An optional, external RF demodulator is required to use the AVR 630 to listen to the Dolby Digital soundtracks available on laser discs. Connect the RF output of the LD player to the - Harman Kardon AVR 630 | Owners Manual - Page 31
up to five separate main audio channels and a special dedicated low-frequency effects channel. Dolby Digital EX Available when the receiver is configured for 6.1/7.1 channel operation, Dolby Digital EX is the latest version of Dolby Digital. When used with movies or other programs that have - Harman Kardon AVR 630 | Owners Manual - Page 32
. Consult the owner's manual for your DVD player for more information on making these settings. Selecting a Digital Source To utilize either digital mode, you must have properly connected a digital source to the AVR 630. Connect the digital outputs from DVD players, HDTV receivers, satellite systems - Harman Kardon AVR 630 | Owners Manual - Page 33
output format from your computer or a sound card, check with the device's owner's manual or contact the manufacturer's technical support area. • If your computer or sound card's digital output is not capable of direct connection to the AVR 630, you may use an optional, external transcoder to convert - Harman Kardon AVR 630 | Owners Manual - Page 34
in the Upper Display Line # and then goes out. This will also activate manual tuning mode. Preset Tuning Using the remote, up to 30 stations may be stored in the AVR 630's memory for easy recall using the frontpanel controls or the remote. To enter a station into the memory, first tune the station - Harman Kardon AVR 630 | Owners Manual - Page 35
may be separately trimmed for each digital and analog surround mode. If you wish to have different trim levels for a specific mode, select that mode and then follow the instructions in the steps shown earlier. Dim Function Since the AVR 630 will often be used when movies or other video programming - Harman Kardon AVR 630 | Owners Manual - Page 36
most audio/video receivers, when the AVR 630 is turned on, it will always return to the volume setting in effect when the unit was turned off. However, you may prefer to always have the AVR 630 turn on at a specific setting, regardless of what was last in use when the unit was turned off. To change - Harman Kardon AVR 630 | Owners Manual - Page 37
or remote commands using the video display when it is difficult to view the front-panel displays. However, you may also prefer to turn these displays off permanently. You may also want to adjust the length of time the displays remain on the screen. Both of those options are possible with the AVR 630 - Harman Kardon AVR 630 | Owners Manual - Page 38
where A-BUS modules are used, follow the instructions provided with the A-BUS remote modules or keypads. Additional information will also be made available through the Harman Kardon Web site at www.harmankardon.com. RS-232 Control The AVR 630 is rare among A/V receivers in that it provides the - Harman Kardon AVR 630 | Owners Manual - Page 39
the volume level for any room where an ABUS module is used, as that setting is only adjustable using the A-BUS module's volume control or built-in IR sensor. Once the Multiroom system is turned on, it will remain on even if the AVR 630 is placed in the Standby mode in the main room by - Harman Kardon AVR 630 | Owners Manual - Page 40
it is also preprogrammed to operate most recent Harman Kardon DVD players and changers, CD players and changers, CD recorders and cassette decks. The codes for other brand devices may be programmed into the AVR 630 remote using its extensive library of remote codes or a head-to-head learning process - Harman Kardon AVR 630 | Owners Manual - Page 41
. You'll need to follow the Learning Commands instructions below to enter the codes for this device into the AVR remote. 12. When pressing one of the numeric keys in Step 10 or 11 causes the device being programmed to turn back on, follow the instructions shown in Figure 25 and press the Set Button - Harman Kardon AVR 630 | Owners Manual - Page 42
instructions shown in the Renaming Individual Keys section of this manual remote to control the device you have selected. However, in some circumstances you may have configured your system so that the devices connected to the AVR 630 process of reassigning the commands used for a particular device. - Harman Kardon AVR 630 | Owners Manual - Page 43
to the way a device is programmed using manual entry. Continue the process as outlined in the next few steps, remembering that if the codes for your specific device are not found, you may select any brand and then "learn" the proper codes into the AVR remote using the process outlined on page 41. To - Harman Kardon AVR 630 | Owners Manual - Page 44
shows the number of macro steps available of 20 possible steps. Following the instructions on the remote's LCD screen, press the first key you wish to be transmitted in the macro. In our example, we first want the AVR 630 to turn on, so the Power Button 1 should be pressed. POWER ON 00/20 SELECT - Harman Kardon AVR 630 | Owners Manual - Page 45
to link to a different device. For example, if your TV, cable box or satellite receiver is connected through the AVR 630, you will most likely want to use the AVR 630's volume control commands even when the remote has been set to issue all other commands for the video device. "Punch-through" enables - Harman Kardon AVR 630 | Owners Manual - Page 46
new receiver for maximum playback accuracy. In addition to automatically setting the levels, the AVR remote's LCD display allows the unit to be used as a direct read-out SPL meter. Complete instructions for using the EzSet features of the AVR remote are found on pages 26 - 28 of this owner's manual - Harman Kardon AVR 630 | Owners Manual - Page 47
specific button when one remote's controls are programmed into the AVR remote. The AVR remote allows you to change the name of either a master device or any button on the remote using in the remote will not change the name of the input used by the on-screen menu system of the AVR 630. NOTES ON - Harman Kardon AVR 630 | Owners Manual - Page 48
• When a key is renamed it will only apply to the specific device selected in Step 4. The same key may be renamed as needed for each individual device with which it is used. Resetting the Remote Depending on the way in which the remote has been programmed, there may be a situation where you wish to - Harman Kardon AVR 630 | Owners Manual - Page 49
is pressed while the backlight is on. You may keep the backlight lit by holding the Light Button, but extensive use of the backlight will reduce battery life. • The LCD display will remain on for ten seconds after a key is pressed and then turn off to conserve battery life. • When any button is - Harman Kardon AVR 630 | Owners Manual - Page 50
Turn up volume control • Follow the instructions in the Display Brightness section on page 36 so that the display is set to VFD FULL • Check speaker wire connections for shorts at receiver and speaker ends • Contact your local Harman Kardon service reset may clear the problem. To clear the AVR 630's - Harman Kardon AVR 630 | Owners Manual - Page 51
(18.6kg) 47 lb (21.4kg) Depth measurement includes knobs, buttons and terminal connections. Height measurement includes feet and chassis. All features and specifications are subject to change without notice. Harman Kardon, Power for the Digital Revolution and Logic 7 are registered trademarks of - Harman Kardon AVR 630 | Owners Manual - Page 52
250 Crossways Park Drive, Woodbury, New York 11797 www.harmankardon.com ® © 2003 Harman International Industries, Incorporated Part No. ZK-C11-01HA-00
-
 1
1 -
 2
2 -
 3
3 -
 4
4 -
 5
5 -
 6
6 -
 7
7 -
8
-
9
-
10
-
11
-
12
-
13
-
14
-
15
-
16
-
17
-
18
-
19
-
20
-
21
-
22
-
23
-
24
-
25
-
26
-
27
-
28
-
29
-
30
-
31
-
32
-
33
-
34
-
35
-
36
-
37
-
38
-
39
-
40
-
41
-
42
-
43
-
44
-
45
-
46
-
47
-
48
-
49
-
50
-
51
-
52
 |
 |
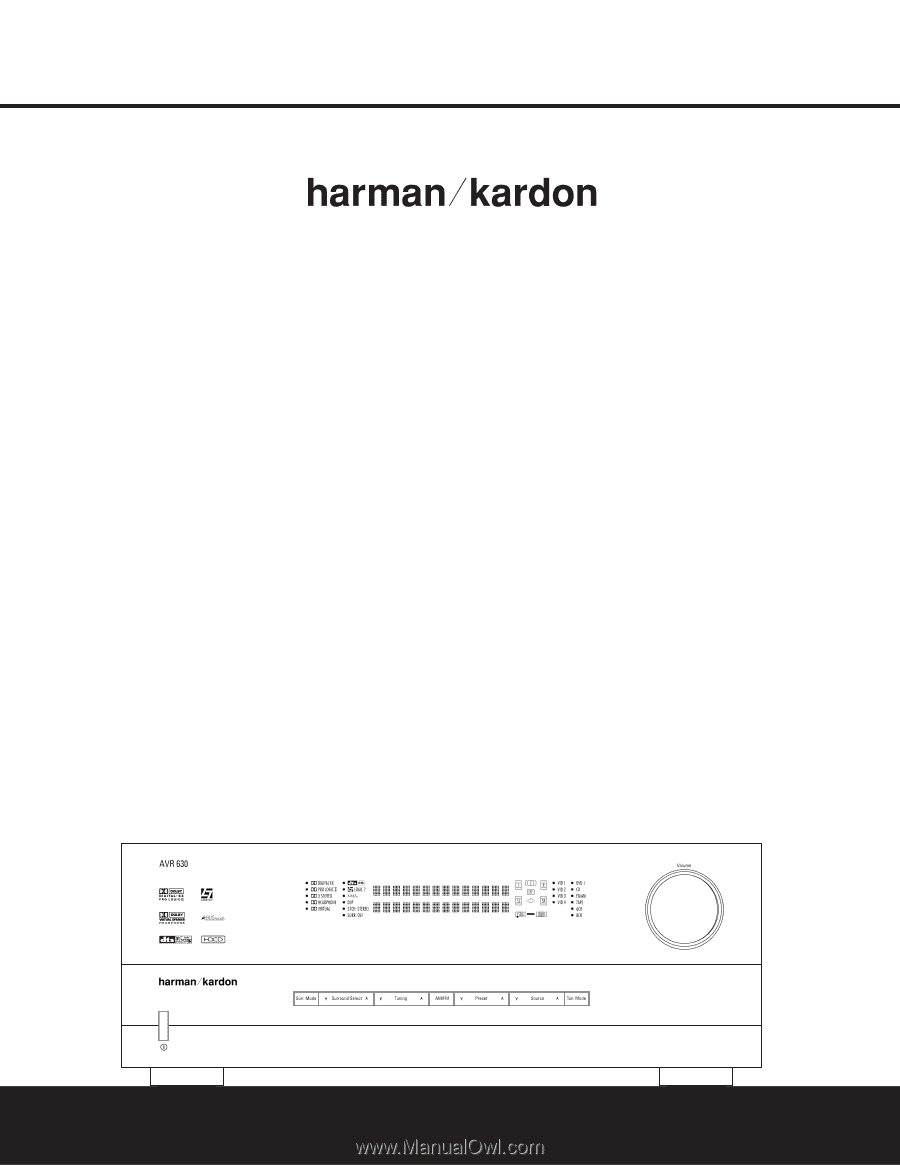
AVR 630
AUDIO/VIDEO RECEIVER
OWNER’S MANUAL
Power for the Digital Revolution
.
®
®