HealthRider E730 Elliptical Canadian English Manual - Page 7
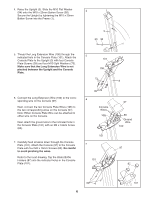
M10 Nylon Locknuts 55. Make sure that the Spacers
 |
View all HealthRider E730 Elliptical manuals
Add to My Manuals
Save this manual to your list of manuals |
Page 7 highlights
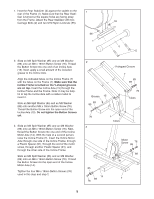
8. While another person holds the Handlebar (13) in the position shown, connect the two Console Plate Wires 8 (106) to the two Pulse Wires (96). Push the wires and connectors into the Handlebar (13). 96 13 106 96 106 9. With the help of another person, loosely attach the right side of the Handlebar (13) to the Upright (3) with two Handlebar Bolts (92), two Curved Washers (74), two Spacers (93), two M10 Flat Washers (94), and two M10 Nylon Locknuts (55). Make sure that the Spacers are positioned between the Handlebar and the Console Plate (101). Be careful to avoid pinching the wires. Attach the left side of the Handlebar (13) in the same way. Firmly tighten all four Handlebar Bolts (92). 10.Identify the Right Pedal Leg (6), which has an "R" sticker attached to it. Next, identify the Right Pedal (23), which has the letter "R" molded onto the bottom. Slide the Right Pedal onto the Right Pedal Leg (6) as shown. Make sure that the plastic posts are completely inserted into the holes in the Right Pedal Leg. Insert the three M4 x 19mm Flange Screws (88) about halfway into the Right Pedal Leg (6) and thread the Screws into the plastic posts on the Right Pedal (23). Using a phillips screwdriver, tighten the three Flange Screws into the plastic posts. Do not overtighten the Flange Screws or the plastic posts may break. Attach the Left Pedal (not shown) in the same way. 9 13 92 92 74 93 94 55 10 94 93 74 55 93 94 93 101 94 3 88 6 23 Opening Plastic Posts 7
-
 1
1 -
 2
2 -
 3
3 -
 4
4 -
 5
5 -
 6
6 -
 7
7 -
 8
8 -
 9
9 -
 10
10 -
 11
11 -
 12
12 -
13
-
14
-
15
-
16
-
17
-
18
-
19
-
20
 |
 |
