HealthRider E730 Elliptical Canadian English Manual - Page 8
Danger, How To Use The Elliptical Crosstrainer
 |
View all HealthRider E730 Elliptical manuals
Add to My Manuals
Save this manual to your list of manuals |
Page 8 highlights
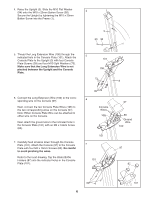
11. Apply a small amount of grease to the axle on the left 11 Crank Arm (8). Side a Nylon Washer (78) and the Left Pedal Leg (5) onto the axle on the left Crank Arm (8). Note: It may be helpful to use a rubber mallet to tap these parts on. Be careful not to confuse the Left Pedal Leg with the Right Pedal Leg (not shown); look at the position of the round tube to correctly identify the Left Pedal Leg. Next, tap a 3/4" Axle Cap (40) onto the axle. Attach the Right Pedal Arm (not shown) in the same way. Grease 5 8 78 40 Round Tube 12.Make sure that all parts of the elliptical crosstrainer are properly tightened. Note: There may be some hardware left over after assembly is completed. To protect the floor or carpet from damage, place a mat under the elliptical crosstrainer. HOW TO USE THE ELLIPTICAL CROSSTRAINER HOW TO PLUG IN THE POWER CORD This product must be Grounded Outlet Box grounded. If it should mal- Grounding Plug function or break down, grounding pro- vides a path of least resis- Grounding Pin tance for elec- Grounded Outlet tric current to reduce the risk of electric shock. This product is equipped with a cord having an equipment-grounding conductor and a grounding plug. Plug the power cord into an appro- priate outlet that is properly installed and ground- ed in accordance with all local codes and ordinances. This product is for use on a nominal 120volt circuit. Important: The elliptical crosstrainer is not compatible with GFCI-equipped outlets. DANGER: Improper connection of the equipment-grounding conductor can result in an increased risk of electric shock. Check with a qualified electrician or serviceman if you are in doubt as to whether the product is properly grounded. Do not modify the plug provided with the product-if it will not fit the outlet, have a proper outlet installed by a qualified electrician. 8
-
 1
1 -
2
-
 3
3 -
 4
4 -
 5
5 -
 6
6 -
 7
7 -
 8
8 -
 9
9 -
 10
10 -
 11
11 -
 12
12 -
 13
13 -
14
-
15
-
16
-
17
-
18
-
19
-
20
 |
 |
