HP 10622 Best practices for HP 10000 Series and HP 10000 G2 Series Racks - Page 15
Additional resources - g2 22u rack
 |
View all HP 10622 manuals
Add to My Manuals
Save this manual to your list of manuals |
Page 15 highlights
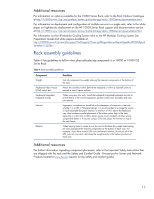
Additional resources For information on options available for the 10000 Series Rack, refer to the Rack Options Catalogue at http://h18004.www1.hp.com/products/servers/proliantstorage/racks/10000series/documentation.html. For information on deployment and configuration of multiple servers in a single rack, refer to the white paper on high-density deployment on the HP 10000 Series Rack support and documentation section at http://h18004.www1.hp.com/products/servers/proliantstorage/racks/10000series/documentation.html. For information on the HP Modular Cooling System refer to the HP Modular Cooling System Site Preparation Guide and white papers available at http://h20000.www2.hp.com/bizsupport/TechSupport/Home.jsp?lang=en&cc=us&prodTypeId=329290&prod SeriesId=1155256. Rack assembly guidelines Table 4 lists guidelines to follow when physically placing components in a 10000 or 10000 G2 Series Rack. Table 4. Rack assembly guidelines Component Weight Keyboard/video/mouse (KVM) switch box Keyboard/integrated keyboard monitor Monitor Balance Guideline Sort all components by weight, placing the heaviest components at the bottom of the rack. Mount the switchbox either behind the keyboard or within a sidewall cavity to provide a zero-U space solution. When using any size rack, install the keyboard/integrated keyboard monitor at a level that is in the correct ergonomic position where your shoulders and neck are relaxed. Ergonomic considerations should drive the placement of a monitor in the rack, whether it is a CRT or Flat-panel design. It is recommended to arrange the screen or rack-mountable flat panel monitor, a minimum of 4U's above the keyboard tray. Most customers prefer placement of the video system high in the rack, especially in a full rack, to allow easier access to serviceability of other system components below it. If you are using a 22U rack, place the monitor on top of the rack frame. When baying racks to create a row, be sure to distribute the weight load among the racks and place the heaviest components at the bottom of each rack. For example, if you have several UPS units and several servers, do not put all of the UPS units into one rack-distribute the weight evenly in the bottom positions of each rack. Additional resources For further information regarding component placement, refer to the Important Safety Instructions that are shipped with the rack and the Safety and Comfort Guide - Precautions for Server and Network Products located at www.hp.com (search for the safety and comfort guide). 13
-
 1
1 -
2
-
3
-
4
-
5
-
6
-
7
-
8
-
9
-
 10
10 -
 11
11 -
 12
12 -
 13
13 -
 14
14 -
 15
15 -
 16
16 -
 17
17 -
 18
18 -
 19
19 -
 20
20 -
21
-
22
-
23
-
24
-
25
-
26
-
27
-
28
-
29
-
30
-
31
-
32
-
33
-
34
-
35
-
36
-
37
-
38
-
39
-
40
-
41
-
42
-
43
-
44
-
45
-
46
-
47
-
48
 |
 |
