HP 2000sa HP StorageWorks 2312sa and 2324sa Modular Smart Array user guide (48 - Page 27
Obtaining IP values, Setting management port IP addresses using DHCP - storageworks g2 msa
 |
View all HP 2000sa manuals
Add to My Manuals
Save this manual to your list of manuals |
Page 27 highlights
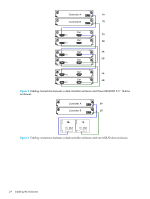
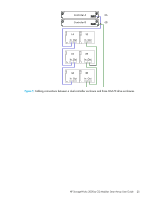
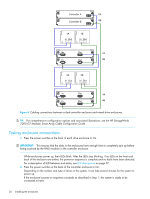
Obtaining IP values NOTE: For help with configuring your MSA2000 G2 product, also see the MSA2000 Software Support/Documentation CD shipped with your product. Setting management port IP addresses using DHCP 1. Look in the DHCP server's pool of leased addresses for two IP addresses assigned to "HP StorageWorks MSA Storage." 2. Use the MSA Device Discovery Tool to discover "HP StorageWorks MSA2300sa" storage devices on the local LAN through SNMP. If the MSA Device Discovery tool is not installed on your system, then install the program: a. Insert the MSA2000 Software Support/Documentation CD into the computer's CD drive. b. When the dialog appears onscreen, double-click AUTORUN.exe. c. From the dialog's Tools tab, select MSA Device Discovery Tool. d. Complete the installation. 3. Use a ping broadcast to try to identify the device through the host's ARP table. If you do not have a DHCP server, you will need to ask your system administrator to allocate two IP addresses and set them using the CLI during initial configuration (see Setting management port IP addresses using the CLI). Setting management port IP addresses using the CLI If you did not use the DHCP to set network port IP values, set them manually (default method) as described below. Network ports on controller module A and controller module B are configured with the following default values: • Management Port IP Address: 10.0.0.2 (controller A), 10.0.0.3 (controller B) • IP Subnet Mask: 255.255.255.0 • Gateway IP Address: 10.0.0.1 If the default IP addresses are not compatible with your network, you must set an IP address for each management port using the command-line interface (CLI) embedded in each controller module. The CLI enables you to access the system using RS-232 communication and terminal emulation software. Use the CLI commands described in the steps below to set the IP address for the Network port on each controller module. Once new IP addresses are set, you can change them as needed using SMU. Be sure to change the IP address via SMU before changing the network configuration. NOTE: Changing IP settings can cause management hosts to lose access to the storage system. 1. From your network administrator, obtain an IP address, subnet mask, and gateway address for controller A and controller B. HP StorageWorks 2000sa G2 Modular Smart Array User Guide 27
-
 1
1 -
2
-
3
-
4
-
5
-
6
-
7
-
8
-
9
-
10
-
11
-
12
-
13
-
14
-
15
-
16
-
17
-
18
-
19
-
20
-
21
-
 22
22 -
 23
23 -
 24
24 -
 25
25 -
 26
26 -
 27
27 -
 28
28 -
 29
29 -
 30
30 -
 31
31 -
 32
32 -
33
-
34
-
35
-
36
-
37
-
38
-
39
-
40
-
41
-
42
-
43
-
44
-
45
-
46
-
47
-
48
-
49
-
50
-
51
-
52
-
53
-
54
-
55
-
56
-
57
-
58
-
59
-
60
-
61
-
62
-
63
-
64
-
65
-
66
-
67
-
68
-
69
-
70
-
71
-
72
-
73
-
74
-
75
-
76
 |
 |
