HP 2000sa HP StorageWorks 2312sa and 2324sa Modular Smart Array user guide (48 - Page 28
address, netmask, gateway, Parameter, Value
 |
View all HP 2000sa manuals
Add to My Manuals
Save this manual to your list of manuals |
Page 28 highlights
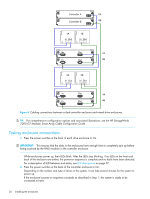
2. Use the provided micro-DB9 serial cable to connect controller A to a serial port on a host computer. SAS 3 SAS 4 SAS 1 SAS 2 CLI CLI Service DIRTY CACHE SAS 1 ACTIVITY LINK Connect serial cable to CLI port on controller faceplate Your package contents include a micro-DB9-to-DB9 serial cable. If necessary, use a DB9-to-DB25 adapter (not included) for connecting the serial cable to a DB25 serial port on the host computer. 3. Start and configure a terminal emulator, such as HyperTerminal or VT-100, using the display settings in Table 4 and the connection settings in Table 5. .Table 4 Terminal emulator display settings Parameter Terminal emulation mode Font Translations Columns Value VT-100 or ANSI (for color support) Terminal None 80 Table 5 Terminal emulator connection settings Parameter Value Connector Baud rate COM1 (typically) 115,200 Data bits 8 Parity None Stop bits 1 Flow control None 4. In the terminal emulator, connect to controller A. 5. Press Enter to display the CLI prompt (#). 6. At the prompt, type the following command to set the values you obtained in Step 1 for each Network port, first for controller A and then for controller B: set network-parameters ip address netmask netmask gateway gateway controller a|b where: • address is the IP address of the controller • netmask is the subnet mask • gateway is the IP address of the subnet router • a|b specifies the controller whose network parameters you are setting For example: # set network-parameters ip 192.168.0.10 netmask 255.255.255.0 gateway 192.168.0.10 controller a 28 Installing the enclosures
-
 1
1 -
2
-
3
-
4
-
5
-
6
-
7
-
8
-
9
-
10
-
11
-
12
-
13
-
14
-
15
-
16
-
17
-
18
-
19
-
20
-
21
-
22
-
 23
23 -
 24
24 -
 25
25 -
 26
26 -
 27
27 -
 28
28 -
 29
29 -
 30
30 -
 31
31 -
 32
32 -
 33
33 -
34
-
35
-
36
-
37
-
38
-
39
-
40
-
41
-
42
-
43
-
44
-
45
-
46
-
47
-
48
-
49
-
50
-
51
-
52
-
53
-
54
-
55
-
56
-
57
-
58
-
59
-
60
-
61
-
62
-
63
-
64
-
65
-
66
-
67
-
68
-
69
-
70
-
71
-
72
-
73
-
74
-
75
-
76
 |
 |
