HP 2500 HP Color LaserJet 1500 and 2500 Imaging Drum - Installation Guide - Page 2
English, Français, Deutsch, Italiano, Español, Dansk, Nederlands
 |
View all HP 2500 manuals
Add to My Manuals
Save this manual to your list of manuals |
Page 2 highlights
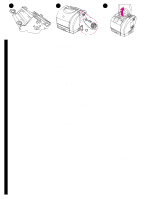
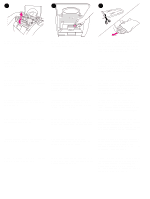
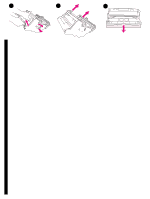
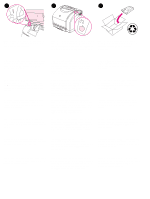
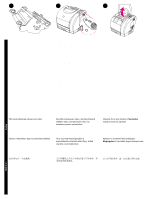
1 2 3 English Français Deutsch Italiano This kit contains an imaging drum. Replace the imaging drum when the corresponding imaging drum light on the control panel is blinking. Open the top cover of the printer. Note: The printer should be turned on. Ce kit contient un tambour d'imagerie. Remplacez le tambour d'imagerie lorsque le voyant correspondant clignote sur le panneau de commande. Ouvrez le capot de l'imprimante. Remarque : L'imprimante doit être sous tension. Dieses Kit enthält eine Bildtrommel. Wechseln Sie die Bildtrommel aus, wenn im Bedienfeld die Bildtrommel-LED blinkt. Öffnen Sie die obere Abdeckung des Druckers. Hinweis: Der Drucker muss eingeschaltet sein. Questo kit contiene un tamburo fotosensibile. Sostituire il tamburo fotosensibile quando il corrispondente indicatore luminoso sul pannello di controllo inizia a lampeggiare. Aprire il coperchio superiore della stampante. Nota: La stampante deve essere accesa. Este kit contiene un tambor de imágenes. Sustituya el tambor de imágenes cuando parpadee la luz del tambor de imágenes correspondiente del panel de control. Abra la cubierta superior de la impresora. Nota: La impresora debe estar encendida. Dette sæt indeholder et billedtromlesæt. Udskift billedtromlen, når billedtromleindikatoren på kontrolpanelet blinker. Åbn printerens topdæksel. Bemærk! Printeren skal være tændt. Deze kit bevat de drumcassette. Vervang de drumcassette wanneer het lampje voor de drumcassette op het bedieningspaneel knippert. Open de printerkap. N.B.: De printer moet ingeschakeld zijn. 1 Español Dansk Nederlands
-
 1
1 -
 2
2 -
 3
3 -
 4
4 -
 5
5 -
 6
6 -
 7
7 -
 8
8 -
9
-
10
-
11
-
12
-
13
-
14
-
15
-
16
 |
 |
