HP 6400/8400 HP StorageWorks EVA6400/8400 M6412A disk enclosure installation i - Page 4
Attaching the rails, Disk enclosure kit contents, IMPORTANT
 |
View all HP 6400/8400 manuals
Add to My Manuals
Save this manual to your list of manuals |
Page 4 highlights
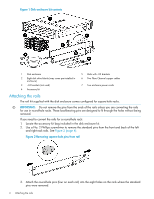
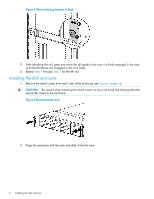
Figure 1 Disk enclosure kit contents 1 Disk enclosure 2 Eight disk drive blanks (may come pre-installed in enclosure) 3 -04 brackets (not used) 4 Accessory kit 5 Rails with -03 brackets 6 Two Fibre Channel copper cables 7 Two enclosure power cords Attaching the rails The rail kit supplied with the disk enclosure comes configured for square-hole racks. IMPORTANT: Do not remove the pins from the ends of the rails unless you are converting the rails for use in round-hole racks. These load-bearing pins are designed to fit through the holes without being removed. If you need to convert the rails for a round-hole rack: 1. Locate the accessory kit bag included in the disk enclosure kit. 2. Use a No. 2 Phillips screwdriver to remove the standard pins from the front and back of the left and right rack rails. See Figure 2 (page 4). Figure 2 Removing square-hole pins from rail 3. Attach the round-hole pins (four on each rail) into the eight holes on the rails where the standard pins were removed. 4 Attaching the rails
-
 1
1 -
 2
2 -
 3
3 -
 4
4 -
 5
5 -
 6
6 -
 7
7 -
 8
8 -
 9
9 -
 10
10 -
11
-
12
-
13
-
14
-
15
 |
 |
