HP 6400/8400 HP StorageWorks EVA6400/8400 M6412A disk enclosure installation i - Page 6
Installing the disk enclosure, Move retaining bracket to back, CAUTION
 |
View all HP 6400/8400 manuals
Add to My Manuals
Save this manual to your list of manuals |
Page 6 highlights
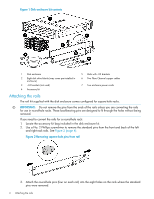
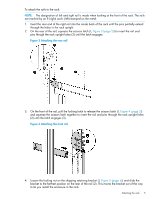
Figure 5 Move retaining bracket to back 5. After attaching the rail, grab and move the rail gently to be sure it is firmly engaged in the rack and that all latches are engaged in the rack holes. 6. Repeat Step 1 through Step 5 for the left rail. Installing the disk enclosure 1. Remove the bezel covers from each side of the enclosure (see Figure 6 (page 6)). CAUTION: Be careful when removing the bezel covers so as to not break the locking tabs that secure the covers to the enclosure. Figure 6 Remove bezel cover 2. Align the enclosure with the rails and slide it into the rack. 6 Installing the disk enclosure
-
 1
1 -
 2
2 -
 3
3 -
 4
4 -
 5
5 -
 6
6 -
 7
7 -
 8
8 -
 9
9 -
 10
10 -
 11
11 -
 12
12 -
13
-
14
-
15
 |
 |

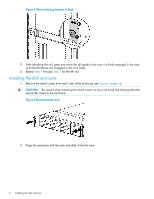
Figure 5 Move retaining bracket to back
5.
After attaching the rail, grab and move the rail gently to be sure it is firmly engaged in the rack
and that all latches are engaged in the rack holes.
6.
Repeat
Step 1
through
Step 5
for the left rail.
Installing the disk enclosure
1.
Remove the bezel covers from each side of the enclosure (see
Figure 6 (page 6)
).
CAUTION:
Be careful when removing the bezel covers so as to not break the locking tabs that
secure the covers to the enclosure.
Figure 6 Remove bezel cover
2.
Align the enclosure with the rails and slide it into the rack.
6
Installing the disk enclosure