HP 6400/8400 HP StorageWorks EVA6400/8400 M6412A disk enclosure installation i - Page 5
until the latch engages 3.
 |
View all HP 6400/8400 manuals
Add to My Manuals
Save this manual to your list of manuals |
Page 5 highlights
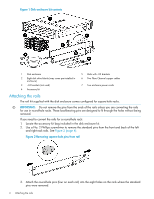
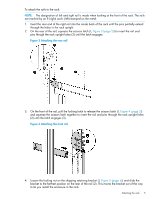
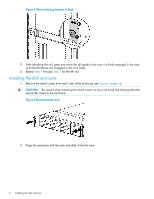
To attach the rails to the rack: NOTE: The designation of left and right rail is made when looking at the front of the rack. The rails are marked by an R (right) and L (left) stamped on the metal. 1. Insert the rear end of the right rail into the inside back of the rack until the pins partially extend through the holes in the rack upright. 2. On the rear of the rail, squeeze the scissors latch (1, Figure 3 (page 5)) to insert the rail and pins though the rack upright holes (2) until the latch engages. Figure 3 Attaching the rear rail 3. On the front of the rail, pull the locking latch to release the scissors latch (1, Figure 4 (page 5)) and squeeze the scissors latch together to insert the rail and pins through the rack upright holes (2) until the latch engages (3). Figure 4 Attaching the front rail 4. Loosen the locking nut on the shipping retaining bracket (1, Figure 5 (page 6)) and slide the bracket to the farthest position on the rear of the rail (2). This moves the bracket out of the way to let you install the enclosure in the rails. Attaching the rails 5
-
 1
1 -
 2
2 -
 3
3 -
 4
4 -
 5
5 -
 6
6 -
 7
7 -
 8
8 -
 9
9 -
 10
10 -
 11
11 -
12
-
13
-
14
-
15
 |
 |
