HP 650 User Guide - Page 61
Clean the cartridge carrier contacts, Access Cartridge, Start, CAUTION, Replace the print cartridge
 |
View all HP 650 manuals
Add to My Manuals
Save this manual to your list of manuals |
Page 61 highlights
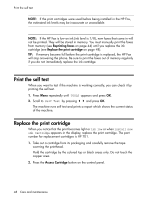
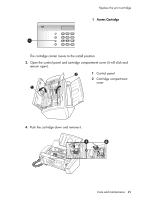
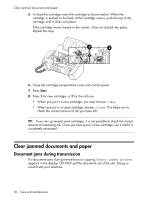
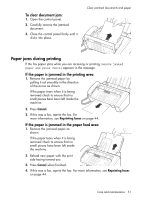
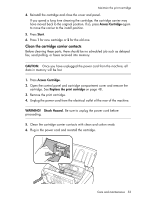
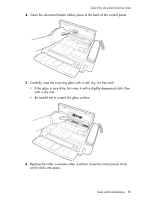
Maintain the print cartridge 4. Reinstall the cartridge and close the cover and panel. If you spend a long time cleaning the cartridge, the cartridge carrier may have moved back to the original position. If so, press Access Cartridge again to move the carrier to the install position. 5. Press Start. 6. Press 1 for new cartridge or 2 for the old one. Clean the cartridge carrier contacts Before cleaning these parts, there should be no scheduled job such as delayed fax, send polling, or faxes received into memory. CAUTION: Once you have unplugged the power cord from the machine, all data in memory will be lost. 1. Press Access Cartridge. 2. Open the control panel and cartridge compartment cover and remove the cartridge. See Replace the print cartridge on page 48. 3. Remove the print cartridge. 4. Unplug the power cord from the electrical outlet of the rear of the machine. WARNING! Shock Hazard. Be sure to unplug the power cord before proceeding. 5. Clean the cartridge carrier contacts with clean and cotton swab. 6. Plug in the power cord and reinstall the cartridge. Care and maintenance 53
-
 1
1 -
2
-
3
-
4
-
5
-
6
-
7
-
8
-
9
-
10
-
11
-
12
-
13
-
14
-
15
-
16
-
17
-
18
-
19
-
20
-
21
-
22
-
23
-
24
-
25
-
26
-
27
-
28
-
29
-
30
-
31
-
32
-
33
-
34
-
35
-
36
-
37
-
38
-
39
-
40
-
41
-
42
-
43
-
44
-
45
-
46
-
47
-
48
-
49
-
50
-
51
-
52
-
53
-
54
-
55
-
 56
56 -
 57
57 -
 58
58 -
 59
59 -
 60
60 -
 61
61 -
 62
62 -
 63
63 -
 64
64 -
 65
65 -
 66
66 -
67
-
68
-
69
-
70
-
71
-
72
-
73
-
74
-
75
-
76
-
77
-
78
-
79
-
80
-
81
-
82
-
83
-
84
-
85
-
86
 |
 |