HP B8550 User Guide - Page 25
Clear paper jams, Print troubleshooting, The product is not responding - printer driver
 |
UPC - 884420048510
View all HP B8550 manuals
Add to My Manuals
Save this manual to your list of manuals |
Page 25 highlights
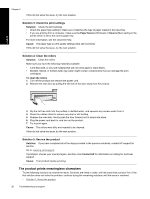
Chapter 3 Clear paper jams In case of a paper jam, check the rear door. You might need to clear the paper jam from the rear door. To clear a paper jam from the rear door 1. Remove the door by pulling it away from the product. English 2. Gently pull the paper out of the rollers. CAUTION: If the paper tears when you are removing it from the rollers, check the rollers and wheels for torn pieces of paper that might be remaining inside the product. If you do not remove all the pieces of paper from the product, more paper jams are likely to occur. 3. Replace the rear door. Gently push the door forward until it snaps into place. 4. Press OK on the control panel to continue the current job. Print troubleshooting Use this section to solve these printing problems. The product is not responding Try the following solutions to resolve the issue. Solutions are listed in order, with the most likely solution first. If the first solution does not solve the problem, continue trying the remaining solutions until the issue is resolved. • Solution 1: Turn on the product • Solution 2: Load paper in the input tray • Solution 3: Select the correct printer • Solution 4: Check the printer driver status • Solution 5: Wait until the product completes the current operation • Solution 6: Remove all cancelled print jobs from the queue • Solution 7: Clear the paper jam • Solution 8: Make sure the print carriage can move freely • Solution 9: Check the connection from the product to your computer • Solution 10: Reset the product Solution 1: Turn on the product Solution: Look at the On light located on the product. If it is not lit, the product is turned off. Make sure the power cord is firmly connected to the product and plugged into a power outlet. Press the On button to turn on the product. Cause: The product was turned off. If this did not solve the issue, try the next solution. 22 Troubleshooting and support
-
 1
1 -
2
-
3
-
4
-
5
-
6
-
7
-
8
-
9
-
10
-
11
-
12
-
13
-
14
-
15
-
16
-
17
-
18
-
19
-
 20
20 -
 21
21 -
 22
22 -
 23
23 -
 24
24 -
 25
25 -
 26
26 -
 27
27 -
 28
28 -
 29
29 -
 30
30 -
31
-
32
-
33
-
34
-
35
-
36
-
37
-
38
-
39
-
40
-
41
-
42
-
43
-
44
-
45
-
46
-
47
-
48
-
49
-
50
-
51
-
52
-
53
-
54
-
55
-
56
-
57
-
58
-
59
-
60
-
61
-
62
-
63
-
64
-
65
-
66
-
67
-
68
-
69
-
70
-
71
-
72
-
73
-
74
 |
 |
