HP Business Inkjet 2200/2250 HP Business InkJet 2200/2250 Printer - (English) - Page 6
Understanding the Control Panel Buttons and LED
 |
View all HP Business Inkjet 2200/2250 manuals
Add to My Manuals
Save this manual to your list of manuals |
Page 6 highlights
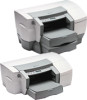
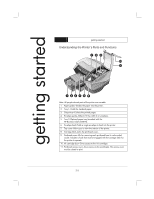
1. Power input-Attach power cord here. 2. EIO Slot-Install an HP JetDirect EIO printer server or the HP PS/PCL5 Kit upgrade card. 3. EIO Slot-Install an HP JetDirect EIO printer server or the HP PS/PCL5 Kit upgrade card. 4. Parallel port-Attach parallel cable here. Note: Do not install two HP JetDirect EIO print server cards. Cards can be installed in either slot. You can install two cards at the same time, but one must be an HP PS/PCL5 Kit upgrade card and the other an HP JetDirect EIO print server card. Understanding the Control Panel Buttons and LED 8 1. Menu-Cycles through the Control Panel menus. 2. Item-Cycles through the selected menu's items. 3. Value-Cycles through the selected menu item's values. 4. LCD Panel-Displays printer messages. 5. Resume-Continues a print job that is waiting and selects values from item menus. 6. Cancel-Cancels the current print job. The time it takes to cancel depends on the size of the print job. Press this button once only to cancel a queued print job. 7. Power-Turns the printer OFF and ON. 8. LED-Lights up when the printer is online (green). Blinks when the printer is printing (green) and when the printer is in an error state (amber). 2-2
-
 1
1 -
 2
2 -
 3
3 -
 4
4 -
 5
5 -
 6
6 -
 7
7 -
 8
8 -
 9
9 -
 10
10 -
 11
11 -
 12
12 -
13
-
14
-
15
-
16
-
17
-
18
-
19
-
20
-
21
-
22
-
23
-
24
-
25
-
26
-
27
-
28
-
29
-
30
-
31
-
32
-
33
-
34
-
35
-
36
-
37
-
38
-
39
-
40
 |
 |
