HP Classmate Notebook PC Classmate Notebook Maintenance and Service Guide - Page 54
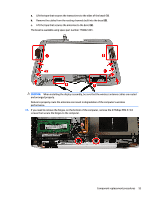
and lay the connected webcam aside.
 |
View all HP Classmate Notebook PC manuals
Add to My Manuals
Save this manual to your list of manuals |
Page 54 highlights
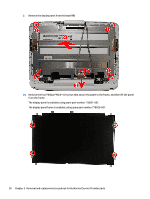
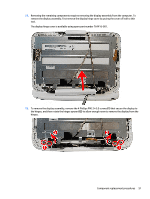
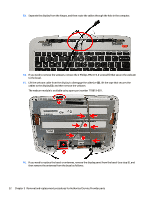
3. Rotate the top of the display enclosure downward and remove it from the display. The display enclosure is available using spare part number 778818-001. 4. If you need to remove the display panel, first move the webcam by removing the 2 Phillips PM2.0×3.0 screws (1) that secure the webcam to the display, lift the webcam cables to disengage the adhesive that secures them to the display (2), and lay the connected webcam aside. 5. Lift the tape that secures the wireless transceivers to the sides of the display (3). 48 Chapter 5 Removal and replacement procedures for Authorized Service Provider parts
-
 1
1 -
2
-
3
-
4
-
5
-
6
-
7
-
8
-
9
-
10
-
11
-
12
-
13
-
14
-
15
-
16
-
17
-
18
-
19
-
20
-
21
-
22
-
23
-
24
-
25
-
26
-
27
-
28
-
29
-
30
-
31
-
32
-
33
-
34
-
35
-
36
-
37
-
38
-
39
-
40
-
41
-
42
-
43
-
44
-
45
-
46
-
47
-
48
-
 49
49 -
 50
50 -
 51
51 -
 52
52 -
 53
53 -
 54
54 -
 55
55 -
 56
56 -
 57
57 -
 58
58 -
 59
59 -
60
-
61
-
62
-
63
-
64
-
65
-
66
-
67
-
68
-
69
-
70
-
71
-
72
-
73
-
74
-
75
 |
 |

3.
Rotate the top of the display enclosure downward and remove it from the display.
The display enclosure is available using spare part number 778818-001.
4.
If you need to remove the display panel, first move the webcam by removing the 2 Phillips PM2.0×3.0
screws
(1)
that secure the webcam to the display, lift the webcam cables to disengage the adhesive that
secures them to the display
(2)
, and lay the connected webcam aside.
5.
Lift the tape that secures the wireless transceivers to the sides of the display
(3)
.
48
Chapter 5
Removal and replacement procedures for Authorized Service Provider parts