HP Classmate Notebook PC Classmate Notebook Maintenance and Service Guide - Page 55
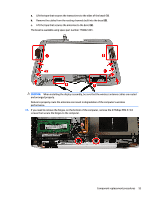
Remove the 4 Phillips PM2.5×4.0 screws, Lift the tape over the display panel connector
 |
View all HP Classmate Notebook PC manuals
Add to My Manuals
Save this manual to your list of manuals |
Page 55 highlights
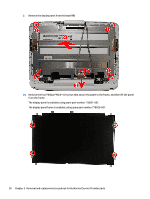
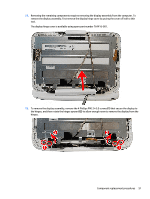
6. Lift the various pieces of tape that secure the display panel to the display (4). 7. Remove the 4 Phillips PM2.5×4.0 screws (1) that secure the display panel to the bezel. 8. Lift the tape over the display panel connector (2) and disconnect the cable from the panel (3). Component replacement procedures 49
-
 1
1 -
2
-
3
-
4
-
5
-
6
-
7
-
8
-
9
-
10
-
11
-
12
-
13
-
14
-
15
-
16
-
17
-
18
-
19
-
20
-
21
-
22
-
23
-
24
-
25
-
26
-
27
-
28
-
29
-
30
-
31
-
32
-
33
-
34
-
35
-
36
-
37
-
38
-
39
-
40
-
41
-
42
-
43
-
44
-
45
-
46
-
47
-
48
-
49
-
 50
50 -
 51
51 -
 52
52 -
 53
53 -
 54
54 -
 55
55 -
 56
56 -
 57
57 -
 58
58 -
 59
59 -
 60
60 -
61
-
62
-
63
-
64
-
65
-
66
-
67
-
68
-
69
-
70
-
71
-
72
-
73
-
74
-
75
 |
 |

6.
Lift the various pieces of tape that secure the display panel to the display
(4)
.
7.
Remove the 4 Phillips PM2.5×4.0 screws
(1)
that secure the display panel to the bezel.
8.
Lift the tape over the display panel connector
(2)
and disconnect the cable from the panel
(3)
.
Component replacement procedures
49