HP Color LaserJet CP2025 HP Color LaserJet CP2020 Series - Software Technical - Page 150
Detailed Microsoft Windows installation instructions, Animated Getting Started Guide (GSG), Setup
 |
View all HP Color LaserJet CP2025 manuals
Add to My Manuals
Save this manual to your list of manuals |
Page 150 highlights
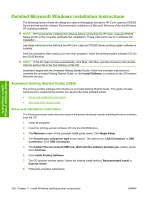
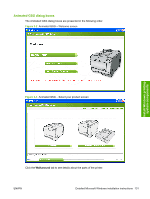
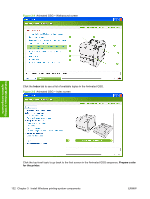
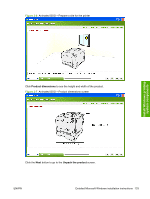
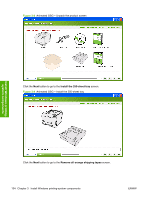
Install Windows printingsystem components Detailed Microsoft Windows installation instructions The following section shows the dialog box options that appear during the HP Color LaserJet CP2020 Series printing-system software Recommended installation on Microsoft Windows Vista and Windows XP operating systems. NOTE: HP recommends installing the software before connecting the HP Color LaserJet CP2020 Series printer to the computer (software-first installation). These instructions are for a software-first installation. Use these instructions the first time the HP Color LaserJet CP2020 Series printing-system software is installed. Start the installation after closing out of all other programs. Insert the printing-system software CD into the CD-ROM drive. NOTE: If the CD does not start automatically, click Start, click Run, and then browse to and doubleclick the autorun file in the root directory of the CD. Installation begins with the Animated Getting Started Guide. Follow the onscreen instructions to complete the animated Getting Started Guide, or click Install Software, to continue to the CD browser Welcome window. Animated Getting Started Guide (GSG) The printing-system software CD includes an animated Getting Started Guide. This guide includes instructions for preparing the product for use and the initial software install. ● Setup and installation instructions ● Animated GSG dialog boxes Setup and installation instructions The following includes instructions for setup of the printer and steps towards installing the driver software from the CD. 1. Close all programs. 2. Insert the printing-system software CD into the CD-ROM drive. 3. The Welcome screen of the animated install guide opens. Click Begin Setup. 4. The Choose your connection type screen opens. The options are: LAN Connection or USB Connection. Click USB Connection. 5. The Caution! Do not connect USB now. Wait until the software prompts you. screen opens. Click Continue. 6. Click Install Product Software. 7. The CD browser window opens. Select the desired install method: Recommended Install or Express Install. 8. Follow the onscreen instructions. 130 Chapter 3 Install Windows printing-system components ENWW
-
 1
1 -
2
-
3
-
4
-
5
-
6
-
7
-
8
-
9
-
10
-
11
-
12
-
13
-
14
-
15
-
16
-
17
-
18
-
19
-
20
-
21
-
22
-
23
-
24
-
25
-
26
-
27
-
28
-
29
-
30
-
31
-
32
-
33
-
34
-
35
-
36
-
37
-
38
-
39
-
40
-
41
-
42
-
43
-
44
-
45
-
46
-
47
-
48
-
49
-
50
-
51
-
52
-
53
-
54
-
55
-
56
-
57
-
58
-
59
-
60
-
61
-
62
-
63
-
64
-
65
-
66
-
67
-
68
-
69
-
70
-
71
-
72
-
73
-
74
-
75
-
76
-
77
-
78
-
79
-
80
-
81
-
82
-
83
-
84
-
85
-
86
-
87
-
88
-
89
-
90
-
91
-
92
-
93
-
94
-
95
-
96
-
97
-
98
-
99
-
100
-
101
-
102
-
103
-
104
-
105
-
106
-
107
-
108
-
109
-
110
-
111
-
112
-
113
-
114
-
115
-
116
-
117
-
118
-
119
-
120
-
121
-
122
-
123
-
124
-
125
-
126
-
127
-
128
-
129
-
130
-
131
-
132
-
133
-
134
-
135
-
136
-
137
-
138
-
139
-
140
-
141
-
142
-
143
-
144
-
 145
145 -
 146
146 -
 147
147 -
 148
148 -
 149
149 -
 150
150 -
 151
151 -
 152
152 -
 153
153 -
 154
154 -
 155
155 -
156
-
157
-
158
-
159
-
160
-
161
-
162
-
163
-
164
-
165
-
166
-
167
-
168
-
169
-
170
-
171
-
172
-
173
-
174
-
175
-
176
-
177
-
178
-
179
-
180
-
181
-
182
-
183
-
184
-
185
-
186
-
187
-
188
-
189
-
190
-
191
-
192
-
193
-
194
-
195
-
196
-
197
-
198
-
199
-
200
-
201
-
202
-
203
-
204
-
205
-
206
-
207
-
208
-
209
-
210
-
211
-
212
-
213
-
214
-
215
-
216
-
217
-
218
-
219
-
220
-
221
-
222
-
223
-
224
-
225
-
226
-
227
-
228
-
229
-
230
-
231
-
232
-
233
-
234
-
235
-
236
-
237
-
238
-
239
-
240
-
241
-
242
-
243
-
244
-
245
-
246
-
247
-
248
-
249
-
250
-
251
-
252
-
253
-
254
-
255
-
256
-
257
-
258
-
259
-
260
-
261
-
262
-
263
-
264
-
265
-
266
-
267
-
268
-
269
-
270
-
271
-
272
-
273
-
274
-
275
-
276
-
277
-
278
-
279
-
280
-
281
-
282
-
283
-
284
-
285
-
286
-
287
-
288
-
289
-
290
-
291
-
292
-
293
-
294
-
295
-
296
-
297
-
298
-
299
-
300
 |
 |
