HP Color LaserJet Pro M452 User Guide - Page 114
Visually inspect the toner cartridge, Print a cleaning
 |
View all HP Color LaserJet Pro M452 manuals
Add to My Manuals
Save this manual to your list of manuals |
Page 114 highlights
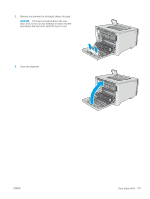
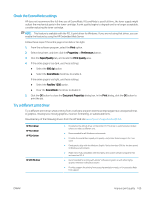
Print a cleaning page NOTE: The steps vary according to the type of control panel. 2-line control panels 1. From the printer control panel, press the OK button. 2. Open the Service menu. 3. Use the arrow keys to select the Cleaning mode option, and then press the OK button. The printer prints the first side and then prompts you to remove the page from the output bin and reload it in Tray 1, keeping the same orientation. Wait until the process is complete. Discard the page that prints. Touchscreen control panels 1. From the Home screen on the printer control panel, touch the Setup button. 2. Touch the Service menu. 3. Touch the Cleaning Page button. 4. Load plain letter or A4 paper when you are prompted. 5. Touch the OK button to begin the cleaning process. The printer prints the first side and then prompts you to remove the page from the output bin and reload it in Tray 1, keeping the same orientation. Wait until the process is complete. Discard the page that prints. Visually inspect the toner cartridge Follow these steps to inspect each toner cartridge. 1. Remove the toner cartridge from the printer. 2. Check the memory chip for damage. 3. Examine the surface of the green imaging drum. CAUTION: Do not touch the imaging drum. Fingerprints on the imaging drum can cause print-quality problems. 104 Chapter 6 Solve problems ENWW
-
 1
1 -
2
-
3
-
4
-
5
-
6
-
7
-
8
-
9
-
10
-
11
-
12
-
13
-
14
-
15
-
16
-
17
-
18
-
19
-
20
-
21
-
22
-
23
-
24
-
25
-
26
-
27
-
28
-
29
-
30
-
31
-
32
-
33
-
34
-
35
-
36
-
37
-
38
-
39
-
40
-
41
-
42
-
43
-
44
-
45
-
46
-
47
-
48
-
49
-
50
-
51
-
52
-
53
-
54
-
55
-
56
-
57
-
58
-
59
-
60
-
61
-
62
-
63
-
64
-
65
-
66
-
67
-
68
-
69
-
70
-
71
-
72
-
73
-
74
-
75
-
76
-
77
-
78
-
79
-
80
-
81
-
82
-
83
-
84
-
85
-
86
-
87
-
88
-
89
-
90
-
91
-
92
-
93
-
94
-
95
-
96
-
97
-
98
-
99
-
100
-
101
-
102
-
103
-
104
-
105
-
106
-
107
-
108
-
 109
109 -
 110
110 -
 111
111 -
 112
112 -
 113
113 -
 114
114 -
 115
115 -
 116
116 -
 117
117 -
 118
118 -
 119
119 -
120
-
121
-
122
-
123
-
124
-
125
-
126
-
127
-
128
-
129
-
130
 |
 |
