HP DesignJet T730 User guide - Page 100
Replace an ink cartridge, Replace Inks
 |
View all HP DesignJet T730 manuals
Add to My Manuals
Save this manual to your list of manuals |
Page 100 highlights
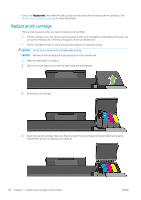
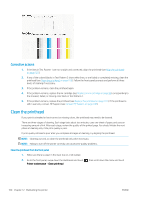
if you touch Replace Inks, the printer will give you step-by-step instructions to replace the ink cartridges. See Replace an ink cartridge on page 96 for more information. Replace an ink cartridge There are two occasions when you need to replace an ink cartridge: ● The ink cartridge is very low and you want to replace it with a full cartridge for unattended printing (you can use up the remaining ink in the first cartridge at a more convenient time). ● The ink cartridge is empty or faulty, and you must replace it to continue printing. CAUTION: Do not try to remove an ink cartridge while printing. CAUTION: Remove an ink cartridge only if you are ready to insert another one. 1. Make sure the printer is turned on. 2. Open the ink cartridge cover on the rear right-hand side of the printer. 3. Remove the ink cartridge. 4. Insert the new ink cartridge. Make sure that you insert the ink cartridge into the slot that has the same colored letter as the cartridge you are installing. 96 Chapter 11 Handling ink cartridges and printhead ENWW
-
 1
1 -
2
-
3
-
4
-
5
-
6
-
7
-
8
-
9
-
10
-
11
-
12
-
13
-
14
-
15
-
16
-
17
-
18
-
19
-
20
-
21
-
22
-
23
-
24
-
25
-
26
-
27
-
28
-
29
-
30
-
31
-
32
-
33
-
34
-
35
-
36
-
37
-
38
-
39
-
40
-
41
-
42
-
43
-
44
-
45
-
46
-
47
-
48
-
49
-
50
-
51
-
52
-
53
-
54
-
55
-
56
-
57
-
58
-
59
-
60
-
61
-
62
-
63
-
64
-
65
-
66
-
67
-
68
-
69
-
70
-
71
-
72
-
73
-
74
-
75
-
76
-
77
-
78
-
79
-
80
-
81
-
82
-
83
-
84
-
85
-
86
-
87
-
88
-
89
-
90
-
91
-
92
-
93
-
94
-
 95
95 -
 96
96 -
 97
97 -
 98
98 -
 99
99 -
 100
100 -
 101
101 -
 102
102 -
 103
103 -
 104
104 -
 105
105 -
106
-
107
-
108
-
109
-
110
-
111
-
112
-
113
-
114
-
115
-
116
-
117
-
118
-
119
-
120
-
121
-
122
-
123
-
124
-
125
-
126
-
127
-
128
-
129
-
130
-
131
-
132
-
133
-
134
-
135
-
136
-
137
-
138
-
139
-
140
-
141
-
142
-
143
-
144
-
145
-
146
-
147
-
148
-
149
-
150
-
151
-
152
-
153
-
154
-
155
-
156
-
157
-
158
-
159
-
160
-
161
-
162
-
163
-
164
-
165
-
166
-
167
-
168
-
169
-
170
-
171
-
172
-
173
-
174
-
175
-
176
-
177
-
178
-
179
-
180
-
181
-
182
-
183
-
184
-
185
-
186
-
187
-
188
-
189
-
190
-
191
-
192
-
193
-
194
-
195
-
196
-
197
-
198
-
199
-
200
-
201
-
202
-
203
 |
 |
