HP DesignJet T730 User guide - Page 162
Flare in the image when scanning glossy originals
 |
View all HP DesignJet T730 manuals
Add to My Manuals
Save this manual to your list of manuals |
Page 162 highlights
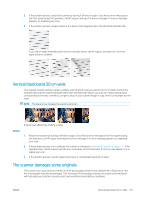
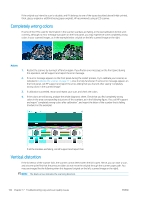
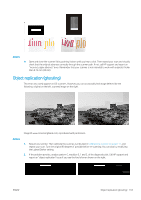
Flare in the image when scanning glossy originals If the scanner is miscalibrated, or if the original plot you are trying to scan is very glossy or reflective, you can sometimes find flare in the scanned image, as in the following example: original on the left, scanned image on the right. Image © www.convincingblack.com, reproduced with permission. Actions 1. Clean the original and the scanner's glass plate, then scan again. See Clean the scanner scanbars on page 109 2. If the problem persists, recalibrate the scanner as indicated in Calibrate the scanner on page 111. Re-scan your original after the calibration is completed. 3. If the problem persists, see Clipping in dark or light areas on page 157. Vertical red and green bands over white or black background If the scanner has not been calibrated for a long period of time, or if the last calibration failed, you can sometimes see defects like the following. NOTE: The black arrow indicates the scanning direction. The original is on the left, the scanned image on the right. Actions 1. First, restart the printer and re-scan or copy. Clean and calibrate the scanner as indicated in Clean the scanner scanbars on page 109 and Calibrate the scanner on page 111. If the calibration failed, proceed as stated in Calibrate the scanner on page 111. However, if the calibration ended correctly, scan your original again and check that the colored vertical bands have disappeared. 2. If the problem persists, call HP support and report "vertical red/green bands after calibration". Vibration If your printer is not properly placed on a flat surface, or if the scanner lid does not close correctly, you may sometimes find that the scanned image suffers from vibration, as in the following example: original on the left, scanned image on the right. 158 Chapter 17 Troubleshooting copy and scan quality issues ENWW
-
 1
1 -
2
-
3
-
4
-
5
-
6
-
7
-
8
-
9
-
10
-
11
-
12
-
13
-
14
-
15
-
16
-
17
-
18
-
19
-
20
-
21
-
22
-
23
-
24
-
25
-
26
-
27
-
28
-
29
-
30
-
31
-
32
-
33
-
34
-
35
-
36
-
37
-
38
-
39
-
40
-
41
-
42
-
43
-
44
-
45
-
46
-
47
-
48
-
49
-
50
-
51
-
52
-
53
-
54
-
55
-
56
-
57
-
58
-
59
-
60
-
61
-
62
-
63
-
64
-
65
-
66
-
67
-
68
-
69
-
70
-
71
-
72
-
73
-
74
-
75
-
76
-
77
-
78
-
79
-
80
-
81
-
82
-
83
-
84
-
85
-
86
-
87
-
88
-
89
-
90
-
91
-
92
-
93
-
94
-
95
-
96
-
97
-
98
-
99
-
100
-
101
-
102
-
103
-
104
-
105
-
106
-
107
-
108
-
109
-
110
-
111
-
112
-
113
-
114
-
115
-
116
-
117
-
118
-
119
-
120
-
121
-
122
-
123
-
124
-
125
-
126
-
127
-
128
-
129
-
130
-
131
-
132
-
133
-
134
-
135
-
136
-
137
-
138
-
139
-
140
-
141
-
142
-
143
-
144
-
145
-
146
-
147
-
148
-
149
-
150
-
151
-
152
-
153
-
154
-
155
-
156
-
 157
157 -
 158
158 -
 159
159 -
 160
160 -
 161
161 -
 162
162 -
 163
163 -
 164
164 -
 165
165 -
 166
166 -
 167
167 -
168
-
169
-
170
-
171
-
172
-
173
-
174
-
175
-
176
-
177
-
178
-
179
-
180
-
181
-
182
-
183
-
184
-
185
-
186
-
187
-
188
-
189
-
190
-
191
-
192
-
193
-
194
-
195
-
196
-
197
-
198
-
199
-
200
-
201
-
202
-
203
 |
 |
